Single-page documentation
Project maintained by profezzorn Hosted on GitHub Pages — Theme by mattgraham
Glossary 🔗
Arduino 🔗
A cross-platform program that attempts to make software development for embedded platforms simple.
Arduino-proffieboard-plugin 🔗
Plugin that makes Arduino capable of compiling and uploading programs to proffieboards. Installation instructions can be found here.
config file 🔗
A file that specifies everything ProffieOS needs to know to make your saber (or other prop) work.
#define 🔗
In ProffieOS, we use C++ defines to specify which features to turn on and off. See the CONFIG_TOP section for a list of available defines. Note that there may be more defines available depending on what prop file you use.
Blade Detect 🔗
Let's ProffieOS detect when a blade is attached/detached.
Blade ID 🔗
Let's ProffieOS detect which blade is attached.
FET 🔗
Field Effect Transistor. Basically a switch that can be controlled electically. A Proffieboard v2.2 has 6 of these that are used to enable/disable power to LEDs and other things.
Kill key 🔗
A small plug that plugs into a charge port on a saber, but which does not do any charging. Instead, it just causes the battery to be disconnected. A kill key is an alternative to having an on/off switch to disconnect the battery when you're not using your saber.
Neopixels 🔗
The Adafruit brand name for LEDs that can be controlled using the WS2811 protocol.
OLED 🔗
Abbreviation meaning "Organic Light Emitting Diode", but in this context, we use it to mean a small display connected to the Proffieboard which can show messages and images.
Preset 🔗
A combination of a font, a track and one or more styles. "factory settings" are configured in the config file, but changes can be made with edit mode or the ProffieOS workbench. Such changes are stored in prests.ini on the SD card.
Port 🔗
Short for "serial port". Used in Arduino to communicate with your Proffieboard. Make sure to select the right one under Arduino -> Tools -> Port.
Profezzorn 🔗
Fredrik Hubinette's online alias. You know, the guy who designed the Proffieboards, wrote ProffieOS and various other stuff. If you want to get in touch with Profezzorn, see the How to Contact Profezzorn Page.
Prop file 🔗
A file that controls most of the behaviors of ProffieOS. In particular, it controls which button does what. Several prop files come with ProffieOS, and you can also make your own. See the CONFIG_PROP section to learn how to specify which prop file to use in your config file.
presets.ini 🔗
A file that stores changes made to your presets.
Serial Monitor 🔗
A window in Arduino which lets you type commands and receive text-based output from a Proffieboard. (Or any other Arduino-compatible board.)
Smoothswing 🔗
An algorithm for how to make Star Wars-style lightsaber sounds from motion events.
TeensySaber 🔗
This is what ProffieOS used to be called. It is also the name of the teensy-based boards that were used with ProffieOS before Proffieboards.
WebUsb 🔗
A way to connect a browser to a Proffieboard. Lets you use the ProffieOS workbench.
Zadig 🔗
A windows program that allows you to specify which driver to use for a USB device.

Your first ProffieOS installation 🔗
If you haven't already, make sure to do the required setup steps first.
Download ProffieOS 🔗
- Go to the ProffieOS homepage and hit the download link.
- Put it somewhere handy and unzip it.
You should now have a directory called ProffieOS with the following files in it:
Arduino.mk    ir/              README.md
blades/       LICENCE.txt      scripts/
buttons/      Makefile         sound/
common/       motion/          styles/
Common.mk     mtp/             Teensy.mk
config/       pov_tools/       transitions/
display/      Proffieboard.mk  videotoblc/
fontconvert/  ProffieOS.ino
functions/    props/
Note that Windows may hide the part after the period, so it may look a little different, but it's still the same files.
The Config File 🔗
If you are upgrading an existing saber, then you may already have a config file, in which case, just use that. If you need to create a new config file, keep reading.
- Go to the configurator page that matches your board:
- Proffieboard V1.x: https://fredrik.hubbe.net/lightsaber/v4/
- Proffieboard V2.x: https://fredrik.hubbe.net/lightsaber/v5/
- Change the options to match how your saber is wired.
- Go back to your ProffieOS directory, then into config/.
- Make a copy of the file called
default_proffieboard_config.h. - Rename the copy to something reasonable for your saber, like maybe
my_saber_config.h. (Please note, that on Windows, the.h. is normally not shown. If it wasn't before you selected rename, don't add it.) - Open up the renamed file in a text editor. You can use Notepad, Notepad++, Sublime or any other editor that knows how to edit plain text. Do not use word, wordpad or other programs intended to edit documents. Documents and text are not the same thing.
- Select all the contents in the renamed file and delete it.
- Go back to the configurator page, scroll down and press the "copy to clipboard" button.
- Paste it into the editor and save.
Congratulations, you now have a config file.
Tell ProfffieOS to use your config file 🔗
- Go to the ProffieOS directory and click on ProffieOS.ino (.ino might be hidden on Windows)
- This should open up ProffieOS.ino in arduino. Arduino might show another file too, like README.md, if so, just click on the ProffieOS.ino tab.
- Find the CONFIG_FILE define, it will be a line that looks like this:
// #define CONFIG_FILE "config/YOUR_CONFIG_FILE_NAME_HERE.h"
- Now change this line to:
#define CONFIG_FILE "config/my_saber_config.h"
Of course, if you used a different filename in the previous step, use that filename instead of my_saber_config.h.
Upload 🔗
- Connect your board to the computer using an micro-usb cable. (Make sure it's not a charge-only cable.)
- In Arduino -> Tools -> Port, make sure that the board shows up and is selected as the current port. If this doesn't work, see this page.
- If the Proffieboard shows up as a drive on your computer, make sure to "safely remove" it before uploading the board.
- Press the upload button.
Check out what happens in the window at the bottom of Arduino. You may need to scroll around to see what's going on. You can also make the window bigger, which helps. If you see a 0-100 progress bar and it goes all the way to 100, then the programming worked, regardless of what other errors and warnings you see.
Now your saber is programmed. You can tweak your config file as many times as you like and re-upload as many times as you like.
Proffieboard Setup 🔗
This page will walk you through installing and configuring the software you need to program your Proffieboards. This includes installing Arduino, the arduino-proffieboard plugin, which provides Proffieboard support to Arduino, and any drivers you might need, which depends on what kind of computer you have.
Arduino 🔗
Go to https://www.arduino.cc/en/software and download the Arduino IDE version v1.6.19 or later. Once downloaded, run it to install the Arduino software on your computer.
The Arduino-Proffieboard plugin 🔗
- Start the Arduino IDE
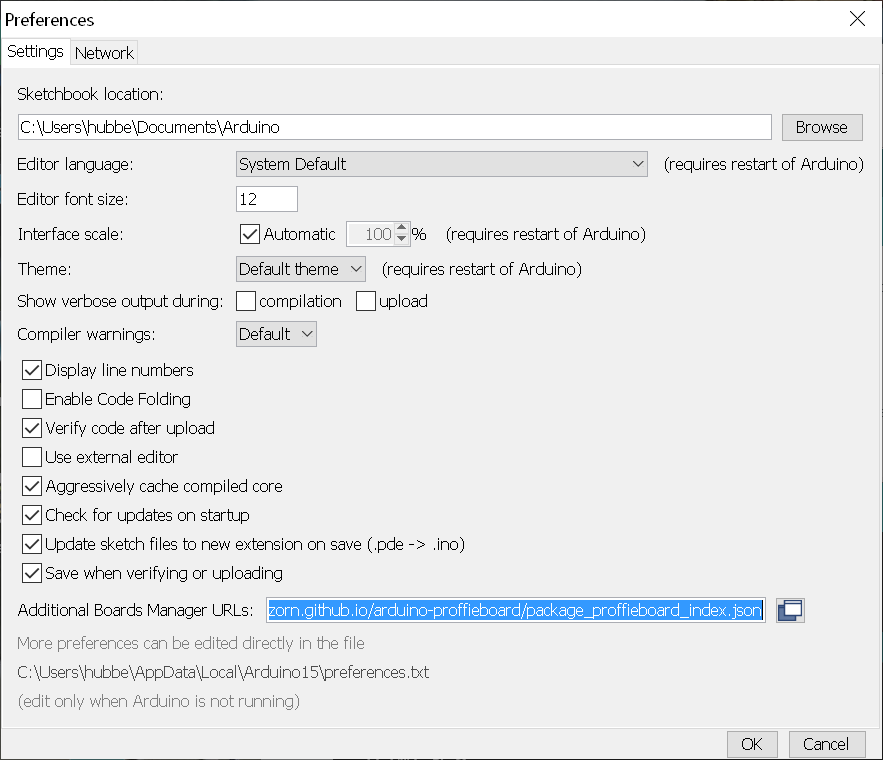
- Go into File -> Preferences
- In "Additional Board Manager URL", enter the following:
https://profezzorn.github.io/arduino-proffieboard/package_proffieboard_index.json
It should look like this:
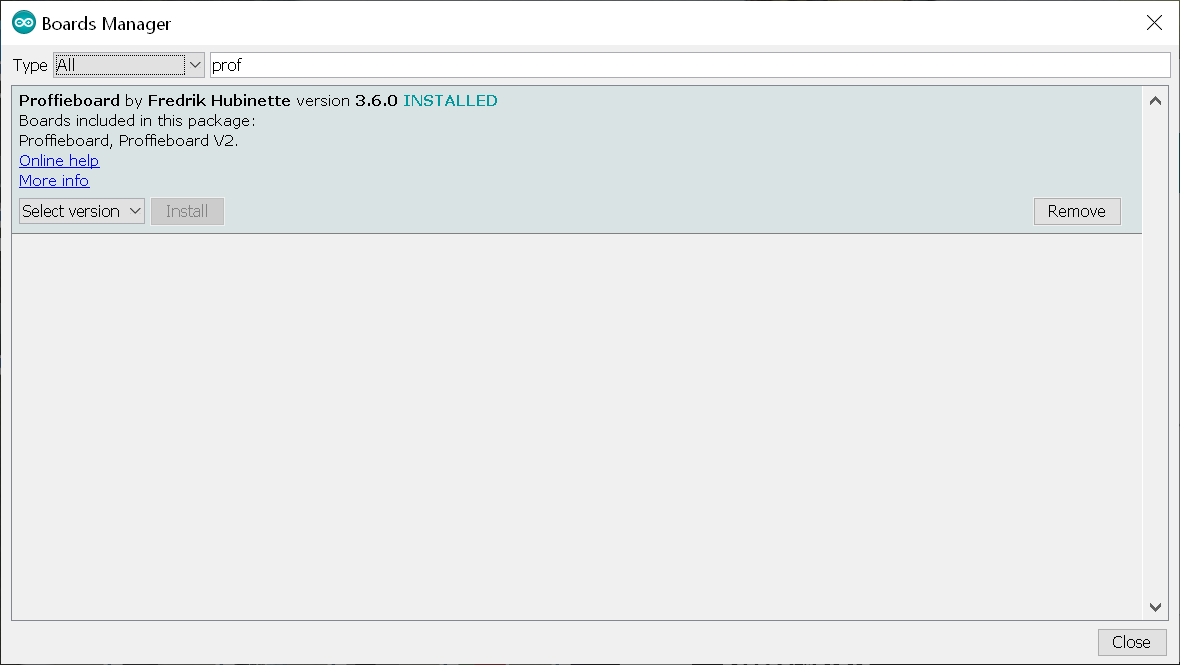
- Open Arduino menu Tools->Board->Boards Manager and type "Proffie" in the search box. Install the latest version "Proffieboard Plugin". You may have to click on it for the "install" button to appear. Once done, it should look like this:
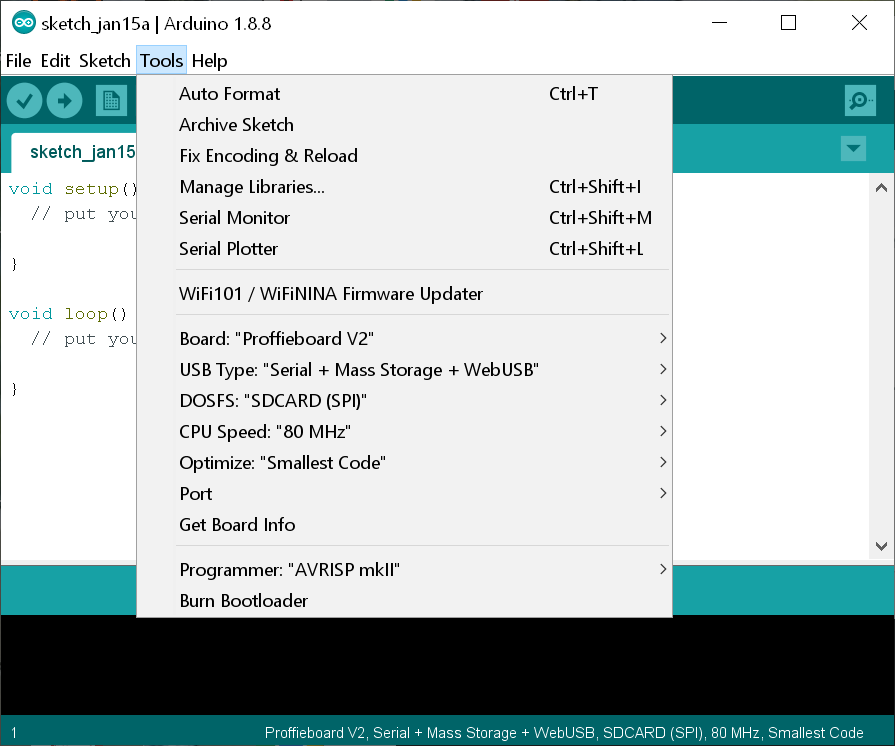
- Select your board version from Arduino menu Tools->Board->Proffieboard-> menu
- Set Tools->DOSFS: to "SDCARD (SPI)". For Proffieboard V3, choose "SDCARD (SDIO High Speed)"
When you're done, the tools menu should look like this:
OS Specific Setup 🔗
Windows 🔗
Download proffie-dfu-setup and run it. (sha256:4773c8693cf62777cd8da4c95441690e7ae7c4171e8c1d533b1f6225f3bdc29e)
If you're using Windows 7 or earlier, you also need to install a USB ACM serial driver:
- Go to ~/AppData/Local/Arduino15/packages/profezzorn/hardware/stm32l4/
<VERSION>/drivers/windows - Right-click on
dpinst_x86.exe(32 bit Windows) ordpinst_amd64.exe(64 bit Windows) and selectRun as administrator - Click on
Install this driver software anywayat theWindows Securitypopup as the driver is unsigned
Linux 🔗
- Go to ~/.arduino15/packages/profezzorn/hardware/stm32l4/
<VERSION>/drivers/linux/ - sudo cp *.rules /etc/udev/rules.d
- reboot
If you have no 32-bit support, you will get this error:
dfu-suffix: no such file or directory
On debian-like systems, this can be fixed with the following commands:
sudo dpkg --add-architecture i386
sudo apt-get update
sudo apt-get install libc6:i386 libncurses5:i386 libstdc++6:i386
If you're on an arm or risc-v system, which doesn't have native i386 support, you can add support through an emulator by running this line:
sudo apt-get install binfmt-support qemu-user-static
Then run the three lines above that adds i386 architecture.
Mac 🔗
No extra steps needed, it should just work.
Done 🔗
Now you're ready to configure, compile and upload ProffieOS to your Proffieboards.
Go here next: Your First Config File
Making changes to this site 🔗
Making changes to this site 🔗
If you find something wrong, or have an idea for how to improve the documentation on this site. Just find the right page and click the pencil in the top right corner. This will take you to the right place on github.
If you don't have a github account, you'll need to create one. Once you are signed it, github will ask you to fork the ProffieOSDocs repository, and you'll need to do that.
After forking, you can make edits. Make sure to check the "Preview" tab to see approximately how your changes will look once they appear on the POD site. For more information about how to make it look the way you want, try this site.
Once you are happy with your changes, write a comment describing your changes below and hit the "propose" button.
Proposing the changes will not send them directly to the POD site though. Instead, the changes will be saved in a branch on your fork of the ProffieOSDocs repository. If you don't know what any of that means, don't worry about it. After pressing the "propose changes" button, github will show you a button to create a pull request. You should click this button and create the pull request. Someone will review your changes and approve them before they will show up on the site. This may take some time, but it also means that you don't have to worry about making any major mistakes or breaking the site somehow.
Of course, if you already know how to use github, you can use any tools you want to fork, edit and upload pull requests.
Best practices 🔗
Don't add newlines unless you need it. In the github editor, set it to "Soft wrap" and just write long lines to make paragraphs. This makes page resizing work better.
Images 🔗
To make things look good in PDFs, print and retina displays, all images should be uploaded at the highest resolution available. That might come out too large when shown on the screen, and the solution is to use an "image" tag instead of using the markdown for an image.
So instead of this:

you do:
<image src="/images/someimage.jpg" width=400 height=200 alt="alt text" />
This will make the browser scale the image to 400 x 200 instead of whatever size the image was when you uploaded it, but print and retina displays will use the extra pixels to make things look good.
Uploading screenshots is good for pointing out where buttons and menues are, but not to show an error message or something like that. Information that is fundamentally text should use text, not images.
Code 🔗
Write code blocks like this:
    ```cpp
    #define EXAMPLE_DEFINE
    ```
This will make it highlighted as C++, with a copy button, like this:
#define EXAMPLE_DEFINE
Searching for dead links (on Linux) 🔗
PS: Here is a useful linux command for finding broken links:
wget --spider -r -nd -nv -l 3 https://pod.hubbe.net/ 2>&1 | grep -B1 'broken link'
You'll need to use grep or something to find where the broken links come from though. If you have the ProffieOSDocs github repository, you can do that with git grep, like this:
wget --spider -r -nd -nv -l 3 https://pod.hubbe.net/ 2>&1 | grep -B1 'broken link' | sed -n 's@https://pod.hubbe.net/\(.*\):@\1@gp' | while read LINK ; do echo "=== $LINK ===" ; git grep $LINK ; done
Config 🔗
ColorChange<> in a blade style 🔗
The template is ColorChange<TRANSITION, COLOR1, COLOR2, ...>
ProffieOS will detect if the style uses ColorChange<> or not.
If it does NOT use ColorChange<>, the "color wheel" will be activated, which has 32768 steps per rotation.
If it does contain ColorChange<>, the OS will let the ColorChange<> template handle the change. When you activate color change mode, there will be up to 12 steps per rotation with a little sound at each step (ccchange.wav)
The prop file used will determine the button combinations to Enter and Exit Color Change mode, as well as save a chosen color, or Exit without changing anything.
IF the style uses ColorChange<>, AND you have #define COLOR_CHANGE_DIRECT in your config file, then when you activate color change mode, it will immediately go to the next color with the button press and exit color change mode.
If the style does not use ColorChange<>, having #define COLOR_CHANGE_DIRECT active has no effect.
RotateColorsX<Variation,COLOR> 🔗
If you use this in a blade style, the "color wheel" colorchange will only affect the colors in a RotateColorsX, and the other colors will not change.
This is useful if you want your base blade color to change, but leave all of the effects like clash, blast, lockup etc... unchanged.
It is also a good way to prevent other blade's styles in the preset (like an accent LED) from changing with the main blade.
If you want to prevent ANY color change on a style, you could just insert a single ColorChange<> value, like ColorChange<TrInstant,Blue>, or make a non-changing Black or White to be RotateColorsX<Variation,Black>
Disable Color Change 🔗
If you want to completely disable any color change option,
you can use the following define in The CONFIG_TOP section of the config file.
#define DISABLE_COLOR_CHANGE
Using the configuration generator 🔗
If you're installing your own Proffieboard, you will need to build a config file which matches your wiring, or ProffieOS won't know how to operate the things you connected to the Proffieboard. There is a tool that helps you do this. The tool is slightly different for each different kind of Proffieboard. Here are links to the different versions:
- Proffieboard V1: https://fredrik.hubbe.net/lightsaber/v4/
- Proffieboard V2: https://fredrik.hubbe.net/lightsaber/v5/
- Proffieboard V3: https://fredrik.hubbe.net/lightsaber/v6/configurator.html
For the rest of this tutorial, I will be using the Proffieboard V3 generator. The others work similarly, but have fewer options. When you load the configuration generator, you'll see something like this:
If you scroll down, you'll see a text window which contains the full text of a ProffieOS config file which matches the options and wiring diagram at the top:
#ifdef CONFIG_TOP
#include "proffieboard_v3_config.h"
#define NUM_BLADES 3
#define NUM_BUTTONS 2
#define VOLUME 1000
const unsigned int maxLedsPerStrip = 144;
#define CLASH_THRESHOLD_G 1.0
#define ENABLE_AUDIO
#define ENABLE_MOTION
#define ENABLE_WS2811
#define ENABLE_SD
#define SHARED_POWER_PINS
#endif

#ifdef CONFIG_PRESETS
Preset presets[] = {
   { "TeensySF", "tracks/venus.wav",
    StyleNormalPtr<CYAN, WHITE, 300, 800>(),
    StyleNormalPtr<CYAN, WHITE, 300, 800>(),
    StyleNormalPtr<CYAN, WHITE, 300, 800>(), "cyan"},
   { "SmthJedi", "tracks/mars.wav",
    StylePtr<InOutSparkTip<EASYBLADE(BLUE, WHITE), 300, 800> >(),
    StylePtr<InOutSparkTip<EASYBLADE(BLUE, WHITE), 300, 800> >(),
    StylePtr<InOutSparkTip<EASYBLADE(BLUE, WHITE), 300, 800> >(), "blue"},
   { "SmthGrey", "tracks/mercury.wav",
    StyleFirePtr<RED, YELLOW, 0>(),
    StyleFirePtr<RED, YELLOW, 1>(),
    StyleFirePtr<RED, YELLOW, 2>(), "fire"},
   { "SmthFuzz", "tracks/uranus.wav",
    StyleNormalPtr<RED, WHITE, 300, 800>(),
    StyleNormalPtr<RED, WHITE, 300, 800>(),
    StyleNormalPtr<RED, WHITE, 300, 800>(), "red"},
   { "RgueCmdr", "tracks/venus.wav",
    StyleFirePtr<BLUE, CYAN, 0>(),
    StyleFirePtr<BLUE, CYAN, 1>(),
    StyleFirePtr<BLUE, CYAN, 2>(), "blue fire"},
   { "TthCrstl", "tracks/mars.wav",
    StylePtr<InOutHelper<EASYBLADE(OnSpark<GREEN>, WHITE), 300, 800> >(),
    StylePtr<InOutHelper<EASYBLADE(OnSpark<GREEN>, WHITE), 300, 800> >(),
    StylePtr<InOutHelper<EASYBLADE(OnSpark<GREEN>, WHITE), 300, 800> >(), "green"},
   { "TeensySF", "tracks/mercury.wav",
    StyleNormalPtr<WHITE, RED, 300, 800, RED>(),
    StyleNormalPtr<WHITE, RED, 300, 800, RED>(),
    StyleNormalPtr<WHITE, RED, 300, 800, RED>(), "white"},
   { "SmthJedi", "tracks/uranus.wav",
    StyleNormalPtr<AudioFlicker<YELLOW, WHITE>, BLUE, 300, 800>(),
    StyleNormalPtr<AudioFlicker<YELLOW, WHITE>, BLUE, 300, 800>(),
    StyleNormalPtr<AudioFlicker<YELLOW, WHITE>, BLUE, 300, 800>(), "yellow"},
   { "SmthGrey", "tracks/venus.wav",
    StylePtr<InOutSparkTip<EASYBLADE(MAGENTA, WHITE), 300, 800> >(),
    StylePtr<InOutSparkTip<EASYBLADE(MAGENTA, WHITE), 300, 800> >(),
    StylePtr<InOutSparkTip<EASYBLADE(MAGENTA, WHITE), 300, 800> >(), "magenta"},
   { "SmthFuzz", "tracks/mars.wav",
    StyleNormalPtr<Gradient<RED, BLUE>, Gradient<CYAN, YELLOW>, 300, 800>(),
    StyleNormalPtr<Gradient<RED, BLUE>, Gradient<CYAN, YELLOW>, 300, 800>(),
    StyleNormalPtr<Gradient<RED, BLUE>, Gradient<CYAN, YELLOW>, 300, 800>(), "gradient"},
   { "RgueCmdr", "tracks/mercury.wav",
    StyleRainbowPtr<300, 800>(),
    StyleRainbowPtr<300, 800>(),
    StyleRainbowPtr<300, 800>(), "rainbow"},
   { "TthCrstl", "tracks/uranus.wav",
    StyleStrobePtr<WHITE, Rainbow, 15, 300, 800>(),
    StyleStrobePtr<WHITE, Rainbow, 15, 300, 800>(),
    StyleStrobePtr<WHITE, Rainbow, 15, 300, 800>(), "strobe"},
   { "TeensySF", "tracks/venus.wav",
    &style_pov,
    StyleNormalPtr<BLACK, BLACK, 300, 800>(),
    StyleNormalPtr<BLACK, BLACK, 300, 800>(), "POV"},
   { "SmthJedi", "tracks/mars.wav",
    &style_charging,
    StyleNormalPtr<BLACK, BLACK, 300, 800>(),
    StyleNormalPtr<BLACK, BLACK, 300, 800>(), "Battery\nLevel"}
};
BladeConfig blades[] = {
 { 0, WS281XBladePtr<144, bladePin, Color8::GRB, PowerPINS<bladePowerPin2, bladePowerPin3> >(),
    SubBladeWithStride(0, 15, 2, WS281XBladePtr<16, blade2Pin, Color8::GRB, PowerPINS<bladePowerPin2, bladePowerPin3> >()),
    SubBladeWithStride(1, 15, 2, NULL)
  , CONFIGARRAY(presets) },
};
#endif

#ifdef CONFIG_BUTTONS
Button PowerButton(BUTTON_POWER, powerButtonPin, "pow");
Button AuxButton(BUTTON_AUX, auxPin, "aux");
#endif
Let's say for the sake of argument that we wanted to make a saber with quillions, a crystal chamber, an OLED display and a bluetooth module. After selecting those options, the top of the page now looks like this:
And the text window has been updated for this configuration:
#ifdef CONFIG_TOP
#include "proffieboard_v3_config.h"
#define NUM_BLADES 10
#define NUM_BUTTONS 2
#define VOLUME 1000
const unsigned int maxLedsPerStrip = 144;
#define CLASH_THRESHOLD_G 1.0
#define ENABLE_AUDIO
#define ENABLE_MOTION
#define ENABLE_WS2811
#define ENABLE_SD
#define SHARED_POWER_PINS
#define ENABLE_SERIAL
#define ENABLE_SSD1306
#endif

#ifdef CONFIG_PRESETS
Preset presets[] = {
   { "TeensySF", "tracks/venus.wav",
    StyleNormalPtr<CYAN, WHITE, 300, 800>(),
    StyleNormalPtr<CYAN, WHITE, 300, 800>(),
    StyleNormalPtr<CYAN, WHITE, 300, 800>(),
    StyleNormalPtr<CYAN, WHITE, 300, 800>(),
    StyleNormalPtr<CYAN, WHITE, 300, 800>(),
    StyleNormalPtr<CYAN, WHITE, 300, 800>(),
    StyleNormalPtr<CYAN, WHITE, 300, 800>(),
    StyleNormalPtr<CYAN, WHITE, 300, 800>(),
    StyleNormalPtr<CYAN, WHITE, 300, 800>(),
    StyleNormalPtr<CYAN, WHITE, 300, 800>(), "cyan"},
   { "SmthJedi", "tracks/mars.wav",
    StylePtr<InOutSparkTip<EASYBLADE(BLUE, WHITE), 300, 800> >(),
    StylePtr<InOutSparkTip<EASYBLADE(BLUE, WHITE), 300, 800> >(),
    StylePtr<InOutSparkTip<EASYBLADE(BLUE, WHITE), 300, 800> >(),
    StylePtr<InOutSparkTip<EASYBLADE(BLUE, WHITE), 300, 800> >(),
    StylePtr<InOutSparkTip<EASYBLADE(BLUE, WHITE), 300, 800> >(),
    StylePtr<InOutSparkTip<EASYBLADE(BLUE, WHITE), 300, 800> >(),
    StylePtr<InOutSparkTip<EASYBLADE(BLUE, WHITE), 300, 800> >(),
    StylePtr<InOutSparkTip<EASYBLADE(BLUE, WHITE), 300, 800> >(),
    StylePtr<InOutSparkTip<EASYBLADE(BLUE, WHITE), 300, 800> >(),
    StylePtr<InOutSparkTip<EASYBLADE(BLUE, WHITE), 300, 800> >(), "blue"},
   { "SmthGrey", "tracks/mercury.wav",
    StyleFirePtr<RED, YELLOW, 0>(),
    StyleFirePtr<RED, YELLOW, 1>(),
    StyleFirePtr<RED, YELLOW, 2>(),
    StyleFirePtr<RED, YELLOW, 3>(),
    StyleFirePtr<RED, YELLOW, 4>(),
    StyleFirePtr<RED, YELLOW, 5>(),
    StyleFirePtr<RED, YELLOW, 6>(),
    StyleFirePtr<RED, YELLOW, 7>(),
    StyleFirePtr<RED, YELLOW, 8>(),
    StyleFirePtr<RED, YELLOW, 9>(), "fire"},
   { "SmthFuzz", "tracks/uranus.wav",
    StyleNormalPtr<RED, WHITE, 300, 800>(),
    StyleNormalPtr<RED, WHITE, 300, 800>(),
    StyleNormalPtr<RED, WHITE, 300, 800>(),
    StyleNormalPtr<RED, WHITE, 300, 800>(),
    StyleNormalPtr<RED, WHITE, 300, 800>(),
    StyleNormalPtr<RED, WHITE, 300, 800>(),
    StyleNormalPtr<RED, WHITE, 300, 800>(),
    StyleNormalPtr<RED, WHITE, 300, 800>(),
    StyleNormalPtr<RED, WHITE, 300, 800>(),
    StyleNormalPtr<RED, WHITE, 300, 800>(), "red"},
   { "RgueCmdr", "tracks/venus.wav",
    StyleFirePtr<BLUE, CYAN, 0>(),
    StyleFirePtr<BLUE, CYAN, 1>(),
    StyleFirePtr<BLUE, CYAN, 2>(),
    StyleFirePtr<BLUE, CYAN, 3>(),
    StyleFirePtr<BLUE, CYAN, 4>(),
    StyleFirePtr<BLUE, CYAN, 5>(),
    StyleFirePtr<BLUE, CYAN, 6>(),
    StyleFirePtr<BLUE, CYAN, 7>(),
    StyleFirePtr<BLUE, CYAN, 8>(),
    StyleFirePtr<BLUE, CYAN, 9>(), "blue fire"},
   { "TthCrstl", "tracks/mars.wav",
    StylePtr<InOutHelper<EASYBLADE(OnSpark<GREEN>, WHITE), 300, 800> >(),
    StylePtr<InOutHelper<EASYBLADE(OnSpark<GREEN>, WHITE), 300, 800> >(),
    StylePtr<InOutHelper<EASYBLADE(OnSpark<GREEN>, WHITE), 300, 800> >(),
    StylePtr<InOutHelper<EASYBLADE(OnSpark<GREEN>, WHITE), 300, 800> >(),
    StylePtr<InOutHelper<EASYBLADE(OnSpark<GREEN>, WHITE), 300, 800> >(),
    StylePtr<InOutHelper<EASYBLADE(OnSpark<GREEN>, WHITE), 300, 800> >(),
    StylePtr<InOutHelper<EASYBLADE(OnSpark<GREEN>, WHITE), 300, 800> >(),
    StylePtr<InOutHelper<EASYBLADE(OnSpark<GREEN>, WHITE), 300, 800> >(),
    StylePtr<InOutHelper<EASYBLADE(OnSpark<GREEN>, WHITE), 300, 800> >(),
    StylePtr<InOutHelper<EASYBLADE(OnSpark<GREEN>, WHITE), 300, 800> >(), "green"},
   { "TeensySF", "tracks/mercury.wav",
    StyleNormalPtr<WHITE, RED, 300, 800, RED>(),
    StyleNormalPtr<WHITE, RED, 300, 800, RED>(),
    StyleNormalPtr<WHITE, RED, 300, 800, RED>(),
    StyleNormalPtr<WHITE, RED, 300, 800, RED>(),
    StyleNormalPtr<WHITE, RED, 300, 800, RED>(),
    StyleNormalPtr<WHITE, RED, 300, 800, RED>(),
    StyleNormalPtr<WHITE, RED, 300, 800, RED>(),
    StyleNormalPtr<WHITE, RED, 300, 800, RED>(),
    StyleNormalPtr<WHITE, RED, 300, 800, RED>(),
    StyleNormalPtr<WHITE, RED, 300, 800, RED>(), "white"},
   { "SmthJedi", "tracks/uranus.wav",
    StyleNormalPtr<AudioFlicker<YELLOW, WHITE>, BLUE, 300, 800>(),
    StyleNormalPtr<AudioFlicker<YELLOW, WHITE>, BLUE, 300, 800>(),
    StyleNormalPtr<AudioFlicker<YELLOW, WHITE>, BLUE, 300, 800>(),
    StyleNormalPtr<AudioFlicker<YELLOW, WHITE>, BLUE, 300, 800>(),
    StyleNormalPtr<AudioFlicker<YELLOW, WHITE>, BLUE, 300, 800>(),
    StyleNormalPtr<AudioFlicker<YELLOW, WHITE>, BLUE, 300, 800>(),
    StyleNormalPtr<AudioFlicker<YELLOW, WHITE>, BLUE, 300, 800>(),
    StyleNormalPtr<AudioFlicker<YELLOW, WHITE>, BLUE, 300, 800>(),
    StyleNormalPtr<AudioFlicker<YELLOW, WHITE>, BLUE, 300, 800>(),
    StyleNormalPtr<AudioFlicker<YELLOW, WHITE>, BLUE, 300, 800>(), "yellow"},
   { "SmthGrey", "tracks/venus.wav",
    StylePtr<InOutSparkTip<EASYBLADE(MAGENTA, WHITE), 300, 800> >(),
    StylePtr<InOutSparkTip<EASYBLADE(MAGENTA, WHITE), 300, 800> >(),
    StylePtr<InOutSparkTip<EASYBLADE(MAGENTA, WHITE), 300, 800> >(),
    StylePtr<InOutSparkTip<EASYBLADE(MAGENTA, WHITE), 300, 800> >(),
    StylePtr<InOutSparkTip<EASYBLADE(MAGENTA, WHITE), 300, 800> >(),
    StylePtr<InOutSparkTip<EASYBLADE(MAGENTA, WHITE), 300, 800> >(),
    StylePtr<InOutSparkTip<EASYBLADE(MAGENTA, WHITE), 300, 800> >(),
    StylePtr<InOutSparkTip<EASYBLADE(MAGENTA, WHITE), 300, 800> >(),
    StylePtr<InOutSparkTip<EASYBLADE(MAGENTA, WHITE), 300, 800> >(),
    StylePtr<InOutSparkTip<EASYBLADE(MAGENTA, WHITE), 300, 800> >(), "magenta"},
   { "SmthFuzz", "tracks/mars.wav",
    StyleNormalPtr<Gradient<RED, BLUE>, Gradient<CYAN, YELLOW>, 300, 800>(),
    StyleNormalPtr<Gradient<RED, BLUE>, Gradient<CYAN, YELLOW>, 300, 800>(),
    StyleNormalPtr<Gradient<RED, BLUE>, Gradient<CYAN, YELLOW>, 300, 800>(),
    StyleNormalPtr<Gradient<RED, BLUE>, Gradient<CYAN, YELLOW>, 300, 800>(),
    StyleNormalPtr<Gradient<RED, BLUE>, Gradient<CYAN, YELLOW>, 300, 800>(),
    StyleNormalPtr<Gradient<RED, BLUE>, Gradient<CYAN, YELLOW>, 300, 800>(),
    StyleNormalPtr<Gradient<RED, BLUE>, Gradient<CYAN, YELLOW>, 300, 800>(),
    StyleNormalPtr<Gradient<RED, BLUE>, Gradient<CYAN, YELLOW>, 300, 800>(),
    StyleNormalPtr<Gradient<RED, BLUE>, Gradient<CYAN, YELLOW>, 300, 800>(),
    StyleNormalPtr<Gradient<RED, BLUE>, Gradient<CYAN, YELLOW>, 300, 800>(), "gradient"},
   { "RgueCmdr", "tracks/mercury.wav",
    StyleRainbowPtr<300, 800>(),
    StyleRainbowPtr<300, 800>(),
    StyleRainbowPtr<300, 800>(),
    StyleRainbowPtr<300, 800>(),
    StyleRainbowPtr<300, 800>(),
    StyleRainbowPtr<300, 800>(),
    StyleRainbowPtr<300, 800>(),
    StyleRainbowPtr<300, 800>(),
    StyleRainbowPtr<300, 800>(),
    StyleRainbowPtr<300, 800>(), "rainbow"},
   { "TthCrstl", "tracks/uranus.wav",
    StyleStrobePtr<WHITE, Rainbow, 15, 300, 800>(),
    StyleStrobePtr<WHITE, Rainbow, 15, 300, 800>(),
    StyleStrobePtr<WHITE, Rainbow, 15, 300, 800>(),
    StyleStrobePtr<WHITE, Rainbow, 15, 300, 800>(),
    StyleStrobePtr<WHITE, Rainbow, 15, 300, 800>(),
    StyleStrobePtr<WHITE, Rainbow, 15, 300, 800>(),
    StyleStrobePtr<WHITE, Rainbow, 15, 300, 800>(),
    StyleStrobePtr<WHITE, Rainbow, 15, 300, 800>(),
    StyleStrobePtr<WHITE, Rainbow, 15, 300, 800>(),
    StyleStrobePtr<WHITE, Rainbow, 15, 300, 800>(), "strobe"},
   { "TeensySF", "tracks/venus.wav",
    &style_pov,
    StyleNormalPtr<BLACK, BLACK, 300, 800>(),
    StyleNormalPtr<BLACK, BLACK, 300, 800>(),
    StyleNormalPtr<BLACK, BLACK, 300, 800>(),
    StyleNormalPtr<BLACK, BLACK, 300, 800>(),
    StyleNormalPtr<BLACK, BLACK, 300, 800>(),
    StyleNormalPtr<BLACK, BLACK, 300, 800>(),
    StyleNormalPtr<BLACK, BLACK, 300, 800>(),
    StyleNormalPtr<BLACK, BLACK, 300, 800>(),
    StyleNormalPtr<BLACK, BLACK, 300, 800>(), "POV"},
   { "SmthJedi", "tracks/mars.wav",
    &style_charging,
    StyleNormalPtr<BLACK, BLACK, 300, 800>(),
    StyleNormalPtr<BLACK, BLACK, 300, 800>(),
    StyleNormalPtr<BLACK, BLACK, 300, 800>(),
    StyleNormalPtr<BLACK, BLACK, 300, 800>(),
    StyleNormalPtr<BLACK, BLACK, 300, 800>(),
    StyleNormalPtr<BLACK, BLACK, 300, 800>(),
    StyleNormalPtr<BLACK, BLACK, 300, 800>(),
    StyleNormalPtr<BLACK, BLACK, 300, 800>(),
    StyleNormalPtr<BLACK, BLACK, 300, 800>(), "Battery\nLevel"}
};
BladeConfig blades[] = {
 { 0, WS281XBladePtr<144, bladePin, Color8::GRB, PowerPINS<bladePowerPin2, bladePowerPin3> >(),
    SubBladeWithStride(0, 15, 2, WS281XBladePtr<16, blade2Pin, Color8::GRB, PowerPINS<bladePowerPin2, bladePowerPin3> >()),
    SubBladeWithStride(1, 15, 2, NULL),
    WS281XBladePtr<36, blade3Pin, Color8::GRB, PowerPINS<bladePowerPin1> >(),
    SubBladeWithStride(0, 15, 2, WS281XBladePtr<16, blade5Pin, Color8::GRB, PowerPINS<bladePowerPin1> >()),
    SubBladeWithStride(1, 15, 2, NULL),
    WS281XBladePtr<36, blade4Pin, Color8::GRB, PowerPINS<bladePowerPin4> >(),
    SubBladeWithStride(0, 15, 2, WS281XBladePtr<16, blade6Pin, Color8::GRB, PowerPINS<bladePowerPin4> >()),
    SubBladeWithStride(1, 15, 2, NULL),
    WS281XBladePtr<2, blade7Pin, Color8::GRB, PowerPINS<bladePowerPin5> >()
  , CONFIGARRAY(presets) },
};
#endif

#ifdef CONFIG_BUTTONS
Button PowerButton(BUTTON_POWER, powerButtonPin, "pow");
Button AuxButton(BUTTON_AUX, auxPin, "aux");
#endif
Whatever configuration you select at the top, the wiring diagram will change to match it, and the contents of the text window will contain the config file you need. Note that the presets for this config file are fairly primitive, and you might want to use the Fett263 configuration tool to make more interesting presets. This configuration generator is mainly targeted at getting the blade array and buttons configured correctly.
Saving the config file. 🔗
To get the config file contents saved into a proper config file, please follow these directions:
- If you haven't already, download and unzip ProffieOS.
- Open up the "config" folder in ProffieOS.
- Hold the right mouse button on any config file in that directory, for instance "default_proffieboard_config.h", drag the mouse a little up or down (but stay in the same window) and release.
- A menu will pop up, where one of the options is "copy here", select that option.
- This will create a copy of this file, but named "default_proffieboard_config - Copy.h". Right-click on the copy and select rename. (It's an icon near the top, and it doesn't actually say rename until you hoover over it for a bit.)
- Rename the file to something that makes sense for your saber. Let's say "ben.h" (Note that the .h might not show, in which case you would just call it "ben". The ".h" part would show as an H in the type column instead.)
- Right-click the file again (now called "ben.h") and select "Edit in Notepad".
- In the NotePad window, select Edit -> Select All, then Edit -> Cut. The file should now be empty.
- Go to the configurator window, scroll down to the "copy to clipboard" button and click it.
- Go back to Notepad, select Edit -> Paste, then File -> Save
- Close Notepad
Congratulations, you now have a config file that you can use to program your Proffieboard.
Finding a config file on your SD card. 🔗
If your Proffieboard was configured for "Mass Storage" when configured, then you can connect a USB cable to your Proffieboard, and the contents of the SD card should show up on your computer, same as if you connected an USB drive. On windows, this would show up under "This PC" as a new drive.
If your board is not configured for "Mass Storage", then you will need to take the SD card out of the saber and use an SD card reader to access the files on the SD card. This may be preferable anyways since it is generally much faster than accessing the SD card through the Proffieboard.
When you open up the SD card, you should see something like this:
This SD card has a config file called "k4.h" in the root directory. Please note that depending on how windows is configured and what programs are installed, the ".h" part might not show, and it might just show an H in the type column instead. This can be very confusing, but unfortunately this is something windows does by default.
Unfortunatly, not everybody make it this easy to find the config file. Sometimes the config file in a sub-directory, in a zip file, and sometimes it will be a ".txt" file instead of a ".h" file. We'll talk about how to deal with that later.
Sometimes people put a zip file containing all of ProffieOS, with the config file on the SD card, like this:
We could copy, unzip and use this directly, but since there is often a newer version of ProffieOS available, let's assume that we're only interested in getting the config file.
To do that, click on the zip file. Usually it contains a single folder called "ProffieOS-vX.Y", so click on that. In there there is usually a single folder called ProffieOS, so click on that. Now you should see multiple folders called blades, buttons, etc. Scroll down until you find a file called "ProffieOS", of type INO. (Or "ProffieOS.ino" if your windows installation shows extensions.) Now click on that. It should open up in Arduino (if you don't have Arduino installed, you can either install it, or use a text editor instead.)
Once the files open, scroll down until you see something like this:
Note that yours may look different, but only the lines WITHOUT // in the beginning counts. So in this case it shows that the config file we're looking for is called "k4.h" and it's in the "config" directory.
So we can close Arduino, then click on the "config" directory, and scroll until we find the file:
Once you find the config file, copy it to somewhere reasonable, like "Documents", or your desktop, and if need be, rename it to something that makes it easy to know which saber it's for.
ProffieOS v6.x, Keeping edits when uploading 🔗
In ProffieOS6, all edits made to your presets or settings in either Edit Mode or using ProffieOS Workbench (WebUSB) are saved to your SD card in various *.ini files.
NOTE: It is strongly recommended you save a backup of all SD card contents (fonts and *.ini files) after making edits in case your SD card is erased or corrupted.
Typically, whenever you reupload through Arduino the existing .ini files are ignored. In order to prevent this you will want to include this define in your config BEFORE you make your edits.
#define KEEP_SAVEFILES_WHEN_PROGRAMMING
This define will allow you to keep all previous Edits (so long as the .ini files were not erased or overwritten). As such this define is intended to be used when you no longer wish to upload changes via Arduino and only edit the saber via Edit Mode or ProffieOS Workbench.
However, BEFORE USING THIS DEFINE it's important to note the following. 🔗
#1 With #define KEEP_SAVEFILES_WHEN_PROGRAMMING changes to fonts, tracks, colors/settings, control defines (i.e. gestures) as well as volume, blade length and clash threshold in the config you upload will not be used, instead the saber will continue to use any previous values that exist in the .ini files. This means that if you're trying to make changes or adjustments via uploading changes to the config those changes may not actually appear on your saber after the upload if there are different values in the related .ini. So if you have a specific clash threshold or a font already in a .ini file the new value you put into your config and uploaded would not appear so you would then use Edit Mode or ProffieOS Workbench to make your adjustments. For this reason, it is not recommended that you add this define until you have the baseline for your saber set for the following:
- clash_threshold (CLASH_THRESHOLD_G)
- max volume (VOLUME)
- max blade length (set in BladeConfig for each blade)
- all desired styles (see below)
- other starting settings such as swing on speed, lockup delay, clash detect, max clash, brightness Once you have the saber set up in the form and with all styles that you want you would then add the above define to allow for all future adjustments and edits to made using Edit Mode or ProffieOS Workbench as intended.
#2a The style number in presets.ini is based on the order of the styles in the recently uploaded config beginning with 0. So all styles in the first preset of your config are equal to "style number 0". So if you change style code in a preset all presets that were edited to use "style number 0" will reflect the new style from the most recently uploaded config.
If this is not desired it is recommended you add new style code to a new preset at the end of the config and use an editing method to change on the desired presets.
#2b Related to above if you add a new preset to your config and upload it will not be visible on the saber until you use Edit Mode or ProffieOS Workbench to Copy Preset (add a preset) and then select the new style number and set up the font and track. This is because presets.ini will not have a reference to new presets uploaded. The style code from your new presets is stored on the board (if upload is successful) but there won't be any presets in the .ini that utilize. The easiest way to get the new style into a preset is to use Copy Preset for an existing preset, then Edit the style number to use the new style code and change Font and Track as desired.
#3 You should not remove presets from your config.
Because presets.ini is not updated on upload with this define if you upload a config missing a style number that is referenced it will cause the board to lock up. So if your original config had 15 presets and you upload a config that removes a preset presets.ini will reference style number 14 but it will not exist on the board.
The simplest approach would be to replace the style for that preset in your config if you no longer wish to use that specific style code (see #2a above).
If you only wish to not have the preset on your saber but don't need to remove the style code, just select the preset and use the Delete Preset functionality in Edit Mode or ProffieOS Workbench.
If it's absolutely necessary to remove the style entirely then you will need to manually update your presets.ini file to change all instances of the style number(s) removed keeping in mind they are always sequential from the first preset starting at 0 to the final preset (being equal to preset # - 1). So if you have 15 presets the final style number is "14". If you delete the last preset in your config and upload (without replacing) you would need to manually change any preset the uses:
style=builtin 14 1
and change the "14" to any number between 0 and 13 corresponding to the style you want. See Edit presets.ini by Hand for more information.
Once you have all of the initial settings and the styles you want uploaded to your saber you can then use this define to move all edits to Edit Mode or ProffieOS Workbench.
Preset Configuration 🔗
In Proffie OS the term Preset means the combination of:
- Sound Font
- Music Track
- Blade Style
- A name for the preset
Presets are defined in object array of type Preset. A single Preset looks something like this:
{
  "fontdir",
  "tracks/track.wav",
  style definition, // NUM_BLADES specifies how many style definitions there are
  "description",
}
Sound Font ("fontdir") 🔗
The first part of a preset is the directory of the sound font. ProffieOS supports most of the major sound font formats that are widely used. Sound-playing engine automatically detects through the files in the directory and switches to the appropriate mode.
- Plecter-style Fonts (Including CFX style fonts, as of ProffieOS 3.x)
- Nec-styled Fonts
- Smooth Swing V1
- Smooth Swing V2
You can also specify multiple directories, in which case ProffieOS will search all of them when looking for sound files. When using multiple directories, they should be separated by semicolons, like this:
"fontdir;common"
This will make ProffieOS first look in "fontdir" then in "common". Note that all sounds with the same name (but different numbers) have to be in the same directory.
Music Track ("tracks/track.wav") 🔗
In the second field is configured the audio track which can be used for soundtrack music or ambient sound in parallel to the rest of the sounds that are played by the saber.
Music Track invoke is configured to be runned via button combination or with Command send via the Serial port/Bluetooth module.
NOTE - If a music track is not desired for use with the preset, that's fine, however there needs to be a placeholder for the argument in the preset. This can be as simple as "",
Style definition 🔗
The style definition specifies the look and behavior of the blade itself. If more then one blade is used (NUM_BLADES is greater than 1) then more then one styles have to be defined in the current preset.
Style definitions, or "blade styles" are somewhat complicated, so they have their own page.
Preset Description 🔗
The last element in a preset is the Preset Name. It is in the form of a character string, and while it is optional to include in the preset in order for it to compile, it is highly suggested to use since the preset name is used by the ProffieOS workbench and OLED screens to identify the preset. Otherwise it will show nothing and you won't see what the preset is that you are working with.
Additionally, if there's a mismatch of number of styles per preset and the number of blades set, no helpful error occurs without the "name" argument in place.
The preset description generally uses the StarJedi font when displayed.
As of ProffieOS 6, the name can be displayed on an OLED screen using an Aurebesh font by adding #define USE_AUREBESH_FONT to your CONFIG_TOP section.
The Config File 🔗
While EVERYTHING in ProffieOS is possible to change, most of the time, only the config file needs to be changed. The config file is really just some C++ code that specifies how the rest of the code should behave, but since many ProffieOS users are not C++ experts, this page describes the ProffieOS config files in more detail.
First, let's take a look at a simple config file:
#ifdef CONFIG_TOP
#include "proffieboard_v1_config.h"
#define NUM_BLADES 1
#define NUM_BUTTONS 2
#define VOLUME 1000
const unsigned int maxLedsPerStrip = 144;
#define CLASH_THRESHOLD_G 1.0
#define ENABLE_AUDIO
#define ENABLE_MOTION
#define ENABLE_WS2811
#define ENABLE_SD
#endif

#ifdef CONFIG_PRESETS
Preset presets[] = {
   { "TeensySF", "tracks/venus.wav",
    StyleNormalPtr<CYAN, WHITE, 300, 800>(), "cyan"},
   { "SmthJedi", "tracks/mars.wav",
    StylePtr<InOutSparkTip<EASYBLADE(BLUE, WHITE), 300, 800> >(), "blue"},
   { "TthCrstl", "tracks/mars.wav",
    StylePtr<InOutHelper<EASYBLADE(OnSpark<GREEN>, WHITE), 300, 800> >(), "green"},
   { "TthCrstl", "tracks/uranus.wav",
    StyleStrobePtr<WHITE, Rainbow, 15, 300, 800>(), "strobe"},
   { "TeensySF", "tracks/venus.wav",
    &style_pov, "POV"},
   { "SmthJedi", "tracks/mars.wav",
    &style_charging, "Battery\nLevel"}
};
BladeConfig blades[] = {
 { 0, WS2811BladePtr<144, WS2811_ACTUALLY_800kHz | WS2811_GRB>(), CONFIGARRAY(presets) },
};
#endif

#ifdef CONFIG_BUTTONS
Button PowerButton(BUTTON_POWER, powerButtonPin, "pow");
Button AuxButton(BUTTON_AUX, auxPin, "aux");
#endif
As you can see, this file has three sections: TOP, PRESETS and BUTTONS. Each section looks something like this:
#ifdef CONFIG_NAME
Some stuff goes here
#endif
Where "NAME" is the name of the section. While this file has three sections, some have four, and more may be possible in the future. While each section can technically contain any valid C++ code, it is recommended to use the sections as intended. Each section is explained in it's own page, to find out more, follow the links below:
- The CONFIG_TOP section
- The CONFIG_PRESETS section
- The CONFIG_BUTTONS section
- The CONFIG_PROP section
- The CONFIG_STYLES section
The CONFIG_BUTTONS section 🔗
The CONFIG_BUTTONS is probably the simplest of all the sections in the config file. While it doesn't have to contain anything at all, it's purpose is to contain the buttons. The buttons are global variables in in C++, and we just create the variables directly in the config file. The general format looks like:
TYPE Name(BUTTON, PIN, "name");
For buttons, the Name is not used, so it can be anything you like. (Well, anything that is allowed by C++ as least.) The type, should be one of Button, LatchingButton, InvertedLatchingButton or TouchButton.
The BUTTON argument should be one of:
BUTTON_POWER
BUTTON_AUX
BUTTON_AUX2
BUTTON_UP
BUTTON_DOWN
BUTTON_LEFT
BUTTON_RIGHT
BUTTON_SELECT
Although most sabers only use the first three. This specifies what type of event this button will generate when activated.
The PIN is the pad wired to the button. Most of the time it will be one of these symbolic names:
powerButtonPin
auxPin
aux2Pin
These symbolic names are mapped to numbers by the proffieboard config file which is normally included in the CONFIG_TOP section.
Button pins, data pins and rx/tx pins could all be used as buttons.
The "name" is not very important, but is used to identify the button in error messages, top and commands.
For TouchButton, there is a fourth argument (a number), which must be tweaked to make the button work well. To establish what value to use, use the serial monitor and type "monitor touch". Pay attention to the values printed out when touching and not touching the button, then choose a threshold value somewhere in between.
Simple two-button example:
#ifdef CONFIG_BUTTONS
Button PowerButton(BUTTON_POWER, powerButtonPin, "pow");
Button AuxButton(BUTTON_AUX, auxPin, "aux");
#endif
The CONFIG_PRESETS section 🔗
The main purpose of the CONFIG_PRESETS section, is to define the blades[] array. However, the blades[] array contains pointers to the presets[] array(s), so we must also define those in this section. It is also possible to put custom LED structs, style aliases and other such things in this section.
First, let's explain what an array is: It is a repeated list of data. The general format of an array is something like:
TYPE NAME[] = { first_entry, second_entry, third_entry };
The TYPE specifies what kind of data goes in each entry. For the blades[] array, the type is BladeConfig, and for the presets[] array, the type is Preset.
A BladeConfig looks something like this:
{
  0,  // Blade ID resistance
  blade definitions,   // NUM_BLADES specifies how many blade definitions there are
  CONFIGARRAY(presets),
}
If there are multiple BladeConfigs, ProffieOS will measure the resistance between the blade data pin and GND and use the BladeConfig that has the closest Blade ID. This decides what blade definitions and preset arrays to use.
Also, if you use #define SAVE_STATE in your config, you can save states in a subfolder on your SD card for each blade array by adding a quoted save name to the end of the BladeConfig [] array, similar to the quoted "name" at the end of a preset. For example:
BladeConfig blades[] = {
{ 0, WS281XBladePtr<0, bladePin, Color8::GRB, PowerPINS<bladePowerPin2, bladePowerPin3> >(), CONFIGARRAY(NBpresets),
"No_Blade_save", },
{ 33000, WS281XBladePtr<123, bladePin, Color8::GRB, PowerPINS<bladePowerPin2, bladePowerPin3> >(),
CONFIGARRAY(34presets), "My34inch_blade_save", },
};
will create 2 folders on the SD card named No_Blade_save and My34inch_blade_save, each containing the last used preset, color change state, and last used volume with each blade.
Each blade definition should use one of the following: (click for more info)
- WS281XBladePtr - new style pixel blade definition
- WS2811BladePtr - old style pixel blade definition
- SimpleBladePtr - blade for single LEDs and LED stars
- StringBladePtr - blade for old-fashioned 6-segment blades (or more with external FETs)
- SubBlade - A blade from a sub-section of a pixel string
- SubBladeReverse - Like SubBlade, but reverses indexing for zig-zag blades
- FASTLEDBladePtr - EXPERIMENTAL, used for dotstar blades
- DimBlade - Similar to SubBlade, but reduces the brightness of the blade.
- SpiBladePtr - Non-experimental, but somewhat slow dotstar support.
- ServoBladePtr - for controlling servos, best used with the Free* pins on V3 Proffieboards.
The Preset array is made up of Presets, see Preset Configuration for details.
Note that that there can be multiple preset arrays, and the name of the preset array is not important, as long as the blade array uses the right name. Example:
Preset p1[] = {
  {"font1", "track1.wav", StyleNormalPtr<BLUE, WHITE, 800, 300>(), "blue preset"}
};
Preset p2[] = {
  {"font2", "track2.wav", StyleNormalPtr<RED, WHITE, 800, 300>(), "red preset"}
};

BladesConfig blades[] = {
  { 5000,
    WS2811BladePtr<144, WS2811_ACTUALLY_800kHz | WS2811_GRB>(),
    CONFIGARRAY(p1)
  },
  { 10000,
    WS2811BladePtr<144, WS2811_ACTUALLY_800kHz | WS2811_GRB>(),
    CONFIGARRAY(p2)
  }
};
In this example, the Blade ID is used to select between the red and blue presets. Also note that spaces and newlines are basically ignored, so we are free to write the configuration on one line or many lines as we please. Finally, please note that you cannot have two identical blades in the same bladeconfig, it will crash ProffieOS.
If you have RFID_SERIAL in the CONFIG_TOP section, then you will also need to have a RFID_Commands array, which could look like this:
RFID_Command RFID_Commands[] = {
  { 0x0000000C04ULL,    "change_preset", "0" },
  { 0x09003A8CDCULL,    "change_preset", "1" },
};
This will change preset to 0 when the RFID reader sees card with ID C04 (which happens to be a green crystal) and change to preset 1 when it sees something with a card ID of 3a8cdc. Any serial monitor command can be used.
The CONFIG_PROP section 🔗
The CONFIG_PROP section is relatively new, and a lot of config files don't use it. The purpose of the CONFIG_PROP section is to specify which class is given control of what everything does. Most of the time, this is done by simply including a file from the ProffieOS/props directory in your config file, like this:
#ifdef CONFIG_PROP
#include "../props/detonator.h"
#endif
However, it would be perfectly fine to define your own prop class in this section and then define PROP_CLASS to be the name of your class. Learning how to do that is outside the scope of this tutorial though.
Here is a list of prop files that come with ProffieOS, each file will have some additional instructions at the top.
- saber.h - this is the default, you don't need a CONFIG_PROP section to use this.
- saber_sa22c_buttons.h - saber prop with button assignments designed by sa22c.
- saber_shtok_buttons.h - saber prop with button assignments designed by Dmitry Shtok.
- saber_fett263_buttons.h - saber prop with button assignments designed by fett263, includes battle mode.
- saber_BC_buttons.h - (ProffieOS 6 or later) saber prop with button assignments and features designed by Brian Conner.
- detonator.h - thermal detonator prop.
- blaster.h - blaster prop.
- audiofx.h - similar to an adafruit audiofx board.
- micom.h - voice/dialog prop.
The CONFIG_STYLES section 🔗
Please note, the CONFIG_STYLES section requires ProffieOS 7.x or later.
The CONFIG_STYLES section is a convenience location for placing custom style templates and aliases in your config file. In ProffieOS 6.x and older, you would need to put these sort of statements in the CONFIG_PRESETS section, somewhere before the presets[] array. While this is still entirely possible, it can be inconvenient, because the styles are often large and unchanging, while the presets may be tweaked a lot more often. By putting the styles in their own section, we now have the option of putting them anywhere we want in the config file, since sections can be written in any order. Normally, the CONFIG_STYLES section is expected to be near the bottom of the config file.
Here is an example of what it could look like:
#ifdef CONFIG_STYLES
using BatteryLevelStyle = InOutHelperX<Gradient<Red,Orange,Yellow,Green,Green,Green,Green>,BatteryLevel>;
#endif
Then in the preset you would apply that aliased style like this:
StylePtr<BatteryLevelStyle>(),
Please not that there is no actual difference between putting things at the top of the CONFIG_PRESETS section and putting them in the CONFIG_STYLES section, it is merely provided to make it easier to keep your config file organized.
The CONFIG_TOP section 🔗
The CONFIG_TOP section is primarily used to set up defines which enable and disable features in the code. However, it is also used to include a board specific config file. Let's start with the required parts:
First, we must include a board config file, basically, we have to pick one of these lines:
#include "v1_config.h"   // TeensySaber V1
#include "v2_config.h"   // TeensySaber V2
#include "v3_config.h"   // TeensySaber V3
#include "proffieboard_v1_config.h"  // Proffieboard V1
#include "proffieboard_v2_config.h"  // Proffieboard V2
#include "proffieboard_v3_config.h"  // Proffieboard V3
Note that if you include the proffieboard_config.h file (no version in the filename), the appropriate board version will be chosen for you based on which board is being programmed. This allows you to use your config on multiple versions of Proffieboards without needing to change this line to match.
NUM_BLADES 🔗
Next we must define how many blades there are. Note that accent LEDs, crystal chambers and light-up buttons also counts as blades.
#define NUM_BLADES 1
NUM_BUTTONS 🔗
And we must also specify how many buttons we have. Note that this is just used to change how some of the buttons behave, and nothing will actually break if you specify a number different from your actual number of buttons.
#define NUM_BUTTONS 2
VOLUME 🔗
Then we specify the volumes. Generally values between 0 and 3000 are useful, but it may depend on what kind of board you have.
To set the maximum volume of the saber, use this with the value of your choice:
#define VOLUME 1000
With some prop files, you can use a volume menu to adjust the sound level of the saber. This menu's maximum volume is set by the above define. Sometimes (like late night for example) you may want to boot the saber at a lower volume level, which can be adjusted up to the maximum later using volume menu. To do that, use this with the value of your choice:
#define BOOT_VOLUME 300
maxLedsPerStrip 🔗
I don't remember why, but this next number is a constant instead of a define. It specifies how many pixels we can have in a single strip. There is no need to make this smaller if your strips are not 144 pixels long, but you do need to make it bigger if they are more than 144 pixels long.
const unsigned int maxLedsPerStrip = 144;
CLASH_THRESHOLD_G 🔗
Next, we have the clash threshold. When two consecutive accelerometer readings differ by this much, a clash is triggered. The unit is in Gs. (About 9.81 newtons.) Larger values will make clashes harder to trigger, smaller values will make clashes easier to trigger.
#define CLASH_THRESHOLD_G 1.0
Please note that in ProffieOS 6.x, some changes were made to the motion detection system. This tended to make clash detection more sensetive, so it's not uncommon to have to increase the clash threshold when upgrading from 5.x to 6.x.
In ProffieOS 7.x, the clash detection was modified in ways that makes it less sensetive to false clashes. This change also means that the CLASH_THRESHOLD_G might have to be changed when upgrading from 6.x to 7.x. However, in this case you will probably be adjusting the clash threshold downwards rather than upwards.
Finally, we have a set of defines that enable standard features. From ProffieOS 8.x, these defines are on by default and are not required.
#define ENABLE_AUDIO
#define ENABLE_MOTION
#define ENABLE_WS2811
#define ENABLE_SD
OPTIONAL defines 🔗
ENABLE_SSD1306 🔗
This define enables the OLED display code.
#define ENABLE_SSD1306
OLED_FLIP_180 🔗
This code will flip the OLED displayed content 180 degrees.
#define OLED_FLIP_180
OLED_MIRRORED 🔗
Shows the OLED displayed content in reverse (for scopes that might use HUD 45 degree mirrors for example).
#define OLED_MIRRORED
PLI_OFF_TIME 🔗
Duration that the Power Level Indicator (battery level meter) will show on the OLED when blade is turned off.
Example below show 10 seconds set.
#define PLI_OFF_TIME 10000
SHARED_POWER_PINS 🔗
This code makes it possible to use the same power pins for multiple blades.
#define SHARED_POWER_PINS
Orientation defines 🔗
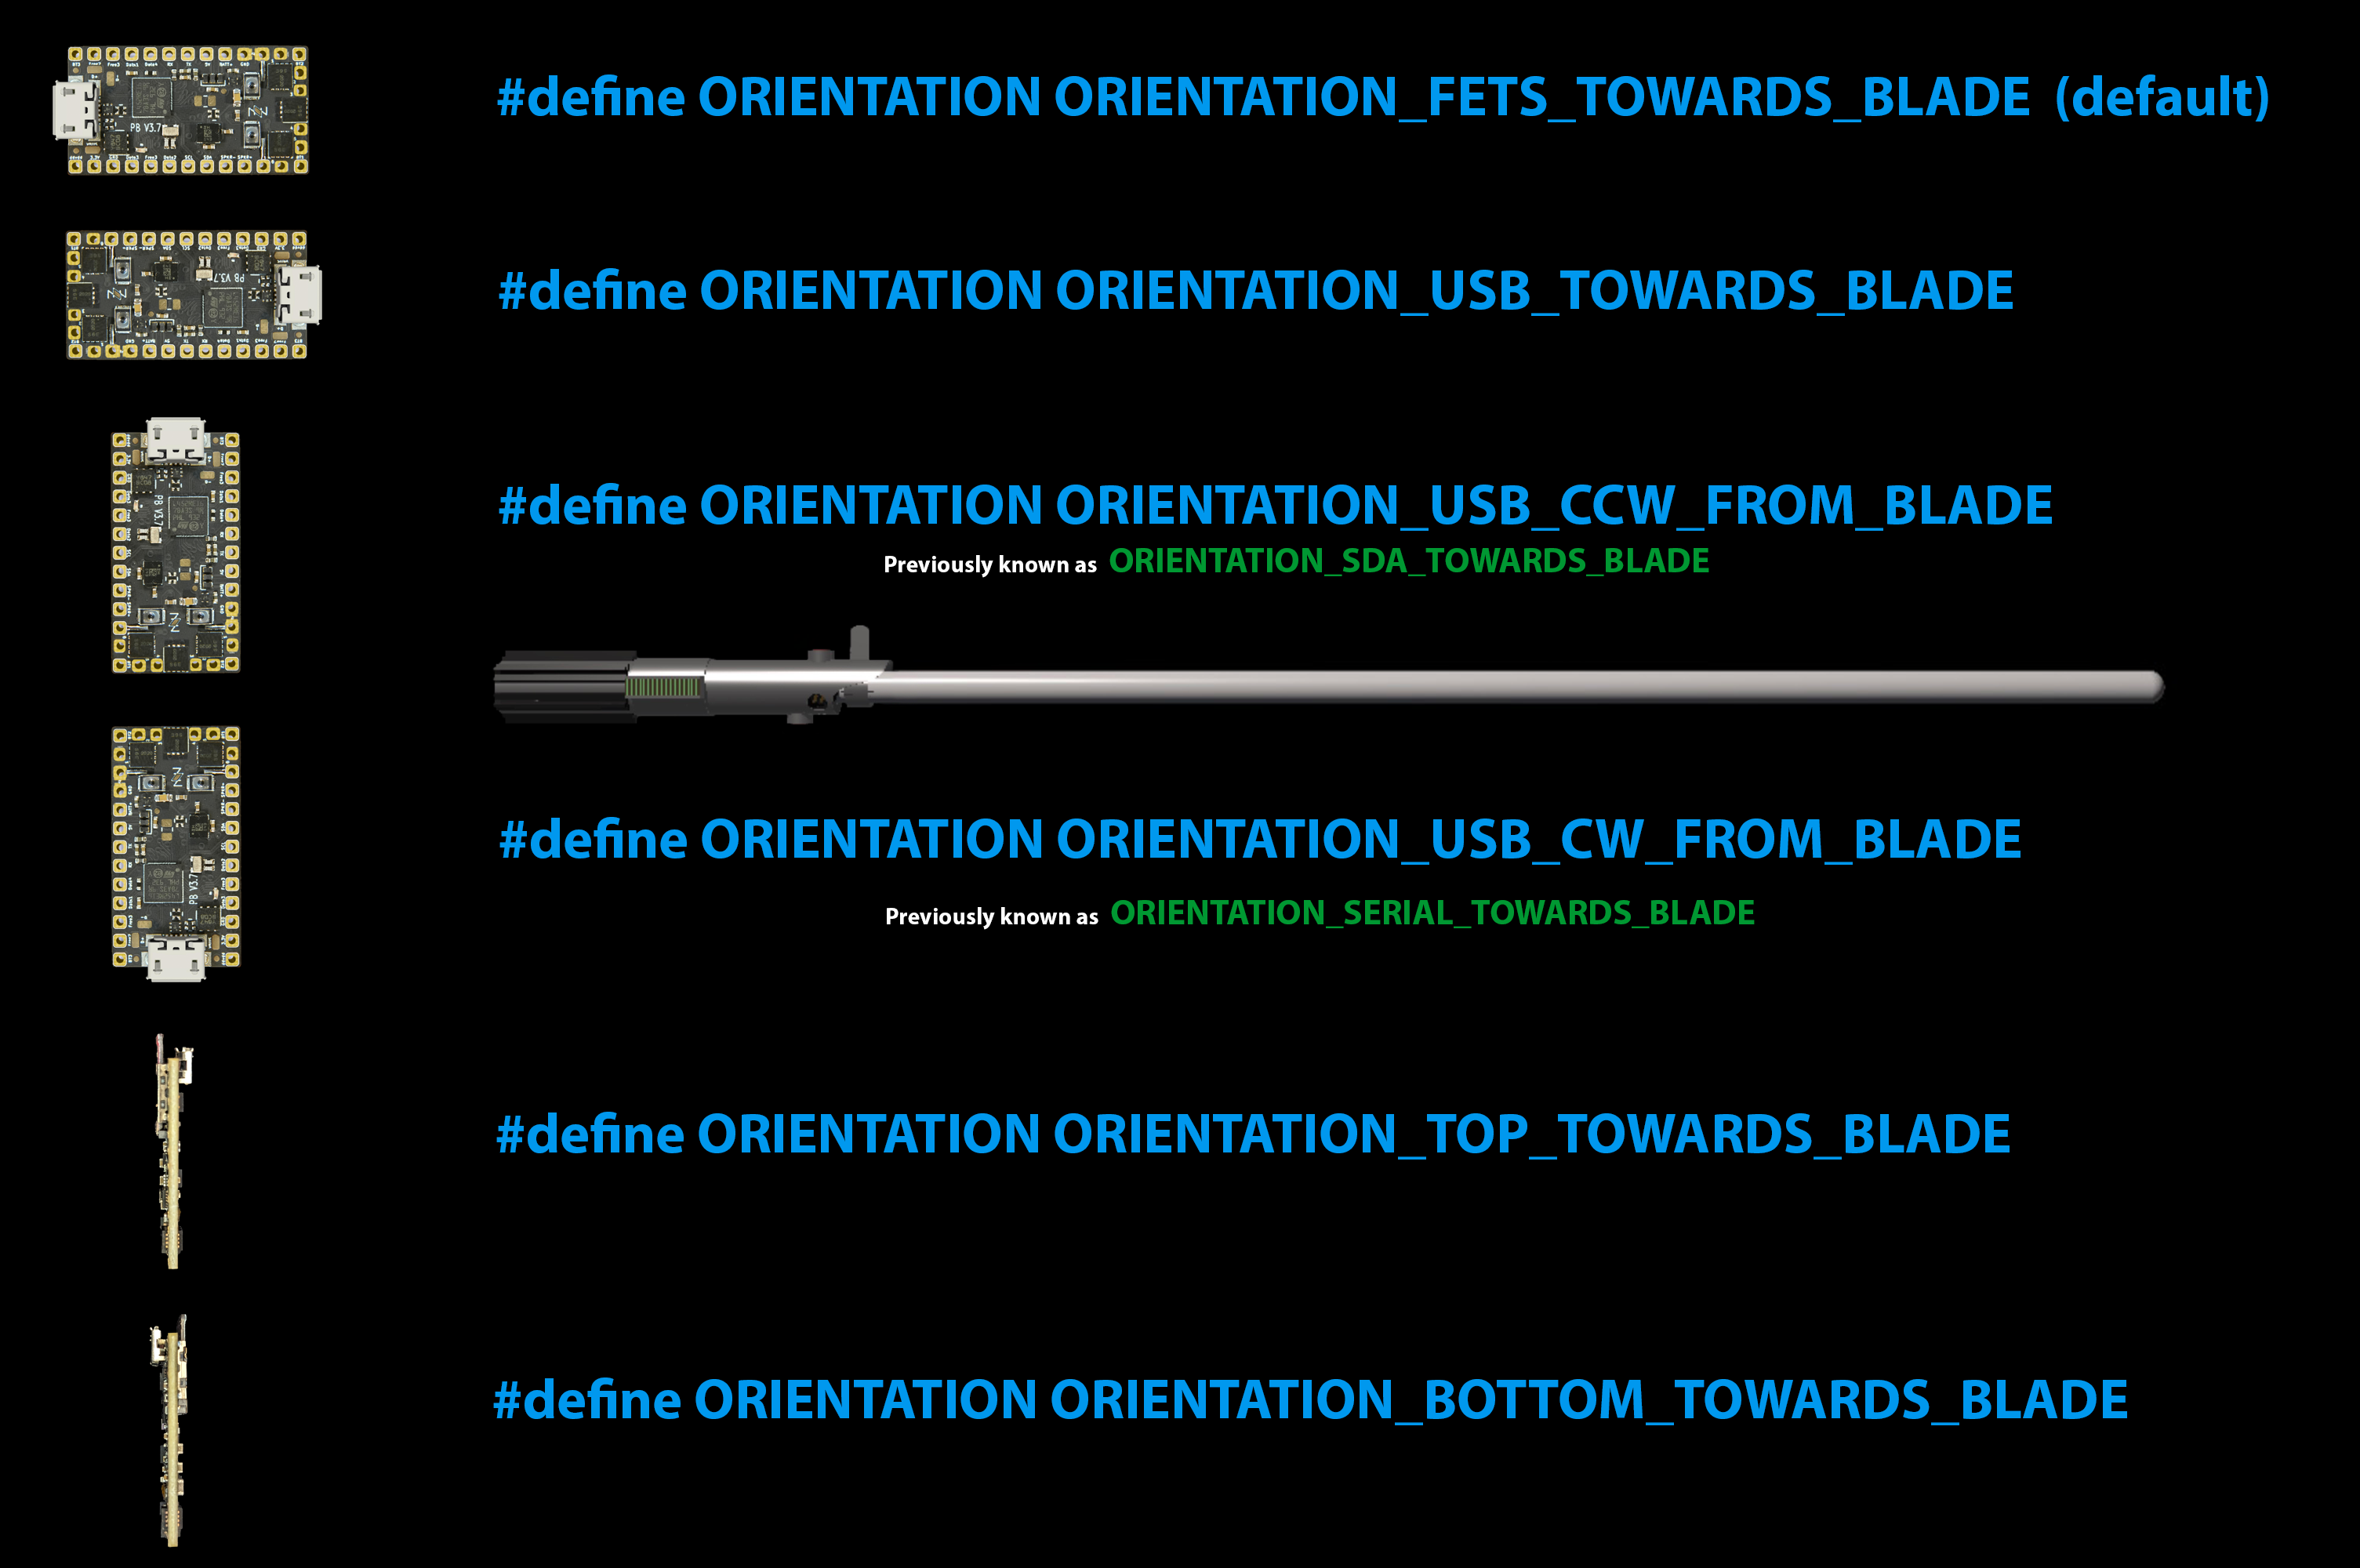
If your board is installed in a different orientation than normal, you may need to add one of the following lines to make ProffieOS behave properly:
#define ORIENTATION ORIENTATION_NORMAL  // USB connector points away from blade
#define ORIENTATION ORIENTATION_FETS_TOWARDS_BLADE
#define ORIENTATION ORIENTATION_USB_TOWARDS_BLADE
#define ORIENTATION ORIENTATION_USB_CCW_FROM_BLADE
#define ORIENTATION ORIENTATION_USB_CW_FROM_BLADE
#define ORIENTATION ORIENTATION_TOP_TOWARDS_BLADE
#define ORIENTATION ORIENTATION_BOTTOM_TOWARDS_BLADE
Here's a visual reference (viewed from above with the blade to the right):
ORIENTATION_ROTATION 🔗
For Curved hilts, or where the board is not parallel with the blade (for Twist on/off particularly) This will rotate the orientation of the board 20 degrees around the Y axis. Depending on the orientation of the board, you might need -20 degrees instead. (Or 15 degrees? or 30?)
#define ORIENTATION_ROTATION 0,20,0
DUAL_POWER_BUTTONS 🔗
This one means that clicking the AUX will also turn the saber on. If not defined, AUX will go to next preset when off.
#define DUAL_POWER_BUTTONS
ENABLE_SERIAL 🔗
This enables the serial port, which can be used to talk to a BLE chip.
#define ENABLE_SERIAL
If you have a redbear BLE nano bluetooth chip, you'll need the following three defines to configure it:
#define BLE_PASSWORD "password"
#define BLE_NAME "saber"
#define BLE_SHORTNAME "saber"
The BLE_PASSWORD must be 20 characters or less. BLE_SHORTNAME must be 8 characters or less.
ENABLE_SERIALFLASH 🔗
This is only for TeensySaber V1 and enables the serialflash chip on the PJRC prop board
#define ENABLE_SERIALFLASH
ENABLE_FASTLED 🔗
This enables the FastLED blade driver, which can be used to drive dotstar blades. This is experimental and may not work properly.
#define ENABLE_FASTLED
ENABLE_POWER_FOR_ID 🔗
To use blade ID in a 3-pin connector, the GND leg of the resistor has to be hooked up to the part that is controlled by FETs. That means that those FETs has to be powered on in order for blade ID to work. This define lets you do that by specifying which FETs needs to be powered while the blade is identified.
#define ENABLE_POWER_FOR_ID PowerPINS<bladePowerPin1,bladePowerPin2,bladePowerPin3>
See the blade ID page for more information.
ProffieOS 3.x defines 🔗
ENABLE_DEVELOPER_COMMANDS 🔗
By default, some commands which are only useful for developers are normally not compiled into the final binary to save memory, if you want them, add this define to enable them.
#define ENABLE_DEVELOPER_COMMANDS
Plase beware that this turns off some useful commands, like "sdtest" and "monitor".
DISABLE_DIAGNOSTIC_COMMANDS 🔗
To save even more memory, you can disable some diagnostic commands like "monitor", "top" and "sdtest" using this define:
#define DISABLE_DIAGNOSTIC_COMMANDS
BLADE_ID_CLASS 🔗
Proffieboards have some challenges when it comes to BladeID, but it's possible to work around them by adding a bridge to another pin, or by adding a pullup resistor. However, when you do so, you have to use the BLADE_ID_CLASS to specify how the OS should calculate the Blade ID. Chose one of:
#define BLADE_ID_CLASS BridgedPullupBladeID<bladeIdentifyPin, BRIDGED_PIN>
#define BLADE_ID_CLASS ExternalPullupBladeID<bladeIdentifyPin, PULLUP_RESISTANCE>
See the blade ID page for more information.
IDLE_OFF_TIME 🔗
ProffieOS has pretty good standby idle time, but if you have accent LEDs that glow even when the saber is off, that will make your saber run out of batteries pretty fast. This define lets you specify a timeout for such accent LEDs (in milliseconds), this example would set it to 10 minutes:
#define IDLE_OFF_TIME 60 * 10 * 1000
DISABLE_COLOR_CHANGE 🔗
If you think color change is annoying, or you just need to save some memory, you can disable the color change feature with this define:
#define DISABLE_COLOR_CHANGE
BLADE_DETECT_PIN 🔗
This define lets you use a pin to detect when a blade is present or not. The pin will work kind of like a latching button which is pressed when there is a blade in the saber. When there is no blade in the saber, NO_BLADE (one billion) will be added to the blade ID.
#define BLADE_DETECT_PIN PIN
See the Blade Detect page for more information.
SAVE_COLOR_CHANGE 🔗
On-the-fly color changing is new in 3.x. If you want it to save the color change state, add this define to your config file:
#define SAVE_COLOR_CHANGE
SAVE_VOLUME 🔗
Start with the volume used last
#define SAVE_VOLUME
SAVE_PRESET 🔗
Start at the last preset when you turn the saber on:
#define SAVE_PRESET
SAVE_STATE 🔗
Save state is one define to encompass SAVE_COLOR_CHANGE, SAVE_VOLUME and SAVE_PRESET. (From ProffieOS 7.8 onward, this also encompasses SAVE_BLADE_DIMMING)
#define SAVE_STATE
ProffieOS 4.x defines 🔗
KEEP_SAVEFILES_WHEN_PROGRAMMING 🔗
From OS4.7 onward: After uploading, all .INI file will be deleted from the SD card. These files may contain modifications to your uploaded config file such as saved colorcahngemode info, volume etc. To retain this additional information even after re-flashing ProffieOS to the board, use:
#define KEEP_SAVEFILES_WHEN_PROGRAMMING
Please use this define with caution. If you leave this define in your config file when you are tring to make changes to your saber, weird things tends to happen.
See this page for further information.
ORIENTATION_ROTATION 🔗
If your board is not mounted at 90 degree angles to the hilt, you can use this define:
#define ORIENTATION_ROTATION X,Y,Z
The X, Y and Z are floating point numbers which specify how many degrees to rotate all measurements.
ProffieOS 5.x defines: 🔗
RFID_SERIAL 🔗
Add an RFID reader. To configure the RFID reader, you will need an RFID_Commands array in the CONFIG_PRESETS section.
#define RFID_SERIAL Serial3
SPEAK_TOUCH_VALUES 🔗
To calibrate your touch buttons, you can temporarily add this to your config to have ProffieOS say the touch values out loud. Can be confusing if you have more than one touch button. If you have more than one, calibrate one at a time and comment out the rest temporarily.
#define SPEAK_TOUCH_VALUES
ENABLE_I2S_OUT 🔗
This enables I2S output, Data3 is SCK, Data4 is FS and Button2/aux is DATA
#define ENABLE_I2S_OUT
ENABLE_SPDIF_OUT 🔗
This enables SPDIF output. The SPDIF signal will come out at 3.3 volts on Button2/AUX.
#define ENABLE_SPDIF_OUT
LINE_OUT_VOLUME 🔗
If you use ENABLE_I2S_OUT or ENABLE_SPDIF_OUT, you can control the volume with this define:
#define LINE_OUT_VOLUME 2000
The default is 2000. If you want the line out volume to follow the master volume, you do:
#define LINE_OUT_VOLUME dynamic_mixer.get_volume()
ProffieOS 6.x defines: 🔗
Enables dynamic blade dimming / blade length / clash threshold, controllable from ProffieOS Workbench or some props.
#define DYNAMIC_BLADE_DIMMING
#define DYNAMIC_BLADE_LENGTH
#define DYNAMIC_CLASH_THRESHOLD
Enable storing the dynamic dimming / clash threshold. Doesn't do anything unless the corresponding DYNAMIC_* define is also used.
#define SAVE_BLADE_DIMMING
#define SAVE_CLASH_THRESHOLD
INCLUDE_SSD1306 🔗
Includes support for ssd1306 displays, but does not automatically enable it. This lets you declare your own display and set the size and controller for the display.
#define INCLUDE_SSD1306
FILTER_CUTOFF_FREQUENCY 🔗
If present, these defines enable a butterworth highpass filter with the given order and cutoff frequency. The idea is to remove frequencies that your speaker can't reproduce anyways to put less stress on the speaker. The filter order defaults to 8. A reasonable cutoff frequncy might be 100Hz. The filter does not affect I2C or S/PDIF output if enabled.
#define FILTER_CUTOFF_FREQUENCY
#define FILTER_ORDER
NO_REPEAT_RANDOM 🔗
This define will make ProffieOS remember which file (of each effect) was played last and avoid playing it again next time. If there are only 2 of a particular sound, there is still a chance that the same sound is played to avoid simply flipping between them in a predictable pattern.
#define NO_REPEAT_RANDOM
FEMALE_TALKIE_VOICE 🔗
Uses a female talkie voice, only affects built-in error messages, for other sounds, go check out the Sound Library.
#define FEMALE_TALKIE_VOICE
DISABLE_BASIC_PARSER_STYLES 🔗
Saves memory by disabling old-fashioned styles. With this define, these styles will not be available in the ProffieOS Workbench.
#define DISABLE_BASIC_PARSER_STYLES
ENABLE_ALL_EDIT_OPTIONS 🔗
The following "umbrella" define is equivalent to separately defining:
- DYNAMIC_BLADE_LENGTH
- DYNAMIC_BLADE_DIMMING
- DYNAMIC_CLASH_THRESHOLD
- SAVE_VOLUME
- SAVE_BLADE_DIMMING
- SAVE_CLASH_THRESHOLD
- SAVE_COLOR_CHANGE
- MOUNT_SD_SETTING (from OS 8.x)
Note - #define SAVE_STATE is different, as that encompasses:
- SAVE_VOLUME
- SAVE_PRESET
- SAVE_COLOR_CHANGE
- SAVE_BLADE_DIMMING (From ProffieOS 7.9 onward)
#define ENABLE_ALL_EDIT_OPTIONS
ProffieOS 7.x defines 🔗
BOOT_VOLUME 🔗
Let's you specify what volume should be used at boot.
Note that if #define SAVE_VOLUME is active (or SAVE_STATE or ENABLE_ALL_EDIT_OPTIONS since they also encompass SAVE_VOLUME), BOOT_VOLUME wil be overridden by your saved value.
#define BOOT_VOLUME 300
KILL_OLD_PLAYERS 🔗
When playing overlapping effects, you can sometimes run out of available wav players. When this define is enabled, ProffieOS will find the oldest playing overlapping effect and stop that sound to make room for the new sound to play. The result is that the new sound always plays.
#define KILL_OLD_PLAYERS
DISABLE_TALKIE 🔗
Saves 7.5kB of flash memory by disabling the spoken error codes that ProffieOS uses. The spoken error codes will be replaced with beeps, and you can use the ("What is it beeping?" page)[/troubleshooting/beep_codes.html] to figure out what the sounds mean. You can also see the errors in the (serial monitor)[/tools/serial-monitor.html].
#define DISABLE_TALKIE
BLADE_ID_TIMES 🔗
This define tells ProffieOS to run the blade ID multiple times and then average the results. This is particularly helpful when using BLADE_ID_SCAN_MILLIS, as the results tends to be very noisy otherwise.
#define BLADE_ID_TIMES 10
BLADE_ID_SCAN_MILLIS 🔗
With this define, blade ID will run all the time, even when the blade is on. The define specifies how many milliseconds in between each blade ID scan. Reasonable values might be 100 to 5000 ms. If the computed blade ID is different from the previous ones, then the saber will re-load blade definitions and presets, as if a Blade Detect event had occured.
#define BLADE_ID_SCAN_MILLIS 500
Please note, you will most likely need BLADE_ID_TIMES and SHARED_POWER_PINS to use this define. Also, it currently only works with pixel blades.
AUDIO_CLASH_SUPPRESSION_LEVEL 🔗
This define lets you adjust how much harder it is to do a clash when the audio is loud. The useful range is roughly 1 to 50, and the default is 10.
#define AUDIO_CLASH_SUPPRESSION_LEVEL 20
PROFFIEOS_DONT_USE_GYRO_FOR_CLASH 🔗
This define allows you to use only Accelerometer for Clash Detection (OS6 or earlier algorithm), instead of Accelerometer and Gyro combined (OS7 algorithm).
#define PROFFIEOS_DONT_USE_GYRO_FOR_CLASH
POV_INCLUDE_FILE 🔗
This define lets you include some other POV data instead of the default star wars logo. To learn how to generate pov data, go check out the POV tools
#define POV_INCLUDE_FILE "jedi_logo.h"
BUTTON_DOUBLE_CLICK_TIMEOUT 🔗
This define is really meant to be used by a prop file, but can also be set in a config file. It allows you to alter how many milliseconds can be between to clicks to make them count as a double click. The default is 500 milliseconds.
#define BUTTON_DOUBLE_CLICK_TIMEOUT 500
BUTTON_SHORT_CLICK_TIMEOUT 🔗
This define is really meant to be used by a prop file, but can also be set in a config file. Pressing a button for a shorter than this counts as a "short click". The default is 500 milliseconds.
#define BUTTON_SHORT_CLICK_TIMEOUT 500
BUTTON_HELD_TIMEOUT 🔗
This define is really meant to be used by a prop file, but can also be set in a config file. It determines how long after you press a button, the "held" event is fired. The default is 300 milliseconds.
#define BUTTON_HELD_TIMEOUT 300
BUTTON_HELD_MEDIUM_TIMEOUT 🔗
This define is really meant to be used by a prop file, but can also be set in a config file. It determines how long after you press a button, the "held medium" event is fired. The default is 800 milliseconds.
#define BUTTON_HELD_MEDIUM_TIMEOUT 800
BUTTON_HELD_LONG_TIMEOUT 🔗
This define is really meant to be used by a prop file, but can also be set in a config file. It determines how long after you press a button, the "held long" event is fired. The default is 2000 milliseconds.
#define BUTTON_HELD_LONG_TIMEOUT 2000
ProffieOS 8.x defines 🔗
DISABLE_AUDIO 🔗
ENABLE_AUDIO is now the default, but this define can be used to disable it. This would only be used when developing support for new boards though.
#define DISABLE_AUDIO
DISABLE_MOTION 🔗
ENABLE_MOTION is now the default, but this define can be used to disable it. This would only be used when developing support for new boards though.
#define DISABLE_MOTION
DISABLE_WS2811 🔗
ENABLE_WS2811 is now the default, but this define can be used to disable it. This would only be used when developing support for new boards though.
#define DISABLE_WS2811
DISABLE_SD 🔗
ENABLE_SD is now the default, but this define can be used to disable it. This would only be used when developing support for new boards though.
#define DISABLE_SD
MOUNT_SD_SETTING 🔗
With this setting, you don't have to worry about your computer accessing the SD card and causing a corruption when you program the board anymore. By default, if you have "Mass Storage" selected in Arduino -> Tools -> USB Type, you can use access your SD card from you computer, basically, the Proffieboard performs the function of a (slow) SD card reader. Unfortunately, your computer may access the SD card when you don't expect it, and if interrupted at the wrong time, your SD card may become corrupt. This is why it is normally very important to "eject" the SD card before disconnecting or programming the proffieboard.
With MOUNT_SD_SETTING defined, ProffieOS will default to not allowing the computer to access the SD card, but you can change that setting at any time by using the comamnd "sd 1" in the serial monitor, an in-hilt menu setting, or by using the ProffieOS workbench. Then you can access the card like normal from the computer, and then make sure to "eject" it when you are done. Afterwards, you can use "sd 0" to disable access again. Note that the SD access setting is never saved and always returns to disallowing SD access when the saber is rebooted.
This setting is recommended for all users, especially when combined with a menu to enable/disable it easily.
#define MOUNT_SD_SETTING
Note that MOUNT_SD_SETTING does not do anything unless you enable "mass storage" in Arduino.
PROFFIEOS_LOG_LEVEL 🔗
This lets you quickly and easily control how much information ProffieOS will log to the serial monitor. 100 means only the absolute necesseties, 200 means include things that tell you what is going on, 300 is the default, which includes things you probably want to know, 400 is verbose logging, which includes things you don't normally need and 500 is spammy logging which includes lots of things that happen on a regular basis. Higher values use more cpu and memory. Lower values makes finding problems more difficult.
#define PROFFIEOS_LOG_LEVEL 300
DISABLE_NO_REPEAT_RANDOM 🔗
NO_REPEAT_RANDOM is on by default in ProffieOS 8.x, however, if you want to turn it off, you can still do so with this define.
#define DISABLE_NO_REPEAT_RANDOM
NO_BLADE_ID_RANGE 🔗
This define will change how blade ID works. Basically, if the blade ID is between the two given values, then the NO_BLADE (1 billion) will be added to the returned ID. The idea is that in most cases, the ID values returned when there is no blade in your hilt is different from when there is a blade in your hilt. By making ID values in that range return NO_BLADE, you may not need a blade detect pin to see if there is a blade in your hilt or not. This is particularly useful in combination with BLADE_ID_SCAN_MILLIS.
#define NO_BLADE_ID_RANGE 100,1000
MENU_SPEC_TEMPLATE 🔗
This define lets you specify what the "enter menu" button actually does. Currently there are two supported values:
- DefaultMenuSpec - complete menu with settings, and edit mode menues
- SettingsOnlyMenuSpec - limited menu with only settings Note that this define is currently only supported by the saber.h and saber_BC_buttons.h prop. Other props will likely support this in the future.
#define MENU_SPEC_TEMPLATE DefaultMenuSpec
You may also want to add the ENABLE_ALL_EDIT_OPTIONS define, or some menu entries might not be available. To learn how to use the menus, see this page.
MENU_SPEC_MENU 🔗
This define can be used together with MENU_SPEC_TEMPLATE to make the "enter menu" launch directly into a submenu. This means that only that submenu will be available, and all other menues will not possible to access. For instance, if you only want a volume menu, you could set this define to "ChangeVolumeMode". The name for each menu can be found in the menu specification.
#define MENU_SPEC_MENU ChangeVolumeMode
COLOR_MENU_GAMMA 🔗
ProffieOS uses linear colors, which means that Rgb<10,10,10> is exactly twice as bright as Rgb<5,5,5>, however, human visual perception is not linear, which means that it doesn't appear twice as bright. This is particularly apparent when using the menu system to adjust colors. The difference between Rgb<5,5,5> and Rgb<10,10,10> feels much more important than the difference between Rgb<205,205,205> and Rgb<210,210,210>. This is why computer RGB uses sRGB, which has a gamma of about 2.2. This define allows you to apply such a gamma factor when selecting R, G and B values in the color menus. A value between 2 and 3 will probably make the most sense. The higher the gamma value, the more space will be allocated to adjusting dark values, less space will be allocated for adjusting bright values. The default is 2.2, just like sRGB. You can try stting it to 1.0 to appreciate the difference. Note that some props have their own menus and might not use this define.
#define COLOR_MENU_GAMMA 2.2
CLASH_THRESHOLD_GAMMA 🔗
Just lke COLOR_MENU_GAMMA above, this only affects the clash threshold menu, and gives you more accuracy when adjusting low values than when adjusting high values. Default is 2.0. Note that some props have their own menus and might not use this define.
#define CLASH_THRESHOLD_GAMMA 2.0
VOLUME_MENU_GAMMA 🔗
Just lke COLOR_MENU_GAMMA above, this only affects the clash threshold menu, and gives you more accuracy when adjusting low values than when adjusting high values. Default is 2.2. Note that some props have their own menus and might not use this define.
#define VOLUME_MENU_GAMMA 2.2
BLADE_ID_SCAN_TIMEOUT 🔗
This define allows you to set a timeout on how long active blade scanning will actually be active for. Similar to IDLE_OFF_TIME, but just for the continous blade ID scan.
#define BLADE_ID_SCAN_TIMEOUT 5 * 60 * 1000
BLADE_ID_STOP_SCAN_WHEN_IGNITED 🔗
This define stops ID scanning while the saber is ignited. With no scanning there is no chance of getting the ID wrong and re-initialize the saber while using it.
#define BLADE_ID_STOP_SCAN_WHEN_IGNITED
ENABLE_SPIDISPLAY 🔗
Currently, including support for color displays use a small amount of memory even if no display is actually used. To work around this issue, we have this define. Without it, color display support is disabled and takes no memory. With it, you can use color displays in your config file.
#define ENABLE_SPIDISPLAY
FONT_PATTERN 🔗
When using the MENU_SPEC_TEMPLATE, you can edit and modify presets using menus. However, font packs are typically stored in a directory called "common", so the font search path for each preset is typically on the form "font_directory;common". This works well in many cases, but can be somewhat limiting. By using this define, you can change the pattern used to extract and construct font search paths. The default FONT_PATTERN is "*;common", and the star is where the font directory will go. However, you could set it to something like "override;*;common", and now any sound you put in "override" will be used by all fonts. There can also be multiple stars in the pattern, for instance, you could use "*;*/mysaber;common", and if your font direcory is "ANH", then the final search path will be "ANH;ANH/mysaber;common". Note that, in order for ProffieOS to be able to extract the font directory from the font search path, all presets in your config file must have font search paths that match the pattern.
#define FONT_PATTERN "*;common"
SMOOTH_COLORCHANGE_TICKS_PER_REVOLUTION 🔗
This define enables "tick" sounds when using the smooth color change menu. The ticks don't actually have any meaning, but improves the feel of using the smooth color change menu nontheless. The define also specifies how many ticks to play per revolution.
#define SMOOTH_COLORCHANGE_TICKS_PER_REVOLUTION 60
ENABLE_IDLE_SOUND 🔗
This enables a sound effect called "idle", which is basically the inverse of "hum" as it will play when the saber is off, instead of when it's on. It will stop playing after IDLE_OFF_TIME has passed.
#define ENABLE_IDLE_SOUND
BUTTON_LONG_CLICK_TIMEOUT 🔗
This define is really meant to be used by a prop file, but can also be set in a config file. It allows you to alter the maxium time for a "long click". The default is 2500 milliseconds.
#define BUTTON_LONG_CLICK_TIMEOUT 2500
Your first config file 🔗
Once you have Arduino installed and configured, it's time to download ProffieOS and set it up with a config file for your particular saber or prop. This page isn't meant to show you all the ways you can customize a config file, for now we're just going to start with something simple, and we can customize and configure it later.
Where to get a config file. 🔗
While it's possible to just open up a text editor and write a config file, I wouldn't recommend it. Instead, I would go with one of these options:
- If you bought your saber from somewhere, the seller or installer usually saves the config file, or a copy of ProffieOS with a config file in it on the SD card. If you need help finding it, check this page Note that not all sellers/installers do this, and if that is the case, you should contact them and get the file directly from them.
- If you are installing your own Proffieboard, you can use the configuration generator web page to generate a config file for your board.
- You can take an existing, similar config file and modify it. (If necessary) Just don't overwrite or delete any of the ones whose name starts with "proffieboard". Making a copy of OS6_config_example.h is a good idea.
- You can use the Fett263 configuration helper tool, but please beware that it requires you to input the blade configuration, so it's usually best to start with one of the other methods above, and then use the Fett263 tool to generate a better config file.
- There is also the ProffieConfig tool, which aims to streamline this entire process, including uploads to the board.
Configuring ProffieOS to use your config file. 🔗
- Go to the ProffieOS directory and click on ProffieOS.ino (.ino might be hidden on Windows)
- This should open up ProffieOS.ino in arduino. Arduino might show another file too, like README.md, if so, just click on the ProffieOS.ino tab.
- Scroll down to the
CONFIG_FILEdefine, it will be a line that looks like this:
// #define CONFIG_FILE "config/YOUR_CONFIG_FILE_NAME_HERE.h"
- Now change this line to:
#define CONFIG_FILE "config/my_saber_config.h"
Of course, replace my_saber_config with the actual name of your config file.
Once this is done, you can click the "Upload" button in Arduino to send your programming to the Proffieboard.
For more information about configuration files and what they can contain, proceed to the config file page.
Config, blades 🔗
Blade Configuration 🔗
Proffie OS allows the use of multiple blades configurations.
All blades are defined in object array of type BladeConfig. Blade selection works with resistance measurement on the ID pin of the board. If no more then one blade configurations are defined in the array, it will be selected regardless of the resistance on the pin.
Example: The following code defines two blade configurations. If you connect 2.6k Resistor between ID and GND pin, the saber board will be configured to use neopixel setup with style configuration in the presets array. Similarly the second configuration switches to Tri-Cree setup. To learn how to configure presets array check out the Preset Configuration page.
BladeConfig blades[] = {
  {2600, WS2811BladePtr<144, WS2811_ACTUALLY_800kHz | WS2811_GRB>(), CONFIGARRAY(presets) },
  {13000, SimpleBladePtr<CreeXPL, CreeXPL, CreeXPL, NoLED>(), CONFIGARRAY(white_presets) },
};
For more information about the blades array, see The CONFIG_PRESETS section page.
LED Support 🔗
Most major LEDs that are used in the saber practice are already defined as templates (CreeXPE2White, CreeXPE2Blue and etc.), and their current and voltage values are defined so that the PWM engine can drive them accordingly.
Note: For direct drive it is still good practice to use a resistor to prolong the LED dye lifespan.
For more info on direct drive LEDs, see this page.
SubBlade 🔗
When using addressable LED strip, a single strip can be separated into a couple of sub blades with their own style configuration and behaviour. This is really useful when you want to use only one data pin for all the addressable LEDs in your setup.
Example for SubBlade usage:
BladeConfig blades[] = {
{ 0,
   SubBlade(0, 1, WS2811BladePtr<146, WS2811_580kHz>()),
   SubBlade(2, 14, NULL),   // Quillon A
   SubBlade(15,26, NULL),   // Quillon B
   SubBlade(27, 145, NULL)  // Main Blade
   CONFIGARRAY(presets)
}
};
Sample Preset that works with sub-blades:
#define FIRE1_SPEED 2
#define FIRE1_DELAY 800
#define FIRE1_NORMAL 0, 1000, 2
#define FIRE1_CLASH  3000, 0, 0
#define FIRE1_LOCKUP 0, 5000, 10
#define FIRE1PTR(NUM, DELAY) \
  StyleFirePtr<RED, YELLOW, NUM, DELAY, FIRE1_SPEED, \
    FIRE1_NORMAL, FIRE1_CLASH, FIRE1_LOCKUP>()


 Preset presets[] = {
{ "font01", "tracks/title.wav",
   StyleNormalPtr<AudioFlicker<YELLOW, WHITE>, RED, 300, 800>, //Accent Pixel Style
   FIRE1PTR(1, FIRE1_DELAY),  //Quilon A Style
   FIRE1PTR(2, FIRE1_DELAY),  //Quilon A Style
   FIRE1PTR(0, 0), //Main Blade Style
 }
};
For more details check out the SubBlade page.
DimBlade 🔗
DimBlade is used to reduce the brightness of a blade, usually to save battery.
DimBlade(percentage, blade_definition)
Note the use of () instead of <>, as DimBlade is a regular function, not a template. DimBlade will wrap a blade definition and reduce the brightness of the output. If percentage is 10.0, the blade will be 10% as bright, produce less heat and the battery will last longer.
Note that some effects, like clash will NOT be dimmed, which can make it stand out more than normal.
So for example, if you your blades array looks like this:
BladeConfig blades[] = {
{ 0, WS281XBladePtr<144, bladePin, Color8::GRB, PowerPINS<bladePowerPin2, bladePowerPin3> >(), CONFIGARRAY(presets) },
};
Then here is how it would look with DimBlade():
BladeConfig blades[] = {
{ 0, DimBlade(50.0, WS281XBladePtr<144, bladePin, Color8::GRB, PowerPINS<bladePowerPin2, bladePowerPin3> >()),
CONFIGARRAY(presets) },
};
This would make your blade 50% as bright.
FASTLEDBladePtr 🔗
FASTLEDBladePtr is EXPERIMENTAL, that means that it probably doesn't work. In theory, it can be used to drive dotstar blades though. If you need help using it just let me know. If it turns out to be useful, I will write better documentation for it. :)
LED Channel Selection 🔗
If you have read the LED Configuration page, you know how ProffieOS activates channels based on colors. However, what is perhaps less obvious is how to use that in practice.
Let's start with the obvious case, an RGB three-cree star, using the recommended resistors:
SimpleBladePtr<CreeXPE2RedTemplate<550>, CreeXPE2GreenTemplate<0>, CreeXPE2BlueTemplate<240>, NoLED>()
In this case, the mapping between color and what channels are turned on is pretty obvious: Red colors turns on the red LED, green colors turn on the green LED and blue colors turn on the blue LED. But what if we replace the red led with an amber one?
Now, we have two choices, the first one is fairly obvious:
SimpleBladePtr<CreeXPE2AmberTemplate<420>, CreeXPE2GreenTemplate<0>, CreeXPE2BlueTemplate<240>, NoLED>()
However, the mapping between colors and channels now get more complicated. Green and blue works the way you would expect, but red won't turn on anything. The amber LED struct defines it's color as:
static const int Red = 255; static const int Green = 128; static const int Blue = 0;
Going back to the LED configuration page, we can figure out that we would need to use a color like Rgb<255,128,0> to activate the amber LED. However, that color will also activate the green LED with 50% power, which might not be what we want.
However, there is another option: We can redefine what RGB means. To do that, we'll need to copy the amber LED struct into our config file and change it to:
template<int milliohms = 420>
struct MyCreeXPE2PCAmberTemplate {
  static constexpr float MaxAmps = 1.0;
  static constexpr float MaxVolts = 3.28;
  static constexpr float P2Amps = 0.35;
  static constexpr float P2Volts = 3.05;
  static constexpr float R = milliohms / 1000.0;
  static const int Red = 255;
  static const int Green = 0;  // This is the only thing that was changed
  static const int Blue = 0;
};
The we can use it:
SimpleBladePtr<MyCreeXPE2AmberTemplate<420>, CreeXPE2GreenTemplate<0>, CreeXPE2BlueTemplate<240>, NoLED>()
Now we're back at a state where the red activates the first channel, even though it's not really red. So Rgb<255,0,0> now means amber, not red. Green and Blue still work as normal. Other colors will also become funky, because Purple will now activate amber and blue, and yellow will activate amber and green. Not sure exactly what these colors will look like, but they won't be purple and yellow.
This trick can be applied to any of the channels. Note that this trick will not really work properly if you have four different LEDs on your star, and you want to control all of them. RGB only has three values in it after all.
LED Configuration 🔗
When using SimpleBladePtr<> or StringBladePtr<> in your blade array, you have to provide a led configuration class. That class specifies the color and electrical properties of the LED. If the color returned by the style matches the color specified in the led configuration, the LED will be activated. If the current battery voltage is higher than what is specified in the electrical properties, the LED brightness will be reduced to avoid overheating the LED.
Example LED configuration class 🔗
struct MyBlueLED {
  static constexpr float MaxAmps = 1.0;
  static constexpr float MaxVolts = 3.15;
  static constexpr float P2Amps = 0.7;
  static constexpr float P2Volts = 3.05;
  static constexpr float R = 0.55;
  // LED color
  static const int Red = 0;
  static const int Green = 0;
  static const int Blue = 255;
};
MaxAmps should be the maximum current that the LED allows. In this case, 1.0A. MaxVolts is the forward voltage at which you get the maximum number of amps. In this case 3.15 volts. "P2" stands for "second point", and P2Amps/P2Volts specifies another point on the amp/volt curve. In the case above, it says that at 3.05 volt, the LED will draw 0.7 Amps.
Generally, MaxAmps can be found in the data sheet for the LED. And while you can also get the other values from the data sheet, it is preferable to measure them, as the forward voltages can vary from led to led and a small amount of difference in voltage can mean a fairly large difference in current.
The "R" value, specifies what resistor is hooked up in series with the LED. In this case 0.55 ohms.
Finally, the Red, Green and Blue values specifies the color of the LED.
Color Activation 🔗
ProffieOS uses a simple formula to determine how much a LED should be turned on given a particular color from style associated with that LED. The formula is:
activation = 255;
if (LED.Red) activation = min(activation, color_from_style.red * 255 / LED.Red);
if (LED.Green) activation = min(activation, color_from_style.green * 255 / LED.Green);
if (LED.Blue) activation = min(activation, color_from_style.blue * 255 / LED.Blue);
This essentially means that for the blue led in our example, only the blue part of the RGB color is considered when deciding how much the LED should be activated. This also means that Cyan, Purple and White will also activate the Blue LED, which is usually what we want. A LED specified as being White, will only be activated when for White colors. For a color like {10, 20, 30}, the min() means that a white LED will have it's activation set to 10 (out of 255). For an RGB star, three LED definitions are used, and the activation for each channel is calculated separately according to the above formula.
This formula is not well suited for color accuracy. A matrix multiplication could be used instead to get proper color accuracy and account for the fact "blue" can mean different things for different LEDs. While this formula does not provide that type of color accuracy, it is much simpler and generally chooses the brightest possible value, which I think is more suitable for a lightsaber.
Using SUBTRACT 🔗
One problem with the activation formula above is that if you have a Blue/Blue/White LED, there is no way to get a pure white color, because the Blue LEDs will also be activated. To remedy this, we can introduce subtraction into the activation formula. To do that we place the following in the blue LED struct:
typedef MyWhiteLED SUBTRACT; // MyWhiteLED is the name of the led struct used for the white LED
When you do this, ProffieOS will calculate the activation as shown above, then calculate the activation based on the white color and subtract that, sort of like:
activation = CalculateActivation(MyBlueLED) - CalculateActivation(MyWhiteLED)
With this setup, the blue led will turn on for blue colors, but turn off for white colors. This can also be used as a power-saving feature for RGBW stars to make it so that only the white die is used for white colors. Otherwise all of the dies will turn on for white colors. Here is how you would do that:
struct MyWhiteLED : public CreeXPE2WhiteTemplate<550> {};
struct MyRedLED : public CreeXPE2RedTemplate<1000> { typedef MyWhiteLED SUBTRACT; };
struct MyGreenLED : public CreeXPE2GreenTemplate<0> { typedef MyWhiteLED SUBTRACT; };
struct MyBlueLED : public CreeXPE2BlueTemplate<240> { typedef MyWhiteLED SUBTRACT; };

BladeConfig blades[] = {
  { 0,  SimpleBladePtr<MyRedLED, MyBlueLED, MyGreenLED, MyWhiteLED,
                       bladePowerPin1, bladePowerPin2, bladePowerPin3, bladePowerPin4>(),
    CONFIGARRAY(presets) }
};
Note the use of "struct SOMETHING : public SOMETHING_ELSE { .... }" this creates a new struct, but copies the content of SOMETHING_ELSE into it. If you decide to use the snipped above in your config file, please make sure to adjust the resistors to the values you are actually using.
Overheat protection 🔗
ProffieOS will use MaxAmps, MaxVolts, P2Amps, P2Volts and R to estimate the current flowing through the LED, based on the current battery voltage. This is done using a fairly simplistic affine model of the LED. Basically, imagine that you draw a current/voltage graph for the LED, locate the MaxAmps/MaxVolts and P2Amps/P2Volts points and draw a straight line through them. Based on this line, and R, the current can be estimated. If the estimated current comes out to be 20% higher than what is recommended for the LED, the activation value calculated above will be reduced by 20% to compensate. This works well enough that resistors are not always required to drive LEDs using ProffieOS, however, it may reduce the life span of the LED.
Stated differently, if the above algorithm shows that the led would end up using more power than the LED struct specifies, the PWM ratio (the fraction of time that the FET is ON for each 800Hz cycle) is adjusted downwards to try to protect the LED.
Note that if any of the values are not specified correctly, the LED may dim because ProffieOS thinks the LED is going to overheat. Or, overheat-protection might not work. If you don't want the overheat protection, because it is too difficult to configure, just specify a very high R and MaxVolts values and ProffieOS will always assume the LED will be fine.
Templated LED configuration 🔗
Many popular LEDs already have LED configuration structs in blades/leds.h. Since people have their own preferences for what resistors to use, they are generally specified as templates, which lets you specify what resistor you actually used as a parameter in milliohms. (Unfortunately, specifying it in Ohms was not an option as templates cannot handle floating-point values.) For example, using CreeXPE2PCAmberTemplate<240> specifies that you have a CREE XP-E2 amber LED, and you have it hooked up in series with a 0.24 ohm resistor.
Implications 🔗
- If you specify the wrong led struct, or the wrong resistor, the above doesn't work the way it should.
- If you tell ProffieOS that you have less resistance than you really have, ProffieOS will dim the LED when it shouldn't.
- If you don't need or want overheat-protection (perhaps because your resistors take care of that part) then you can disable it by putting in a large resistor value, like for instance 100000.
Calculating resistor values 🔗
Calculating resistor values for LEDs is very simple. I could give you the formula, but why bother when there are simple calculators available online.
Adding/Modifying LED structs 🔗
While you are welcome to add your own LED configuration structs to blades/leds.h, I recommend putting them in your config file instead, right before the blades[] array. That way, you won't have to remember to copy them over when you update to a new version of ProffieOS.
ServoBladePtr 🔗
ServoBladePtr takes 2 arguments, but usually you only have to specify one.
    ServoBladePtr<PIN>()
// or
    ServoBladePtr<PIN, SELECTOR>()
The PIN argument is required and specifies which pin to use for the servo signal. Servo control signals are basic PWM signals at 50 hz. This is similar to SimpleBladePtr, except SimpleBladePtr uses 813 hz. The selector works similar to LED structs, but you probably don't need to mess with that for servos.
SimpleBladePtr 🔗
SimpleBladePtr takes 8 arguments, 4 of which are required:
SimpleBladePtr<LED1, LED2, LED3, LED4, pin1, pin2, pin3, pin4>
The first four are class names which specifies how to drive the LEDs, the last four are the pins for those leds. The pins defaults to bladePowerPin1, bladePowerPin2, bladePowerPin3 and bladePin, respectively.
You can read more about how to configure the led classes on the Led Configuration page.
SpiBladePtr 🔗
SpiBladePtr can have up to 10 arguments, but only the first three are required.
SpiBladePtr<leds, data_pin, clock_pin, byte_order, power_pins, max_frequency, pin_class, power_off_delay>
- leds - number of leds in this pixel string, must be less or equal to maxLedsPerSrtring
- data_pin - pin to output SPI data
- clock_pin - pin to output SPI clock
- byte_order - specifies in which orders the colors are sent to the pixels
- power_pins - which pads powers the string, defaults to PowerPINS<bladePowerPin1, bladePowerPin2, bladePowerPin3>
- max_frequency - maximum data rate, defaults to 800000
- pin_class - This is the driver class, defaults to SpiLedPin
- power_off_delay - milliseconds before turning off the power
data_pin and clock_pin is normally one of:
bladePin
blade2Pin
blade3Pin
blade4Pin
blade5Pin
blade6Pin
blade7Pin
Other pins may or may not work depending on what board and driver is being used.
byte_order depends on what kind of pixel strip is used, these values are possible:
Color8::BGR
Color8::BRG
Color8::GBR
Color8::GRB
Color8::RBG
Color8::RGB
Color8::BGRW
Color8::BRGW
Color8::GBRW
Color8::GRBW
Color8::RBGW
Color8::RGBW
Color8::WBGR
Color8::WBRG
Color8::WGBR
Color8::WGRB
Color8::WRBG
Color8::WRGB
Color8::BGRw
Color8::BRGw
Color8::GBRw
Color8::GRBw
Color8::RBGw
Color8::RGBw
Color8::wBGR
Color8::wBRG
Color8::wGBR
Color8::wGRB
Color8::wRBG
Color8::wRGB
By far the most common byte order is GRB, but some pixel strips use RGB byte order. The four-letter byte orders are used for RGBW strips, the most common of those are GRBW and RGBW. The byte orders will capitol W will use both RGB AND W for white colors, while byte orders will lower-case w will only turn on the white LED for white colors. Thus RGBw is more power efficient than RGBW, but not as bright.
StringBladePtr 🔗
StringBladePtr is meant for old-style segmented blades and take 3 arguments, but only one is required:
StringBladePtr<LED, clash_pin, clash_led>
- LED - led struct for the segments (see LED configuration)
- clash_pin - pin that drives the clash string, if present, defaults to -1 (no clash string)
- clash_led - led struct for the clash string (see LED configuration) defaults to NoLED
SubBlade 🔗
SubBlade is used to split a string of pixels into multiple blades which can have their own styles. It takes three arguments:
SubBlade(first_led, last_led, blade_definition)
Note the use of () instead of <>, as SubBlade is a regular function, not a template. If blade_definition is NULL, SubBlade() will use the blade definition from the previous call to SubBlade(). Since you can't have two blade definitions for the same string, you must use NULL to make multiple SubBlades refer to the same string of pixels.
Let's say we have a string that has one accent LED, one 8-pixel battery indicator and then a 100-LED blade. The blades[] array could then look something like this:
SubBlade(9, 108, WS281XBlade<109, bladePin, Color8::GRB, PowerPINS<bladePowerPin2, bladePowerPin3>>()),
SubBlade(1, 8, NULL),
SubBlade(0, 0, NULL),
Note that the first LED in the string is counted as zero, so there's always a -1 offset to your numbers to the actual pixels as you'd count them. Also, The code doesn't really know what the "main blade" is. They do not need to be in sequential order either. The first style simply matches up with the first blade in the blades[] array, second style matches the second blade in the blades[] array, etc.
Some more clarification and example:
The data travels in series, one direction starting from the board, usually through accents and crystal chambers, and lastly the main blade.
This is why it's important to wire your LED strips following the arrows' direction.
For a blade with 130 pixels, the first_led is 0, the last_led is 129.
For a "blade" with 5 pixels (such as a NPXL hilt PCB connector), the first_led is 0, the last_led is 4.
Below we have a total of 135 pixels.
The first SubBlade is for the main blade which has 134 pixels. It starts at 1 and ends at 134.
The second SubBlade is for the accent led / crystal chamber which has 1 pixel. It starts and ends at 0.
They both use bladePin (data pad 1) and run in series. Power (-) for all pixels in series uses bladePowerPin2 and bladePowerPin3 (LED2 and LED3 pads, usually bridged).
BladeConfig blades[] = {
  { 0,
    SubBlade(1, 134, WS281XBladePtr<135, bladePin, Color8::GRB, PowerPINS<bladePowerPin2, bladePowerPin3>>()),
    SubBlade(0, 0, NULL),
    CONFIGARRAY(presets),
  }
};
See also: SubBladeZZ, SubBladeReverse, SubBladeWithStride, SubBladeWithList
SubBladeReverse 🔗
SubBladeReverse is works exactly like SubBlade, except, that the pixels in the indexed range are addressed in reverse order. This can be useful to create zig-zag blades, where the data travels up one strip, than DOWN the other one. Such a blade lets you address all the pixels individually without needing more data lines.
Example, if you have a 100-pixel zig-zag blade:
SubBlade(0, 99, WS281XBladePtr<200, bladePtr, Color8::GRB>()),
SubBladeReverse(100, 199, NULL)
Note that you'll need to increase maxLedsPerString to 200. Also, the first LED in the string is counted as zero, so there's always a -1 offset to your numbers to the actual pixels as you'd count them.
See also: SubBlade, SubBladeWithStride, SubBladeZZ, SubBladeWithList
SubBladeWithList 🔗
ProffieOS has several subblade variants, for different arrangement of pixels. But if your pixel arrangement doesn't match any of those, then you should use SubBladeWithList, as it lets you specify exactly which pixels are a part of the subblade, and in any order.
SubBladeWithList example: 🔗
SubBladeWithList<0,10,1,9>(blade_definition)
This will create a blade out of the first, 11th, 2nd and 10th pixel, in that order.
See also: SubBlade, SubBladeReverse, SubBladeZZ, SubBladeWithStride
SubBladeWithStride 🔗
SubBladeWithStride lets you interleave multiple SubBlades. Basically, it lets you make a blade out of every other pixel along the blade (or whatever interval you set). It's mostly intended for using with the KR "Pixel Stick" blades which have 264 pixels wired in series, alternating between the top and bottom side. By using SubBladeWithStride, you can make each side behave as it's own blade. This alleviates the issue of animations rendering slower than intended due to the extra distance the blade presents within the same overall length. Blade styles that have something like fire or stripes that move along the blade will appear slow travelling along 264 pixels. So instead of editing every single argument that pertains to speed throughout the presets, we can make the blade appear as standard back-to-back 132 pixel strips by using SubBladeWithStride, and use blade styles as they are written for standard blades.
SubBladeWithStride usage 🔗
Same as SubBlade, but with an additional argument of stride length is added like this:
SubBladeWithStride(first_led, last_led, stride_length, blade_definition)
So to split the 264 pixel strip into 2 x 132 pixel blades, we would do this :
BladeConfig blades[] = {
  { 0,
    SubBladeWithStride (0, 262, 2, WS281XBladePtr<264, bladePin, Color8::GRB, PowerPINS<bladePowerPin2, bladePowerPin3> >() ),
    SubBladeWithStride (1, 263, 2, NULL),
    CONFIGARRAY(presets),
  }
};
See also: SubBlade, SubBladeReverse, SubBladeZZ, SubBladeWithList
SubBladeZZ 🔗
SubBladeZZ is similar to SubBladeWithStride, but each row changes direction. This is useful when pixels are arranged in some sort of grid, and the data signal goes up, down, up, down or left, right, left, right. SubBladeZZ was added in ProffieOS 7.x.
The usage is similar to SubBladeWithStride, but adds a "column" parameter, because you can't just adjust "first_led" to select which column you want.
SubBladeZZ(first_led, last_led, stride, column, blade_definition)
So, if we have a grid of 3x5 leds, where data is going left, then right, alternatenating for each column. Our blade definition might look something like:
BladeConfig blades[] = {
  { 0,
    SubBladeZZ(0, 14, 3, 0, WS281XBladePtr<15, bladePin, Color8::GRB, PowerPINS<bladePowerPin6> >() ),
    SubBladeZZ(0, 14, 3, 1, NULL),
    SubBladeZZ(0, 14, 3, 2, NULL)
    CONFIGARRAY(presets),
  }
};
Now we have one blade for each column in the grid.
See also: SubBlade, SubBladeReverse, SubBladeWithStride, SubBladeWithList
WS2811BladePtr 🔗
WS2811BladePtr is an older version of WS281XBladePtr. I recommend using WS281XBladePtr instead this documentation can be helpful to understand older config files though.
WS2811BladePtr takes 7 arguments, but only two are actually required.
WS2811BladePtr<leds, config, data_pin, power_pins, pin_class, reset_us, t1h, t0h>
All the arguments except for "config" behave the same as in WS281XBladePtr.
The config specifies both the byte order and the frequency. The byte order is one of:
WS2811_RGB
WS2811_RBG
WS2811_GRB
WS2811_GBR
If no byte order, it defaults to RGB, which is probably not what you want. The frequency is one of:
WS2811_800kHz
WS2811_400kHz
WS2813_800kHz
WS2811_580kHz
WS2811_ACTUALLY_800kHz
Note that the 800kHz ones actually use 740kHz. And the WS2811 and WS2813 ones are identical since all of them use a timeout of 300us.
The frequency and byte order are combined by using the | operator, like this:
WS2811_800kHz | WS2811_GRB
WS281XBladePtr 🔗
WS281XBladePtr can have up to 10 arguments, but only the first three are required.
WS281XBladePtr<leds, data_pin, byteorder, power_pins, pin_class, frequency, reset_us, t1h, t0h>
- leds - number of leds in this pixel string, must be less or equal to maxLedsPerSrtring
- data_pin - pin to output ws281x data
- byte_order - specifies in which orders the colors are sent to the pixels
- power_pins - which pads powers the string, defaults to PowerPINS<bladePowerPin1, bladePowerPin2, bladePowerPin3>
- pin_class - This is the driver class, defaults to DefaultPinClass
- frequency - data rate, defaults to 800000
- reset_us - how many us is needed to reset the pixels, defaults to 300
- t1h - how long to keep the signal high for a 1, note that this is is always out of 1200, even if the frequency changes, defaults to 394
- t0h - how long to keep the signal high for a 0, defaults to 894
data_pin is normally one of:
bladePin
blade2Pin
blade3Pin
blade4Pin
blade5Pin
blade6Pin
blade7Pin
Other pins may or may not work depending on what board and driver is being used.
byte_order depends on what kind of pixel strip is used, these values are possible:
Color8::BGR
Color8::BRG
Color8::GBR
Color8::GRB
Color8::RBG
Color8::RGB
Color8::BGRW
Color8::BRGW
Color8::GBRW
Color8::GRBW
Color8::RBGW
Color8::RGBW
Color8::WBGR
Color8::WBRG
Color8::WGBR
Color8::WGRB
Color8::WRBG
Color8::WRGB
Color8::BGRw
Color8::BRGw
Color8::GBRw
Color8::GRBw
Color8::RBGw
Color8::RGBw
Color8::wBGR
Color8::wBRG
Color8::wGBR
Color8::wGRB
Color8::wRBG
Color8::wRGB
By far the most common byte order is GRB, but some pixel strips use RGB byte order. The four-letter byte orders are used for RGBW strips, the most common of those are GRBW and RGBW. The byte orders with a capital W will use both RGB AND W LEDs for white colors, while byte orders with lower-case w will turn on only the white LEDs for white colors. Thus RGBw is more power efficient than RGBW, but not as bright.
Most of the time it does not make sense to change the pin_class, but if you have a Teensy, and you have problems with glitches, you might want to try the serial pixel driver by setting pin_class to WS2811SerialPin. You'll also need to use a data pin that is serial-capable, which may mean that you can't use the serial port for something else. Note that WS2811SerialPin ignores t0h and t1h.
It's unlikely that you will need to change any of the last four parameters, the timing is suitable for almost all types of WS2811-compatible pixels.
Config, functions 🔗
AltF 🔗
Usage 🔗
AltF
Arguments 🔗
- return value: INTEGER
Description 🔗
Returns current_alternative for use in ColorSelect<>, TrSelect<> or IntSelect<>
See Also 🔗
SyncAltToVarianceF, SyncAltToVarianceL, ColorSelect, TrSelect, IntSelect
Source Link 🔗
AnalogReadPinF 🔗
Usage 🔗
AnalogReadPinF<PIN>
AnalogReadPinF<PIN, PIN_MODE>
Arguments 🔗
- PIN: int, pin you want your style to respond to
- PIN_MODE: int, one of INPUT, INPUT_PULLUP or INPUT_PULLDOWN, defaults to INPUT
Description 🔗
returns INTEGER, 0-32768 depending on input reading. Notes:
- May cause slowdowns
- may not update every run() call
- pin modes other than INPUT may not be supported,
- Only analog-capable pins will work.
See Also 🔗
Source Link 🔗
BatteryLevel 🔗
Usage 🔗
BatteryLevel
Arguments 🔗
No arguments
Description 🔗
Returns 0-32768 based on battery level. returned value: INTEGER
Source Link 🔗
BladeAngleX 🔗
Usage 🔗
BladeAngleX<MIN, MAX>
Arguments 🔗
- MIN : FUNCTION (defaults to Int<0>)
- MAX : FUNCTION (defaults to Int<32768>)
- Returns: 0-32768 based on angle of blade
Description 🔗
MIN and MAX specifies the range of angles which are used. For MIN and MAX 0 means down and 32768 means up and 16384 means pointing towards the horizon. So if MIN=16484 and MAX=32768, BladeAngle will return zero when you point the blade towards the horizon and 32768 when you point it straight up. Any angle below the horizon will also return zero. returned value: FUNCTION, same for all LEDs.
Source Link 🔗
BlastF 🔗
Usage 🔗
BlastF<FADEOUT_MS, WAVE_SIZE, WAVE_MS, EFFECT>
Arguments 🔗
- FADOUT_MS: a number (defaults to 200)
- WAVE_SIZE: a number (defaults to 100)
- WAVE_MS: a number (defaults to 400)
- EFFECT: a BladeEffectType (defaults to EFFECT_BLAST)
- returned value: FUNCTION
Description 🔗
This function is intended to be used in a Mix<> or AlphaL<> When a blast occurs, it makes a wave starting at the blast location (which is currently random) and travels out from that direction. At the peak, this function returns 32768 and when there is no blast it returns zero. The FADOUT_MS controls how long it takes the wave to fade out. The WAVE_SIZE controls the width of the wave. The WAVE_MS parameter controls the speed of the waves. EFFECT can be used to trigger this effect by something other than a blast effect.
See Also 🔗
BlastFadeoutF, OriginalBlastF, Mix, AlphaL
Source Link 🔗
BlastFadeoutF 🔗
Usage 🔗
BlastFadeoutF<FADEOUT_MS, EFFECT>
Arguments 🔗
- FADEOUT_MS: a number (defaults to 250)
- EFFECT: a BladeEffectType (defaults to EFFECT_BLAST)
- return value: FUNCTION
Description 🔗
NOrmally returns 0, but returns up to 32768 when the selected effect occurs. Then if fades back to zero over FADEOUT_MS milliseconds.
See Also 🔗
Source Link 🔗
BlasterCharge 🔗
Usage 🔗
BlasterCharge
Arguments 🔗
No arguments
Description 🔗
Return 0-32768 based on the fullness of the clip / magazine. Will cause compilation error if your prop doesn't have bullets. You must define BLASTER_SHOTS_UNTIL_EMPTY for this to be available. Recommended to be used as the EXTENSION argument to InOutHelperL.
See Also 🔗
Source Link 🔗
BlasterModeF 🔗
Usage 🔗
BlasterModeF
Arguments 🔗
- Returns the current blaster mode as an integer:
Description 🔗
0 for MODE_STUN, 1 for MODE_KILL, 2 for MODE_AUTO This function should only be used when BLASTER_SHOTS_UNTIL_EMPTY is defined, indicating that the current prop is a Blaster. Example usage in a style for Blue Stun, Red Kill, and Green Auto: StylePtr<ColorSelect<BlasterModeF, TrInstant, Blue, Red, Green>>()
See Also 🔗
StylePtr, ColorSelect, TrInstant
Source Link 🔗
BlinkingF 🔗
Usage 🔗
BlinkingF<A, B, BLINK_MILLIS_FUNC, BLINK_PROMILLE_FUNC>
Arguments 🔗
- BLINK_MILLIS: a number
- BLINK_PROMILLE: a number, defaults to 500
- BLINK_MILLIS_FUNC: FUNCTION
- BLINK_PROMILLE_FUNC: FUNCTION
- return value: FUNCTION
Description 🔗
Switches between 0 and 32768 A full cycle from 0 to 328768 and back again takes BLINK_MILLIS milliseconds. If BLINK_PROMILLE is 500, we select A for the first half and B for the second half. If BLINK_PROMILLE is smaller, we get less A and more B. If BLINK_PROMILLE is 0, we get all 0. If BLINK_PROMILLE is 1000 we get all 32768.
See Also 🔗
Source Link 🔗
BrownNoiseF 🔗
Usage 🔗
BrownNoiseF<GRADE>
Arguments 🔗
- return value: FUNCTION
Description 🔗
Returns a value between 0 and 32768 with nearby pixels being similar. GRADE controls how similar nearby pixels are.
See Also 🔗
Source Link 🔗
BulletCount 🔗
Usage 🔗
BulletCount
Arguments 🔗
No arguments
Description 🔗
Return 0-N (number of bullets in the magazine.) Will cause compilation error if your prop doesn't have bullets. You must define BLASTER_SHOTS_UNTIL_EMPTY for this to be available.
See Also 🔗
Source Link 🔗
Bump 🔗
Usage 🔗
Bump<BUMP_POSITION, BUMP_WIDTH_FRACTION>
Arguments 🔗
- BUMP_POSITION, BUMP_WIDTH_FRACTION: INTEGER
Description 🔗
Returns different values for each LED, forming a bump shape. If BUMP_POSITION is 0, bump will be at the hilt. If BUMP_POSITION is 32768, the bump will be at the tip. If BUMP_WIDTH_FRACTION is 1, bump will be extremely narrow. If BUMP_WIDTH_FRACTION is 32768, it will fill up most/all of the blade.
See Also 🔗
Source Link 🔗
CenterDistF 🔗
Usage 🔗
CenterDistF<CENTER>
Arguments 🔗
- CENTER : FUNCTION (defaults to Int<16384>)
Description 🔗
Returns distance from center, a full blade length counts as 32768.
Source Link 🔗
ChangeSlowly 🔗
Usage 🔗
ChangeSlowly<F, SPEED>
Arguments 🔗
- F, SPEED: FUNCTION
- return value: FUNCTION, same for all LEDs
Description 🔗
Changes F by no more than SPEED values per second.
Source Link 🔗
CircularSectionF 🔗
Usage 🔗
CircularSectionF<POSITION, FRACTION>
Arguments 🔗
- POSITION: FUNCTION position on the circle or blade, 0-32768
- FRACTION: FUNCTION how much of the blade to light up, 0 = none, 32768 = all of it
- return value: FUNCTION
Description 🔗
Returns 32768 for LEDs near the position with wrap-around. Could be used with MarbleF<> for a marble effect, or with Saw<> for a spinning/colorcycle type effect. Example: If POSITION = 0 and FRACTION = 16384, then this function will return 32768 for the first 25% and the last 25% of the blade and 0 for the rest of the LEDs.
See Also 🔗
Source Link 🔗
ClampF 🔗
Usage 🔗
ClampF<F, MIN, MAX>
   ClampFX<F, MINCLASS, MAXCLASS>
Arguments 🔗
- F, MIN, MAX: INTEGER
- MINCLASS, MAXCLASS: FUNCTION
- return value: INTEGER
Description 🔗
Clamps value between MIN and MAX
See Also 🔗
Source Link 🔗
ClashImpactFX 🔗
Usage 🔗
ClashImpactFX<MIN, MAX>
Arguments 🔗
- MIN: minimum value Clash is detected (recommended range 0 ~ 500, default is 200)
- MAX: maximum impact to return 32768 (recommended range 1000 ~ 1600, default is 1600)
- returned value: INTEGER
Description 🔗
Returns 0-32768 based on impact strength of clash
Source Link 🔗
Divide 🔗
Usage 🔗
Divide<F, V>
Arguments 🔗
- F, V: FUNCTION,
- return value: FUNCTION
Description 🔗
Divide F by V If V = 0, returns 0 Please note that Divide<> isn't an exact inverse of Mult<> because mult uses fixed-point mathematics (it divides the result by 32768) while Divide<> doesn't, it just returns F / V
See Also 🔗
Source Link 🔗
EffectIncrementF 🔗
Usage 🔗
EffectIncrementF<EFFECT, MAX, I>
Arguments 🔗
- I, MAX: FUNCTION
- return value: FUNCTION
Description 🔗
Increases by value I (up to MAX) each time EFFECT is triggered If current value + I = MAX, it returns 0. If adding I exceeds MAX, the function returns 0 + any remainder in excesss of MAX
See Also 🔗
EffectPulse, LockupPulseF, IncrementWithReset, IncrementModulo, ThresholdPulseF, IncrementF
Source Link 🔗
EffectPosition 🔗
Usage 🔗
EffectPosition<>
EffectPosition<EFFECT>
Arguments 🔗
- EFFECT: effect type
- return value: INTEGER
Description 🔗
EffectPosition returns the position of a particular effect. 0 = base, 32768 = tip. For now, this location is random, but may be set explicitly in the future. When used as EffectPosition<> inside a TransitionEffectL whose EFFECT is already specified, then it will automatically use the right effect.
See Also 🔗
Source Link 🔗
EffectPulse 🔗
Usage 🔗
EffectPulse<EFFECT>
Arguments 🔗
- EFFECT: BladeEffectType
Description 🔗
Returns 32768 once for each time the given effect occurs.
See Also 🔗
LockupPulseF, IncrementWithReset, EffectIncrementF, IncrementModulo, ThresholdPulseF, IncrementF
Source Link 🔗
EffectRandomF 🔗
Usage 🔗
EffectRandomF<EFFECT>
Arguments 🔗
- EFFECT: BladeEffectType
- return value: INTEGER
Description 🔗
Returns a random value between 0 and 32768 each time EVENT is triggered
See Also 🔗
Source Link 🔗
HoldPeakF 🔗
Usage 🔗
HoldPeakF<F, HOLD_MILLIS, SPEED>
Arguments 🔗
- F, HOLD_MILLIS and SPEED: FUNCTION
- return value: FUNCTION, same for all LEDs
Description 🔗
Holds Peak value of F for HOLD_MILLIS. then transitions down over SPEED to current F
Source Link 🔗
HumpFlickerFX 🔗
Usage 🔗
HumpFlickerFX<FUNCTION>
HumpFlickerF<N>
Arguments 🔗
- FUNCTION: FUNCTION
- N: NUMBER
- return value: INTEGER
Description 🔗
Creates hump shapes that randomize over the blade. The returned INTEGER is the size of the humps. Large values can give the blade a shimmering look, while small values look more like speckles.
See Also 🔗
Source Link 🔗
Ifon 🔗
Usage 🔗
Ifon<A, B>
Arguments 🔗
- A, B: INTEGER
- return value: FUNCTION
Description 🔗
Returns A if saber is on, B otherwise.
See Also 🔗
Source Link 🔗
InOutFunc 🔗
Usage 🔗
InOutFunc<OUT_MILLIS, IN_MILLIS>
Arguments 🔗
- IN_MILLIS, OUT_MILLIS: a number
- RETURN VALUE: FUNCTION
Description 🔗
0 when off, 32768 when on, takes OUT_MILLIS to go from 0 to 32768 takes IN_MILLIS to go from 32768 to 0.
See Also 🔗
Source Link 🔗
IncrementF 🔗
Usage 🔗
IncrementF<F, V, MAX, I, HYST_PERCENT>
Arguments 🔗
- F, V, I, MAX: FUNCTION
- HYST_PERCENT: FUNCTION percent (defaults to 66)
- return value: FUNCTION
Description 🔗
Increases by value I (up to MAX) each time F >= V Detection resets once F drops below V * HYST_PERCENT if greater than MAX returns 0
See Also 🔗
IncrementModulo, ThresholdPulseF
Source Link 🔗
IncrementModulo 🔗
Usage 🔗
IncrementModulo<PULSE, MAX, INCREMENT>
Arguments 🔗
- PULSE: FUNCTION (pulse type)
- MAX: FUNCTION (not zero) defaults to Int<32768>
- INCREMENT: FUNCTION defaults to Int<1>
Description 🔗
Increments by INCREMENT each time PULSE occurs,
wraps around when it reaches MAX.
See Also 🔗
Source Link 🔗
IncrementWithReset 🔗
Usage 🔗
IncrementWithReset<PULSE, RESET_PULSE, MAX, I>
Arguments 🔗
- PULSE: FUNCTION (pulse type)
- RESET_PULSE: FUNCTION (pulse type) defaults to Int<0> (no reset)
- MAX, I: FUNCTION
Description 🔗
Starts at zero, increments by I each time the PULSE occurs. If it reaches MAX it stays there. Resets back to zero when RESET_PULSE occurs.
See Also 🔗
EffectPulse, LockupPulseF, EffectIncrementF, IncrementModulo, ThresholdPulseF, IncrementF
Source Link 🔗
Int 🔗
Usage 🔗
Int<N>
Arguments 🔗
- N: a number
- return value: INTEGER
Description 🔗
Returns N
Source Link 🔗
IntSelect 🔗
Usage 🔗
IntSelect<SELECTION, Int1, Int2...>
Arguments 🔗
- SELECTION: FUNCTION
- N: numbers
- return value: INTEGER
Description 🔗
Returns SELECTION of N If SELECTION is 0, the first integer is returned, if SELECTION is 1, the second and so forth.
See Also 🔗
Source Link 🔗
IntSelectX 🔗
Usage 🔗
IntSelectX<SELECTION, F1, F2, ...>
Arguments 🔗
- SELECTION: FUNCTION
Description 🔗
Returns SELECTION of N If SELECTION is 0, the first function is returned, if SELECTION is 1, the second and so forth. F1, F2...: FUNCITON return value: INTEGER
See Also 🔗
Source Link 🔗
IsBetween 🔗
Usage 🔗
IsBetween<F, BOTTOM, TOP>
Arguments 🔗
- F, BOTTOM, TOP: INTEGER
- return value: INTEGER
Description 🔗
Returns 0 or 32768 based F > BOTTOM and < TOP
Source Link 🔗
IsLessThan 🔗
Usage 🔗
IsLessThan<F, V>
Arguments 🔗
- F, V: FUNCTION
- return value: FUNCTION
Description 🔗
Returns 0 or 32768 based on V If F < V returns 32768, if F >= V returns 0
Source Link 🔗
LayerFunctions 🔗
Usage 🔗
LayerFunctions<F1, F2, ...>
Arguments 🔗
- F1, F2: FUNCTIONS
- return value: FUNCTION
Description 🔗
Returns (32768 - (32768 - F1) * (32768 * F2) / 32768) This is the same as 1-(1-F1)*(1-F2), but multiplied by 32768. Basically Mix<LayerFunctions<F1, F2>, A, B> is the same as Mix<F2, Mix<F1, A, B>, B>.
See Also 🔗
Source Link 🔗
LinearSectionF 🔗
Usage 🔗
LinearSectionF<POSITION, FRACTION>
Arguments 🔗
- POSITION: FUNCTION position on the blade, 0-32768
- FRACTION: FUNCTION how much of the blade to light up, 0 = none
- return value: FUNCTION
Description 🔗
creates a "block" of pixels at POSITION taking up FRACTION of blade
Source Link 🔗
LockupPulseF 🔗
Usage 🔗
LockupPulseF<LOCKUP_TYPE>
Arguments 🔗
- LOCKUP_TYPE: a SaberBase::LockupType
Description 🔗
Returns 32768 once for each time the given lockup occurs.
See Also 🔗
EffectPulse, IncrementWithReset, EffectIncrementF, IncrementModulo, ThresholdPulseF, IncrementF
Source Link 🔗
MarbleF 🔗
Usage 🔗
MarbleF<OFFSET, FRICTION, ACCELERATION, GRAVITY>
Arguments 🔗
- OFFSET: FUNCTION 0-32768, adjust until "down" represents is actually down
- FRICTION: FUNCTION, higher values makes the marble slow down, usually a constant
- ACCELERATION: FUNCTION, a function specifying how much speed to add to the marble
- GRAVITY: FUNCTION higher values makes the marble heavier
- return value: FUNCTION 0-32768, representing point on a circle
Description 🔗
This is intended for a small ring of neopixels. It runs a simulation of a marble trapped in a circular track and returns the position of that marble. Meant to be used with CircularSectionF to turn the marble position into a lighted up section.
See Also 🔗
Source Link 🔗
ModF 🔗
Usage 🔗
ModF<F, MAX>
Arguments 🔗
- F: FUNCTION
- MAX: FUNCTION (not zero)
Description 🔗
When F is greater than MAX, F wraps to 0 When F is less than 0, F wraps to MAX returns Integer
Source Link 🔗
Mult 🔗
Usage 🔗
Mult<F, V>
Arguments 🔗
- F, V: FUNCTION
- return value: FUNCTION
Description 🔗
Fixed point multiplication of values F * V, fixed point 16.15 arithmetic (32768 = 1.0) (22 would not result in 4), (16384 * 16384 = 8192, representation of 0.50.5=0.25) most blade functions use this method of fixed point calculations
See Also 🔗
Source Link 🔗
NoisySoundLevel 🔗
Usage 🔗
NoisySoundLevel
Arguments 🔗
No arguments
Description 🔗
Returns 0-32768 based on sound level. returned value: INTEGER
See Also 🔗
SmoothSoundLevel, NoisySoundLevelCompat
Source Link 🔗
NoisySoundLevelCompat 🔗
Usage 🔗
NoisySoundLevelCompat
Arguments 🔗
No arguments
Description 🔗
Returns 0-32768 based on sound level. This function is now used to implement the AudioFlicker<> style, don't change it. returned value: INTEGER
See Also 🔗
SmoothSoundLevel, NoisySoundLevel, AudioFlicker
Source Link 🔗
OnsparkF 🔗
Usage 🔗
OnsparkF<MILLIS>
Arguments 🔗
- MILLIS: FUNCTION (defaults to Int<200>)
- return value: FUNCTION
Description 🔗
When the blade turns on, this function starts returning 32768, then fades back to zero over MILLIS milliseconds. This is intended to be used with Mix<> or AlphaL<> to to create a flash of color or white when the blade ignites.
See Also 🔗
Source Link 🔗
OriginalBlastF 🔗
Usage 🔗
OriginalBlastF<EFFECT>
Arguments 🔗
- EFFECT: a BladeEffectType (defaults to EFFECT_BLAST)
- return value: FUNCTION
Description 🔗
Original blast function. Normally returns zero, but returns up to 32768 when the selected effect occurs.
See Also 🔗
Source Link 🔗
Percentage 🔗
Usage 🔗
Percentage<F, V>
Arguments 🔗
- F: FUNCTION
- V: INTEGER
- return value: FUNCTION
Description 🔗
Gets Percentage V of value F, Percentages over 100% are allowed and will effectively be a multiplier. example Percentage<Int<16384>,25> this will give you 25% of Int<16384> and returns Int<4096>
See Also 🔗
Source Link 🔗
RampF 🔗
Usage 🔗
RampF
Arguments 🔗
No arguments
Description 🔗
Returns 0 at base and 32768 at tip. Example: Mix<RampF, COLOR1, COLOR2, COLOR3> This would do the same thing as Gradient<COLOR1, COLOR2, COLOR3>
See Also 🔗
Source Link 🔗
RandomBlinkF 🔗
Usage 🔗
RandomBlinkF<MILLIHZ>
Arguments 🔗
- MILLHZ: FUNCTION
Description 🔗
Randomly returns either 0 or 32768 for each LED. The returned value is held, but changed to a new random value MILLIHZ * 1000 times per second.
Source Link 🔗
RandomF 🔗
Usage 🔗
RandomF
Arguments 🔗
- Return value: FUNCTION
Description 🔗
Returns a random number between 0 and 32768. All LEDS gets the same value.
See Also 🔗
Source Link 🔗
RandomPerLEDF 🔗
Usage 🔗
RandomPerLEDF
Arguments 🔗
- Return value: FUNCTION
Description 🔗
Returns a random number between 0 and 32768. Each LED gets a different random value.
See Also 🔗
Source Link 🔗
ReadPinF 🔗
Usage 🔗
ReadPinF<PIN>
ReadPinF<PIN, PIN_MODE>
Arguments 🔗
- PIN: int, pin you want your style to respond to
- PIN_MODE: int, one of INPUT, INPUT_PULLUP or INPUT_PULLDOWN, defaults to INPUT
Description 🔗
returns INTEGER, 0 if pin is low and 32768 if pin is high
See Also 🔗
Source Link 🔗
Scale 🔗
Usage 🔗
Scale<F, A, B>
Arguments 🔗
- F, A, B: FUNCTION
- return value: FUNCTION
Description 🔗
Changes values in range 0 - 32768 to A-B
See Also 🔗
Source Link 🔗
Sin 🔗
Usage 🔗
Sin<RPM, LOW, HIGH>
Arguments 🔗
- LOW: FUNCTION (defaults to Int<0>)
- HIGH: FUNCTION (defaults to Int<32768>)
- RPM: FUNCTION
- return value: FUNCTION
Description 🔗
pulses between LOW - HIGH RPM times per minute
Source Link 🔗
SliceF 🔗
Usage 🔗
SliceF<DENSITY_FUNCTION>
SliceF<DENSITY_FUNCTION, OFFSET>
Arguments 🔗
- DENSITY_FUNCTION: 3DF
- OFFSET: integer, defaults to 20
- return value: FUNCTION
Description 🔗
The DENSITY_FUNCTION is a 3-dimensional function, f(x, y, z) the SliceF function calculates the x/y/z coordinates based on the angle of the blade. For now, the only density functions available are SmokeDF and FastSmokeDF, which are basically the same thing. This is very similar to how the POV blade works, but instead of using a large data blob as input, it just uses another function as input.
Source Link 🔗
SlowNoise 🔗
Usage 🔗
SlowNoise<SPEED>
Arguments 🔗
- return value: FUNCTION
Description 🔗
Returns a value between 0 and 32768 which changes randomly up and down over time. All pixels gets the same value. SPEED controls how quickly the value changes.
See Also 🔗
Source Link 🔗
SmoothSoundLevel 🔗
Usage 🔗
SmoothSoundLevel
Arguments 🔗
No arguments
Description 🔗
Returns 0-32768 based on sound level. returned value: INTEGER
See Also 🔗
NoisySoundLevel, NoisySoundLevelCompat
Source Link 🔗
SmoothStep 🔗
Usage 🔗
SmoothStep<POS, WIDTH>
Arguments 🔗
- POS, WIDTH: FUNCTION
- return value: FUNCTION
- POS: specifies the middle of the smoothstep, 0 = base of blade, 32768=tip
- WIDTH: witdth of transition, 0 = no transition, 32768 = length of blade
- Example: SmoothStep<Int<16384>, Int<16384>> returns 0 up until 25% of the blade.
Description 🔗
From there it has a smooth transition to 32768, which will be reached at 75% of the blade. If WIDTH is negative, the transition will go the other way.
Source Link 🔗
SparkleF 🔗
Usage 🔗
SparkleF<SPARK_CHANCE_PROMILLE, SPARK_INTENSITY>
Arguments 🔗
- SPARK_CHANCE_PROMILLE: a number
- SPARK_INTENSITY: a number
Description 🔗
Source Link 🔗
StrobeF 🔗
Usage 🔗
StrobeF<STROBE_FREQUENCY, STROBE_MILLIS>
Arguments 🔗
- STROBE_FREQUENCY_FUNC, STROBE_MILLIS_FUNC: FUNCTION
- return value: INTEGER
Description 🔗
Stroboscope-like effect, turns the color to STROBE_COLOR for STROBE_MILLIS STROBE_FREQUENCY times per second.
See Also 🔗
Source Link 🔗
Subtract 🔗
Usage 🔗
Subtract<A, B>
Arguments 🔗
- A, B: FUNCTION
- return value: FUNCTION
Description 🔗
Subtracts B from A (A - B)
Source Link 🔗
Sum 🔗
Usage 🔗
Sum<A, B, ...>
Arguments 🔗
- A, B: FUNCTION
- return value: FUNCTION
Description 🔗
Adds A + B...
Source Link 🔗
SwingAcceleration 🔗
Usage 🔗
SwingAcceleration<MAX>
Arguments 🔗
- MAX: FUNCTION, defaults to 150
- returned value: FUNCTION
Description 🔗
Returns 0-32768 based on swing acceleration
See Also 🔗
Source Link 🔗
SwingSpeed 🔗
Usage 🔗
SwingSpeed<MAX>
Arguments 🔗
- MAX: FUNCTION
- returned value: FUNCTION
Description 🔗
Returns 0-32768 based on swing speed
See Also 🔗
Source Link 🔗
SyncAltToVarianceF 🔗
Usage 🔗
SyncAltToVarianceF
Arguments 🔗
- return value: INTEGER (always zero)
Description 🔗
Enables Bidirectional synchronization between ALT and VARIANCE. If variance changes, so does alt, if alt changes, so does variance.
See Also 🔗
Source Link 🔗
SyncAltToVarianceL 🔗
Usage 🔗
SyncAltToVarianceL
Arguments 🔗
- return value: LAYER (transparent)
Description 🔗
Synchronizes alt to variance, just put it somewhere in the layer stack. (but not first)
See Also 🔗
Source Link 🔗
ThresholdPulseF 🔗
Usage 🔗
ThresholdPulseF<F, THRESHOLD, HYST_PERCENT>
Arguments 🔗
- F: FUNCTION
- THRESHOLD: FUNCTION (defaults to Int<32768>)
- HYST_PERCENT: FUNCTION (defaults to Int<66>
Description 🔗
Returns 32768 once when F > THRESHOLD, then waits until F < THRESHOLD * HYST_PERCENT / 100 before going back to the initial state (waiting for F > THRESHOLD).
See Also 🔗
Source Link 🔗
TimeSinceEffect 🔗
Usage 🔗
TimeSinceEffect<>
TimeSinceEffect<EFFECT>
Arguments 🔗
- EFFECT: effect type
- return value: INTEGER
Description 🔗
TimeSinceEffect returns the number of milliseconds since a particular effect occured. When used as TimeSinceEffect<> inside a TransitionEffectL whose EFFECT is already specified, then it will automatically use the right effect.
See Also 🔗
Source Link 🔗
Trigger 🔗
Usage 🔗
Trigger<EFFECT, FADE_IN_MILLIS, SUSTAIN_MILLIS, FADE_OUT_MILLIS, DELAY>
Arguments 🔗
- EFFECT: BladeEffectType
- FADE_IN_MILLIS: INTEGER
- SUSTAIN_MILLIS: INTEGER
- FADE_OUT_MILLIS: INTEGER
- DELAY_MILLIS: INTEGER (defaults to Int<0>)
- return value: INTEGER
Description 🔗
Normally returns 0, but when EFFECT occurs, it ramps up to 32768, stays there for SUSTAIN_MILLIS, then fades down to zero again. If delay is specified, the whole thing is delayed that much before it starts.
Source Link 🔗
TwistAcceleration 🔗
Usage 🔗
TwistAcceleration<MAX>
Arguments 🔗
- MAX : Maximum acceleration needed to return 32768
- returned value: FUNCTION, same for all leds
Description 🔗
Returns 0-32768 based on acceleration of twist in one direction
See Also 🔗
Source Link 🔗
TwistAngle 🔗
Usage 🔗
TwistAngle<N, OFFSET>
Arguments 🔗
- OFFSET: Adjustable offset (0-32768) to make the twistangle values line up with how you hold the hilt.
- N : Number of times the values goes from 0 to 32768 and back per hilt revolution.
- returned value: FUNCTION, same for all leds
Description 🔗
Returns 0-32768 based on angle of twist
See Also 🔗
Source Link 🔗
Variation 🔗
Usage 🔗
Variation
Arguments 🔗
No arguments
Description 🔗
Returns 0-32768 based on current variation. returned value: FUNCTION Note that using Variation in your style means that the the automatic color rotation is turned off. The color wheel menu is unaffected, but the style is now responsible for actually changing the color. Note that if any blade styles are using ColorChange<>, the variation will return "ticked" values: 0, 1, 2, etc.
See Also 🔗
Source Link 🔗
VolumeLevel 🔗
Usage 🔗
VolumeLevel
Arguments 🔗
No arguments
Description 🔗
Returns 0-32768 based on volume level. returned value: INTEGER
Source Link 🔗
WavLen 🔗
Usage 🔗
WavLen<>
WavLen<EFFECT>
Arguments 🔗
- EFFECT: effect type
- return value: INTEGER
Description 🔗
WavLen (length of wav file) takes the duration of a wav file sound and can be used to replace time integer arguments in a blade style. Example: TrFadeX<WavLen<EFFECT_RETRACTION>> When used as WavLen<> inside a TransitionEffectL whose EFFECT is already specified, then it will automatically use the right effect. Example: TransitionEffectL<TrConcat<TrWipex<WavLen<>>,White,TrWipeX<WavLen<>>>,EFFECT_BLAST>
See Also 🔗
TrFadeX, TransitionEffect, TrConcat, TrWipeX
Source Link 🔗
WavNum 🔗
Usage 🔗
WavNum<>
WavNum<EFFECT>
Arguments 🔗
- EFFECT: effect type
- return value: INTEGER
Description 🔗
Returns which file was actually played. First file returns 0. Even if the file is called 'clash1.wav'.
Source Link 🔗
WavLen 🔗
What is WavLen<>? 🔗
WavLen (length of wav file) takes the duration of a wav file sound and can be used to replace time integer arguments in a blade style.
For example, this is a simple InOutTrL that animates the ignition and retraction of the blade:
InOutTrL<TrWipe<300>,TrWipeIn<500>>
The retraction is currently set to WipeIn for 500 milliseconds. Let's say you have an in.wav file that is 1000ms long. As is, the blade retraction animation will reach the hilt and be "off" before the sound finishes. The sound and transition are out of sync.
If we tell WavLen to listen to the wav playing during retraction, it would look like this instead.
InOutTrL<TrWipe<300>,TrWipeInX<WavLen<EFFECT_RETRACTION>>>
Now, the animation of the WipeIn is timed to the total length of whichever wav gets chosen and stays in sync.
This is perfect for when there are various versions of in.wavs in a font, but they differ in duration.
WavLen<> can be used in place of any Int<>, however it makes most sense to use it in a transition for one of the effect events so that there's actually a sound playing.
For a fade time of a clash for example:
ResponsiveClashL<White,TrInstant,TrFadeX<WavLen<EFFECT_CLASH>>,Int<26000>>,
Syntax - Integer not number 🔗
Most transitions used in blade styles are aliased templates that have been shortcut to keep things a bit simpler.
"Under the hood" though, they have an expanded syntax which needs to be understood a little to start substituting in WavLen for timings.
TrFade<500> has 500 as a NUMBER.
WavLen needs to replace an INTEGER.
To expand TrFade<500> out to a format that takes an Int (so we can swap in WavLen)
TrFade<> becomes TrFadeX<> and 500 Becaomes Int<500>, so it is now TrFadeX<Int<500>>
It can be easy to forget there is now a new set of internal brackets around the Int<> value, so be sure to keep track of what you're writing.
Using WavLen in a TransitionEffectL 🔗
When used inside a TransitionEffectL whose EFFECT is already specified at the end, WavLen<> will automatically use the right effect, so one does not need to be specified. This means it would be written as just WavLen<> like this:
TransitionEffectL<TrConcat<TrWipex<WavLen<>>,White,TrWipeX<WavLen<>>>,EFFECT_BLAST>
Using Percentage<> with WavLen<> 🔗
To use WavLen for an animation containing a chain of events in a TrConcat for example, the time can be calculated and a Percentage of the wav can be used in each transition. This force effect would fade in an unstable looking blade, then fade back out to reveal the base blade color again:
TransitionEffectL<TrConcat<TrFade<1000>,BrownNoiseFlicker<Red,Rgb<150,0,0>,500>,TrFade<1000>>,EFFECT_FORCE>
Since it's a 2 part effect, we can keep the half and half ratio of fade in/fade out equal to the sound duration time, even though the force.wav lengths may vary. In this case, we'd want each fade to take 1/2 the sound's duration. This is where Percentage gets applied.
It gets wrapped around the WavLen, so in plain English it could read as "Get the percentage< of the <wav length of
TransitionEffectL<TrConcat<TrFadeX<Percentage<WavLen<>,50>>,BrownNoiseFlicker<Red,Rgb<150,0,0>,500>,TrFadeX<Percentage<WavLen<>,50>>>,EFFECT_FORCE>
Percentage can also be >100, so to have a transition take twice as long as the sound for example, the Percentage would be 200.
An expanded how-to video on this subject here: https://www.youtube.com/watch?v=5_Mn9KOyLb4
Config, styles 🔗
Usage 🔗
Usage 🔗
&style_charging
Arguments 🔗
- return value: POINTER
Description 🔗
Charging blade style. Slowly pulsating battery indicator.
Source Link 🔗
AlphaL 🔗
Usage 🔗
AlphaL<COLOR, ALPHA>
Arguments 🔗
- COLOR: COLOR or LAYER
- ALPHA: FUNCTION
- Return value: LAYER
Description 🔗
This function makes a color transparent. The ALPHA function specifies just how opaque it should be. If ALPHA is zero, the returned color will be 100% transparent. If Alpha is 32768, the returned color will be 100% opaque. Note that if COLOR is already transparent, it will be made more transparent. Example: If COLOR is 50% opaque, and ALPHA returns 16384, the result will be 25% opaque.
See Also 🔗
Source Link 🔗
AudioFlicker 🔗
Usage 🔗
AudioFlicker<A, B>
AudioFlickerL<B>
Arguments 🔗
- A, B: COLOR
- return value: COLOR
Description 🔗
Mixes between A and B based on audio. Quiet audio means more A, loud audio means more B. Based on a single sample instead of an average to make it flicker.
Source Link 🔗
Blast 🔗
Usage 🔗
Blast<BASE, BLAST, FADEOUT_MS, WAVE_SIZE, WAVE_MS>
BlastL<BLAST, FADEOUT_MS, WAVE_SIZE, WAVE_MS>
Arguments 🔗
- BASE, BLAST: COLOR
- FADEOUT_MS: a number (defaults to 150)
- WAVE_SIZE: a number (defaults to 100)
- WAVE_MS: a number (defaults to 400)
- return value: COLOR
Description 🔗
Normally shows BASE, but creates a blast effect using the color BLAST when a blast is requested. The effect is basically two humps moving out from the blast location. The size of the humps can be changed with WAVE_SIZE, note that smaller values makes the humps bigger. WAVE_MS determines how fast the waves travel. Smaller values makes the waves travel slower. Finally FADEOUT_MS determines how fast the humps fade back to the base color.
See Also 🔗
Source Link 🔗
BlastFadeout 🔗
Usage 🔗
BlastFadeout<BASE, BLAST, FADEOUT_MS>
BlastFadeoutL<BLAST, FADEOUT_MS>
Arguments 🔗
- BASE, BLAST: COLOR
- FADEOUT_MS: a number (defaults to 250)
- return value: COLOR
Description 🔗
Normally shows BASE, but swiches to BLAST when a blast is requested and then fades back to BASE. FADEOUT_MS specifies out many milliseconds the fade takes.
See Also 🔗
Source Link 🔗
Blinking 🔗
Usage 🔗
Blinking<A, B, BLINK_MILLIS, BLINK_PROMILLE>
BlinkingX<A, B, BLINK_MILLIS_FUNC, BLINK_PROMILLE_FUNC>
BlinkingL<B, BLINK_MILLIS_FUNC, BLINK_PROMILLE_FUNC>
Arguments 🔗
- A, B: COLOR
- BLINK_MILLIS: a number
- BLINK_PROMILLE: a number, defaults to 500
- BLINK_MILLIS_FUNC: FUNCTION
- BLINK_PROMILLE_FUNC: FUNCTION
- return value: COLOR
Description 🔗
Switches between A and B. A full cycle from A to B and back again takes BLINK_MILLIS milliseconds. If BLINK_PROMILLE is 500, we select A for the first half and B for the second half. If BLINK_PROMILLE is smaller, we get less A and more B. If BLINK_PROMILLE is 0, we get all B. If BLINK_PROMILLE is 1000 we get all A.
See Also 🔗
Source Link 🔗
BrownNoiseFlicker 🔗
Usage 🔗
BrownNoiseFlicker<A, B, grade>
BrownNoiseFlickerL<B, grade>
Arguments 🔗
- A, B: COLOR
- grade: int
- return value: COLOR
Description 🔗
Randomly selects between A and B, but keeps nearby pixels looking similar.
Source Link 🔗
ByteOrderStyle 🔗
Usage 🔗
ByteOrderStyle<BYTEORDER, COLOR>
Arguments 🔗
- BYTEORDER: Color8::RGB, or one of the other byte orders
- COLOR: COLOR
- return value: COLOR
Description 🔗
Source Link 🔗
ColorChange 🔗
Usage 🔗
ColorChange<TRANSITION, COLOR1, COLOR2, ...>
Arguments 🔗
- TRANSITION: transition
- COLOR1, COLOR2, ...: COLOR
- Return value: COLOR
Description 🔗
Decides what color to return based on the current variation. The returned color will be current_variation % N (where N is the number of colors arguments). When the variation changes, the transition will be used to change from the old color to the new color.
See Also 🔗
Source Link 🔗
ColorCycle 🔗
Usage 🔗
ColorCycle<COLOR, PERCENT, RPM>
ColorCycle<OFF_COLOR, OFF_PERCENT, OFF_RPM, ON_COLOR, ON_PERCENT, ON_RPM, FADE_TIME_MILLIS, BASE_COLOR>
Arguments 🔗
- OFF_COLOR, ON_COLOR, BASE_COLOR: COLOR
- OFF_RPM, OFF_PERCENT, ON_PERCENT, ON_RPM, FADE_TIME_MILLIS: a number
- return value: COLOR
Description 🔗
This is intended for a small ring of neopixels A section of the ring is lit at the specified color and rotates at the specified speed. The size of the lit up section is defined by "percentage". The arguments for this style are divided into two groups of { COLOR, PERCENT, RPM }, one for while the blade is OFF, and the other while it's ON. BASE_COLOR is the color of pixels not part of the lit section, so if PERCENT is 0, the entire blade will be BASE_COLOR, and if PERCENT is 100, the entire blade will be OFF_COLOR or ON_COLOR (depending on blade state). FADE_TIME_MILLIS is the time taken to transition between the OFF and ON groups of values.
See Also 🔗
Source Link 🔗
ColorSelect 🔗
Usage 🔗
ColorSelect<SELECTION, TRANSITION, COLOR1, COLOR2, ...>
Arguments 🔗
- SELECTION: function
- TRANSITION: transition
- COLOR1, COLOR2, ...: COLOR
- Return value: COLOR
Description 🔗
Decides what color to return based on the current selection. The returned color will be selection % N (where N is the number of colors arguments). When the selection changes, the transition will be used to change from the old color to the new color.
See Also 🔗
Source Link 🔗
Cylon 🔗
Usage 🔗
Cylon<COLOR, PERCENT, RPM>
Cylon<OFF_COLOR, OFF_PERCENT, OFF_RPM, ON_COLOR, ON_PERCENT, ON_RPM, FADE_TIME_MILLIS, BASE_COLOR>
Arguments 🔗
- OFF_COLOR, ON_COLOR, BASE_COLOR: COLOR
- OFF_RPM, OFF_PERCENT, ON_PERCENT, ON_RPM, FADE_TIME_MILLIS: a number
- return value: COLOR
Description 🔗
Cylon/Knight Rider effect, a section of the strip is lit up and moves back and forth. Speed, color and fraction illuminated can be configured separately for on and off states. The arguments for this style are divided into two groups of { COLOR, PERCENT, RPM }, one for while the blade is OFF, and the other while it's ON. BASE_COLOR is the color of pixels not part of the lit section, so if PERCENT is 0, the entire blade will be BASE_COLOR, and if PERCENT is 100, the entire blade will be OFF_COLOR or ON_COLOR (depending on blade state). FADE_TIME_MILLIS is the time taken to transition between the OFF and ON groups of values.
See Also 🔗
Source Link 🔗
DisplayStyle 🔗
Usage 🔗
DisplayStyle<MYDISPLAY>
Arguments 🔗
- MYDISPLAY: named instance
- Returns: COLOR
Description 🔗
This style requires a little more work than regular styles. First you would need to declare an in-memory display. To do this, we would put this in the CONFIG_STYLES section:
InMemoryDisplay<8, 8, 3> my_small_display;
Then you need a controller for it:
StandarColorDisplayController<8, 8> my_small_display_controller(&my_small_display);
Now we need give this display a name we can use in a style:
NAME_INSTANCE(my_small_display, MYDISPLAY);
Now we we can use this inside a style template:
DisplayStyle
Briefly, the display controller reads SCR files and tells the in-memory display which PQF files to read. The PQF files are rendered into an in-memory frame buffer. DisplayStyle is used to read from that frame buffer. Note that it's totally ok to use this with regular blades, just make the height or the width of the display equal to 1.
For more information about SCR files, read the SCR Page.
For more information about PQF files, read the PQF Page.
Source Link 🔗
Gradient 🔗
Usage 🔗
Gradient<A, B>
Arguments 🔗
- OR: Gradient<A, B, C>
- OR: Gradient<A, B, C, D, ...>
- A, B, C, D: COLOR or LAYER
- return value: COLOR or LAYER (if any of the inputs are layers)
Description 🔗
Gradient, color A at base, B at tip. Any number of colors can be put together into a gradient.
Source Link 🔗
HardStripes 🔗
Usage 🔗
HardStripes<WIDTH, SPEED, COLOR1, COLOR2, ... >
HardStripesX<WIDTH_CLASS, SPEED, COLOR1, COLOR2, ... >
Arguments 🔗
- WIDTH: integer (start with 1000, then adjust up or down)
- WIDTH_CLASS: INTEGER
- SPEED: integer (start with 1000, then adjust up or down)
- COLOR1, COLOR2: COLOR
- return value: COLOR
Description 🔗
Works like Stripes, but with no gradient between color segments..
- Note * Regular Stripes is recommended for very slow speeds. Without a 1 pixel gradient smoothing the changing pixel color, the animation can seem a little "choppy". At faster speeds, this is not apparent.
See Also 🔗
Source Link 🔗
HumpFlicker 🔗
Usage 🔗
HumpFlicker<A, B, HUMP_WIDTH>
HumpFlickerL<B, HUMP_WIDTH>
Arguments 🔗
- A, B: COLOR
- HUMP_WIDTH: a number
- return value: COLOR
Description 🔗
Makes a random "hump" which is about 2xHUMP_WIDTH leds wide.
Source Link 🔗
IgnitionDelay 🔗
Usage 🔗
IgnitionDelay<DELAY_MILLIS, BASE>
Arguments 🔗
- DELAY_MILLIS: a number
- BASE: COLOR
- return value: COLOR
Description 🔗
This class renders BASE as normal, but delays ignition by the specified number of milliseconds. Intended for kylo-style quillions.
Source Link 🔗
InOutHelper 🔗
Usage 🔗
InOutHelper<BASE, OUT_MILLIS, IN_MILLIS>
InOutHelper<BASE, OUT_MILLIS, IN_MILLIS, OFF_COLOR>
Arguments 🔗
- BASE, OFF_COLOR: COLOR
- OUT_MILLIS, IN_MILLIS: a number
- return value: COLOR
Description 🔗
This class does a basic extend/retract. Basically it fades between BASE and OFF_COLOR (which defaults to black). It starts by just displaying OFF_COLOR, and when you turn the saber on it starts mixing in BASE at the base of the saber. After OUT_MILLIS milliseconds, it will be displaying the BASE color on the entire blade.
See Also 🔗
InOutHelperX, InOutTr, AlphaL, Layers, Ifon, InOutFunc
Source Link 🔗
InOutHelperX 🔗
Usage 🔗
InOutHelperX<BASE, EXTENSION, OFF_COLOR>
Arguments 🔗
- BASE, OFF_COLOR: COLOR
- EXTENSION: FUNCTION
- return value: COLOR
Description 🔗
This class does a basic extend/retract. Basically it fades between BASE and OFF_COLOR (which defaults to black). The amount of extension is determined by EXTENSION. If EXTENSION returns 32768, the blade is fully extended. If it returns zero, it is not extended.
See Also 🔗
InOutHelper, InOutTr, AlphaL, Layers, Ifon, InOutFunc
Source Link 🔗
InOutSparkTip 🔗
Usage 🔗
InOutSparkTip<BASE, OUT_MILLIS, IN_MILLIS, SPARK_COLOR>
Arguments 🔗
- BASE, SPARK_COLOR: COLOR
- OUT_MILLIS, IN_MILLIS: a number
- return value: COLOR
Description 🔗
Similar to InOutHelper, but makes the tip a different color during extension.
See Also 🔗
Source Link 🔗
InOutTr 🔗
Usage 🔗
InOutTr<BASE, OUT_TRANSITION, IN_TRANSITION, OFF_COLOR>
Arguments 🔗
- OR: InOutTrL<OUT_TRANSITION, IN_TRANSITION, OFF_COLOR>
- BASE, OFF_COLOR: COLOR
- OUT_TRANSITION, IN_TRANSITION: TRANSITION
- return value: COLOR
Description 🔗
Similar to InOutHelper<>, but uses configuratble transitions to go to and from the BASE to the OFF_COLOR.
See Also 🔗
InOutHelperX, InOutHelper, AlphaL, Layers, Ifon, InOutFunc
Source Link 🔗
Layers 🔗
Usage 🔗
Layers<BASE, LAYER1, LAYER2, ...>
Arguments 🔗
- BASE: COLOR or LAYER
- LAYER1, LAYER2: LAYER
- return value: COLOR or LAYER (same as BASE)
Description 🔗
This style works like layers in gimp or photoshop. In most cases, the layers are expected to be normally transparent effects that turn opaque when then want to paint an effect over the base color. If the base color is opqaque, the final result of this style will also be opaque. If the base color is transparent, the final result may also be transparent, depending on what the layers paint on top of the base color.
See Also 🔗
Source Link 🔗
LengthFinder 🔗
Usage 🔗
LengthFinder<BASE, LIGHTUP>
LengthFinder<>
Arguments 🔗
- BASE, LIGHTUP: COLOR
- Return value: COLOR
Description 🔗
Lights up exactly one led, based on the current color change variable. When changed, says what the current color change is so that you know which led is lit up. Use this when you don't know how many LEDs are in your blade. Set the blade length to 144, enter color change mode and change it until no LED turns on, go back one and there you go!
Source Link 🔗
LocalizedClash 🔗
Usage 🔗
LocalizedClash<BASE, CLASH_COLOR, CLASH_MILLIS, CLASH_WIDTH_PERCENT=50>
LocalizedClashL<CLASH_COLOR, CLASH_MILLIS, CLASH_WIDTH_PERCENT=50>
Arguments 🔗
- BASE: COLOR
- CLASH_COLOR: COLOR (defaults to white)
- CLASH_MILLIS: a number (defaults to 40)
- return value: COLOR
Description 🔗
Similar to SimpleClash, but lights up a portion of the blade. The fraction of the blade is defined by CLASH_WIDTH_PERCENT The location of the clash is random within the middle half of the blade. Localized clashes should work well with stabs with no modifications.
See Also 🔗
SimpleClash, SmoothStep, Layers
Source Link 🔗
Lockup 🔗
Usage 🔗
Lockup<BASE, LOCKUP, DRAG_COLOR, LOCKUP_SHAPE, DRAG_SHAPE>
LockupL<LOCKUP, DRAG_COLOR, LOCKUP_SHAPE, DRAG_SHAPE, LB_SHAPE>
Arguments 🔗
- BASE, LOCKUP: COLOR
- DRAG_COLOR: COLOR (defaults to the LOCKUP color)
- LOCKUP_SHAPE: FUNCTION (defaults to Int<32768>)
- DRAG_SHAPE: FUNCTION (defaults to SmoothStep<Int<28671>, Int<4096>>)
- LB_SHAPE: FUNCTION (defaults to a suitable function)
- return value: COLOR
Description 🔗
Shows LOCKUP if the lockup state is true, otherwise BASE. Also handles Drag, Melt and Lightning Block lockup types unless those are handled elsewhere in the same style.
See Also 🔗
LockupTr, SmoothStep, IsLessThan, LayerFunctions, Scale, BrownNoiseF, SlowNoise
Source Link 🔗
LockupTr 🔗
Usage 🔗
LockupTr<BASE, COLOR, BeginTr, EndTr, LOCKUP_TYPE, CONDITION>
LockupTrL<COLOR, BeginTr, EndTr, LOCKUP_TYPE, CONDITION>
Arguments 🔗
- COLOR: COLOR or LAYER
- BeginTr, EndTr: TRANSITION
- LOCKUP_TYPE: a SaberBase::LockupType
- Return type: LAYER
Description 🔗
This layer creates a complete lockup effect. When lockup is initiated, BeginTr is used to transition from transparent to COLOR. When lockup ends, EndTr is used to transition from COLOR to transparent again. If you wish to for your lockup to have a shape, you can have COLOR be partially transparent to make the base layer show through. If CONDITION equals 0, Lockup effect ignored
See Also 🔗
Lockup, SmoothStep, IsLessThan, LayerFunctions, Scale, BrownNoiseF, SlowNoise
Source Link 🔗
Mix 🔗
Usage 🔗
Mix<F, A, B>
Mix<F, A, B, C, ....>
Arguments 🔗
- F: INTEGER
- A, B, C: COLOR
- return value: COLOR or LAYER (if A or B is a layer)
Description 🔗
Mix between A and B using function F F = 0 -> return A F = 16384 -> return (A+B)/2 F = 32768 -> return B
With 3 arguments (or more), Mix between A, B and C using function F F = 0 -> return A F = 1 -> mostly A, a little B F = 2 -> a little more A, a little less B F = 32767 -> mostly last color, a little of the last-but-one color F = 32768 -> last color
Source Link 🔗
OnSpark 🔗
Usage 🔗
OnSpark<BASE, SPARK_COLOR, MILLIS>
OnSparX<BASE, SPARK_COLOR, MILLI_CLASS>
OnSparL<SPARK_COLOR, MILLI_CLASS>
Arguments 🔗
- BASE: COLOR
- SPARK_COLOR: COLOR (defaults to white)
- MILLIS: a number (defaults to 200)
- MILLI_CLASS: FUNCTION (defaults to Int<200>)
- return value: COLOR
Description 🔗
When you turn the saber on, it starts with SPARK_COLOR, and then fades to BASE over a peariod of MILLIS millseconds.
Source Link 🔗
OriginalBlast 🔗
Usage 🔗
OriginalBlast<BASE, BLAST>
OriginalBlastL<BLAST>
Arguments 🔗
- BASE, BLAST: COLOR
- return value: COLOR
Description 🔗
Normally shows BASE, but creates a blast effect using the color BLAST when a blast is requested. This was the original blast effect, but it is slow and not very configurable.
See Also 🔗
Source Link 🔗
PixelateX 🔗
Usage 🔗
PixelateX<COLOR, PIXEL_SIZE_FUNC>
or
Pixelate<COLOR, PIXEL_SIZE>
Arguments 🔗
- COLOR: COLOR - color values to pixelate
- PIXEL_SIZE_FUNC: FUNCTION size of pixelation (defaults to 2)
- PIXEL_SIZE: NUMBER size of pixelation (defaults to 2)
- Returns: COLOR
Description 🔗
Source Link 🔗
Pulsing 🔗
Usage 🔗
Pulsing<A, B, PULSE_MILLIS>
PulsingX<A, B, PULSE_MILLIS_FUNC>
PulsingL<B, PULSE_MILLIS_FUNC>
Arguments 🔗
- A, B: COLOR
- PULSE_MILLIS: a number
- PULSE_MILLIS_FUNC: FUNCTION
- return value: COLOR
Description 🔗
Goes back and forth between COLOR1 and COLOR2. A full transition from COLOR1 to COLOR2 and back again takes PULSE_MILLIS milliseconds.
See Also 🔗
Source Link 🔗
Rainbow 🔗
Usage 🔗
Rainbow
Arguments 🔗
- return value: COLOR
Description 🔗
Basic RGB rainbow.
Source Link 🔗
RandomBlink 🔗
Usage 🔗
RandomBlink<MILLIHZ, COLOR1, COLOR2>
RandomBlinkX<MILLIHZ_CLASS, COLOR1, COLOR2>
RandomBlinkL<MILLIHZ_CLASS, COLOR1>
Arguments 🔗
- MILLIHZ: integer
- MILLHZ_CLASS: NUMBER
- COLOR1: COLOR (defaults to WHITE)
- COLOR2: COLOR (defaults to BLACK)
- return value: COLOR
Description 🔗
Each LED is randomly chosen as COLOR1 or COLOR2, then stays that color for 1000/MILLIHZ seconds.
Source Link 🔗
RandomFlicker 🔗
Usage 🔗
RandomFlicker<A, B>
RandomL<B>
Arguments 🔗
- A, B: COLOR
- return value: COLOR
Description 🔗
Mixes randomly between A and B. mix is even over entire blade.
Source Link 🔗
RandomPerLEDFlicker 🔗
Usage 🔗
RandomPerLEDFlicker<A, B>
RandomPerLEDFlickerL<B>
Arguments 🔗
- A, B: COLOR
- return value: COLOR
Description 🔗
Mixes randomly between A and B. mix is chosen individually for every LED.
Source Link 🔗
Remap 🔗
Usage 🔗
Remap<F,COLOR>
Arguments 🔗
- F: FUNCTION - the remapping function
- COLOR: COLOR - color values to remap
- Returns: COLOR
Description 🔗
Source Link 🔗
ResponsiveBlastFadeL 🔗
Usage 🔗
ResponsiveBlastFadeL<BLAST COLOR, SIZE, FADE, TOP, BOTTOM, EFFECT>
Arguments 🔗
- SIZE: controls blast size bump 0 ~ 32768
- FADE: fade time ms
- TOP: uppermost Blast position limit, BOTTOM = lowermost Blast position limit, 32768 = tip, 0 = hilt
- EFFECT: effect type, defaults to EFFECT_BLAST
Description 🔗
Implements Blast effect that will move based on angle of the blade instead of random location Blast will impact and Fade in position
See Also 🔗
ResponsiveLockupL, ResponsiveDragL, ResponsiveMeltL, ResponsiveLightningBlockL, ResponsiveClashL, ResponsiveBlastL, ResponsiveBlastWaveL, ResponsiveStabL, Blast
Source Link 🔗
ResponsiveBlastL 🔗
Usage 🔗
ResponsiveBlastL<BLAST COLOR, FADEOUT_MS, WAVE_SIZE, WAVE_SPEED, TOP, BOTTOM, EFFECT>
Arguments 🔗
- FADE: fade time ms
- WAVE_SIZE: size
- WAVE MS: speed ms
- TOP: uppermost Blast position limit, BOTTOM = lowermost Blast position limit, 32768 = tip, 0 = hilt
- EFFECT: effect type, defaults to EFFECT_BLAST
Description 🔗
Implements Blast effect that will move based on angle of the blade instead of random location Blast will impact and disperse along the blade from original position
See Also 🔗
ResponsiveLockupL, ResponsiveDragL, ResponsiveMeltL, ResponsiveLightningBlockL, ResponsiveClashL, ResponsiveBlastWaveL, ResponsiveBlastFadeL, ResponsiveStabL, Blast
Source Link 🔗
ResponsiveBlastWaveL 🔗
Usage 🔗
ResponsiveBlastWaveL<BLAST COLOR, FADEOUT_MS, WAVE_SIZE, WAVE_SPEED, TOP, BOTTOM, EFFECT>
Arguments 🔗
- FADE: fade time ms
- WAVE_SIZE: size
- WAVE MS: speed ms
- TOP: uppermost Blast position limit, BOTTOM = lowermost Blast position limit, 32768 = tip, 0 = hilt
- EFFECT: effect type, defaults to EFFECT_BLAST
Description 🔗
Implements Blast effect that will move based on angle of the blade instead of random location Blast will impact and split up and down the length of the blade from original position
See Also 🔗
ResponsiveLockupL, ResponsiveDragL, ResponsiveMeltL, ResponsiveLightningBlockL, ResponsiveClashL, ResponsiveBlastL, ResponsiveBlastFadeL, ResponsiveStabL, Blast
Source Link 🔗
ResponsiveClashL 🔗
Usage 🔗
ResponsiveClashL<CLASH COLOR, TRANSITION1, TRANSITION2, TOP, BOTTOM, SIZE>
Arguments 🔗
- TRANSITION1 & TRANSITION2: transition Begin & End
- TOP: uppermost Clash position limit, BOTTOM = lowermost Clash position limit, 32768 = tip, 0 = hilt
- SIZE: controls Clash area size 0 ~ 32768
Description 🔗
Implements LocalizedClash effect that mimics ResponsiveLockup location and size
See Also 🔗
ResponsiveLockupL, ResponsiveDragL, ResponsiveMeltL, ResponsiveLightningBlockL, ResponsiveBlastL, ResponsiveBlastWaveL, ResponsiveBlastFadeL, ResponsiveStabL, LocalizedClash
Source Link 🔗
ResponsiveDragL 🔗
Usage 🔗
ResponsiveDragL<DRAG COLOR, TRANSTION1, TRANSITION2, SIZE1, SIZE2>
Arguments 🔗
- TRANSITION1 & TRANSITION2: transition Begin & End
- SIZE1 & SIZE2: control limits for DRAG size with TwistAngle
- LOCATION: controls SmoothStep location
Description 🔗
Implements Drag that will increase or decrease in size based on turning hilt
See Also 🔗
ResponsiveLockupL, ResponsiveMeltL, ResponsiveLightningBlockL, ResponsiveClashL, ResponsiveBlastL, ResponsiveBlastWaveL, ResponsiveBlastFadeL, ResponsiveStabL
Source Link 🔗
ResponsiveLightningBlockL 🔗
Usage 🔗
ResponsiveLightningBlockL<LIGHTNING BLOCK COLOR, TRANSITION1, TRANSITION2>
Arguments 🔗
- TRANSITION1 & TRANSITION2: transition Begin & End
Description 🔗
Implements hybrid Force Lightning Block with animation, intensity responds to turning the hilt and location/focus will respond to blade angle
See Also 🔗
ResponsiveLockupL, ResponsiveDragL, ResponsiveMeltL, ResponsiveClashL, ResponsiveBlastL, ResponsiveBlastWaveL, ResponsiveBlastFadeL, ResponsiveStabL
Source Link 🔗
ResponsiveLockupL 🔗
Usage 🔗
ResponsiveLockupL<LOCKUP COLOR, TRANSITION1, TRANSITION2, TOP, BOTTOM, SIZE>
Arguments 🔗
- TRANSITION1 & TRANSITION2: transition Begin & End
- TOP: uppermost lockup position limit, BOTTOM = lowermost lockup position limit, 32768 = tip, 0 = hilt
- SIZE: controls LOCKUP area size 0 ~ 32768
Description 🔗
Implements LocalizedLockup that will move based on the angle of the blade
See Also 🔗
ResponsiveDragL, ResponsiveMeltL, ResponsiveLightningBlockL, ResponsiveClashL, ResponsiveBlastL, ResponsiveBlastWaveL, ResponsiveBlastFadeL, ResponsiveStabL
Source Link 🔗
ResponsiveMeltL 🔗
Usage 🔗
ResponsiveMeltL<MELT COLOR, TRANSITION1, TRANSITION2, SIZE1, SIZE2>
Arguments 🔗
- TRANSITION1 & TRANSITION2: transition Begin & End
- SIZE1 & SIZE2: control MELT area limits for TwistAngle
- LOCATION: control SmoothStep location
Description 🔗
Implements Melt effect for cutting through object, size will change to mimic metal heating and intensity will increase or decrease based on turning hilt
See Also 🔗
ResponsiveLockupL, ResponsiveDragL, ResponsiveLightningBlockL, ResponsiveClashL, ResponsiveBlastL, ResponsiveBlastWaveL, ResponsiveBlastFadeL, ResponsiveStabL
Source Link 🔗
ResponsiveStabL 🔗
Usage 🔗
ResponsiveStabL<STAB COLOR, TRANSITION1, TRANSITION2, SIZE1, SIZE2>
Arguments 🔗
- TRANSITION1 & TRANSITION2: transition Begin & End
- SIZE1 & SIZE2: control Stab area limits for BladeAngle, 0 ~ 32768
- LOCATION: control SmoothStep location
Description 🔗
Stab effect Implements Stab effect that will change in size based on angle of the blade
See Also 🔗
ResponsiveLockupL, ResponsiveDragL, ResponsiveMeltL, ResponsiveLightningBlockL, ResponsiveClashL, ResponsiveBlastL, ResponsiveBlastWaveL, ResponsiveBlastFadeL
Source Link 🔗
RetractionDelay 🔗
Usage 🔗
RetractionDelay<DELAY_MILLIS, BASE>
Arguments 🔗
- DELAY_MILLIS: a number
- BASE: COLOR
- return value: COLOR
Description 🔗
This class renders BASE as normal, but delays retraction by the specified number of milliseconds.
Source Link 🔗
Rgb 🔗
Usage 🔗
Rgb<R, G, B>
Arguments 🔗
- R, G, B: a number (0-255)
- return value: COLOR
Description 🔗
See Also 🔗
Source Link 🔗
Rgb16 🔗
Usage 🔗
Rgb16<R, G, B>
Arguments 🔗
- R, G, B: a number (0-65536)
- return value: COLOR
Description 🔗
See Also 🔗
Source Link 🔗
RgbArg 🔗
Usage 🔗
RgbArg<ARG, DEFAULT_COLOR>
Arguments 🔗
- ARG: a number
- DEFAULT_COLOR: Must be Rgb<> or Rgb16<>
- Return value: COLOR
Description 🔗
This is used to create templates that can be configured dynamically. These templates can be assigned to presets from WebUSB or bluetooth. See style_parser.h for more details.
Source Link 🔗
RgbCycle 🔗
Usage 🔗
RgbCycle
Arguments 🔗
- return value: COLOR
Description 🔗
Very fast Red, Green, Blue cycle, result should essentially be white until you start swinging it around.
Source Link 🔗
RotateColorsX 🔗
Usage 🔗
RotateColorsX<ROTATION, COLOR>
Arguments 🔗
- ROTATION: FUNCTION
- COLOR: COLOR or LAYER
- return value: COLOR or LAYER (same as COLOR)
Description 🔗
ROTATION specifies how much to rotate the color in HSV (color wheel) space. 0 = none, 32768 = 360degrees
Source Link 🔗
Sequence 🔗
Usage 🔗
Sequence<COLOR1, COLOR2, int millis_per_bits, int bits, 0b0000000000000000, ....>
Arguments 🔗
- COLOR1: COLOR
- COLOR2: COLOR
- millis_per_bit: millseconds spent on each bit
- bits: number of bits before we loop around to the beginning
- 0b0000000000000000: 16-bit binary numbers containing the actual sequence.
Description 🔗
Shows COLOR1 if the current bit in the sequence is 1, COLOR2 otherwise. The number of 16-bit binary numbers should be at least |bits| / 16, rounded up. Note that if not all bits are used within the 16-bit number. Example, a red SOS pattern: Sequence<RED, BLACK, 100, 37, 0b0001010100011100, 0b0111000111000101, 0b0100000000000000>
Source Link 🔗
SimpleClash 🔗
Usage 🔗
SimpleClash<BASE, CLASH_COLOR, CLASH_MILLIS>
SimpleClashL<CLASH_COLOR, CLASH_MILLIS>
Arguments 🔗
- BASE: COLOR
- CLASH_COLOR: COLOR (defaults to white)
- CLASH_MILLIS: a number (defaults to 40)
- return value: COLOR
Description 🔗
Turns the blade to CLASH_COLOR for CLASH_MILLIS millseconds when a clash occurs.
See Also 🔗
LocalizedClash, SmoothStep, Layers
Source Link 🔗
Sparkle 🔗
Usage 🔗
Sparkle<BASE, SPARKLE_COLOR, SPARK_CHANCE_PROMILLE, SPARK_INTENSITY>
SparkleL<SPARKLE_COLOR, SPARK_CHANCE_PROMILLE, SPARK_INTENSITY>
Arguments 🔗
- BASE: COLOR
- SPARKLE_COLOR: COLOR (defaults to white)
- SPARK_CHANCE_PROMILLE: a number
- SPARK_INTENSITY: a number
Description 🔗
Generally displays BASE, but creates little sparkles of SPARKLE_COLOR SPARK_CHANCE_PROMILLE decides how often a spark is generated, defaults to 300 (30%) SPARK_INTENSITY specifies how intens the spark is, defaults to 1024
Source Link 🔗
Stripes 🔗
Usage 🔗
Stripes<WIDTH, SPEED, COLOR1, COLOR2, ... >
StripesX<WIDTH_CLASS, SPEED, COLOR1, COLOR2, ... >
Arguments 🔗
- WIDTH: integer (start with 1000, then adjust up or down)
- WIDTH_CLASS: INTEGER
- SPEED: integer (start with 1000, then adjust up or down)
- COLOR1, COLOR2: COLOR
- return value: COLOR
Description 🔗
Works like Rainbow, but with any colors you like. WIDTH determines width of stripes SPEED determines movement speed
If you have a ring of LEDs and you want the stripes to line up, you'll need to set WIDTH using the following formula: WIDTH = 50000 * NUM_LEDS_IN_RING / (NUM_COLORS * REPETITIONS * 341)
See Also 🔗
Source Link 🔗
Strobe 🔗
Usage 🔗
Strobe<BASE, STROBE_COLOR, STROBE_FREQUENCY, STROBE_MILLIS>
StrobeX<BASE, STROBE_COLOR, STROBE_FREQUENCY_FUNC, STROBE_MILLIS_FUNC>
StrobeL<STROBE_COLOR, STROBE_FREQUENCY_FUNC, STROBE_MILLIS_FUNC>
Arguments 🔗
- BASE, STROBE_COLOR: COLOR
- STROBE_FREQUENCY, STROBE_MILLIS: a number
- STROBE_FREQUENCY_FUNC, STROBE_MILLIS_FUNC: FUNCTION
- return value: COLOR
Description 🔗
Stroboscope-like effect, turns the color to STROBE_COLOR for STROBE_MILLIS STROBE_FREQUENCY times per second.
See Also 🔗
Source Link 🔗
StylePtr 🔗
Usage 🔗
StylePtr<BLADE>
Arguments 🔗
- BLADE: COLOR
- return value: suitable for preset array
Description 🔗
Most blade styls are created by taking a blade style template and wrapping it this class, which implements the BladeStyle interface. We do this so that the getColor calls will be inlined in this loop for speed.
Source Link 🔗
TransitionEffect 🔗
Usage 🔗
TransitionEffect<COLOR, EFFECT_COLOR, TRANSITION1, TRANSITION2, EFFECT>
TransitionEffectL<EFFECT_COLOR, TRANSITION1, TRANSITION2, EFFECT>
Arguments 🔗
- COLOR, EFFECT_COLOR: COLOR
- TRANSITION1, TRANSITION2 : TRANSITION
- EFFECT: effect type
- return value: COLOR
Description 🔗
When the specified EFFECT happens (clash/blast/etc.) transition from COLOR to EFFECT_COLOR using TRANSITION1. Then transition back using TRANSITION2.
See Also 🔗
Source Link 🔗
TransitionLoop 🔗
Usage 🔗
TransitionLoop<COLOR, TRANSITION>
TransitionLoopL<TRANSITION>
Arguments 🔗
- COLOR: COLOR
- TRANSITION : TRANSITION
- return value: COLOR
Description 🔗
Continuously transitions COLOR to COLOR
Makes more sense if TRANSITION is a TrConcat, as this will
transition to/from the intermediate steps in a loop.
See Also 🔗
Source Link 🔗
TransitionLoop 🔗
Usage 🔗
TransitionLoopWhileL<LOOP_TRANSITION, END_TRANSITION, CONDITION>
Arguments 🔗
- LOOP_TRANSITION : TRANSITION
- END_TRANSITION : TRANSITION
- CONDITION: FUNCTION
- return value: COLOR
Description 🔗
Continuously runs LOOP_TRANSITION while CONDITION > 0
Makes more sense if TRANSITION is a TrConcat, as this will
transition to/from the intermediate steps in a loop.
If CONDITION <= 0, runs END_TRANSITION and stops.
See Also 🔗
Source Link 🔗
TransitionPulseL 🔗
Usage 🔗
TransitionPulseL<TRANSITION, PULSE>
Arguments 🔗
- TRANSITION: TRANSITION
- PULSE: FUNCTION
- return value: COLOR
Description 🔗
When the specified PULSE happens TRANSITION layer will run.
See Also 🔗
TrConcat, EffectPulse, LockupPulseF, IncrementWithReset, EffectIncrementF
Source Link 🔗
Blade Style EFFECTs 🔗
Events of animations on the blade are triggered by various things.
Some examples are ignition, clash, blast, etc...
When these are triggered by a button event, a gesture, or other means, the way the blade knows which animation, or EFFECT to show, is by designating it in the blade style.
A basic example:
TransitionEffectL<TrConcat<TrWipe<50>,White,TrWipe<50>>,EFFECT_BLAST>
In plain English, this says "When I press the blaster deflect button, run a string of concatenated events that wipe White for 50ms, then wipe it away."
Any EFFECT can be substituted in place of the EFFECT_BLAST argument above.
Note that some of these EFFECTS may be included in features used by some prop files (button controls files) but not in others.
The majority of these are self explanitory. Just read EFFECT as "do something during_XXXX"
General effects 🔗
EFFECT_NONE 🔗
Never generated, used as defaults in some places to mean "no effect", but is otherwise not useful for anything.
CLASH_UPDATE 🔗
(OS 6.0+) No effect in blade styles, but may be used in props and other places to detect when the strength of a clash increases after the EFFECT_CLASH has occurred..
EFFECT_CLASH 🔗
EFFECT_BLAST 🔗
EFFECT_FORCE 🔗
EFFECT_STAB 🔗
EFFECT_BOOT 🔗
EFFECT_LOCKUP_BEGIN 🔗
EFFECT_LOCKUP_END 🔗
EFFECT_DRAG_BEGIN 🔗
EFFECT_DRAG_END 🔗
EFFECT_PREON 🔗
EFFECT_POSTOFF 🔗
(OS 6.0+)
EFFECT_IGNITION 🔗
EFFECT_RETRACTION 🔗
EFFECT_CHANGE 🔗
When using color change.
EFFECT_NEWFONT 🔗
Used when changing presets.
EFFECT_LOW_BATTERY 🔗
EFFECT_POWERSAVE 🔗
Typically used to apply a dimming effect on blade to conserve battery.
EFFECT_BATTERY_LEVEL 🔗
Show battery level visually on blade.
EFFECT_ON 🔗
(OS 7.0+)
EFFECT_OFF 🔗
(OS 7.0+)
EFFECT_FAST_ON 🔗
When using a feature that skips preon.
EFFECT_FAST_OFF 🔗
(OS 7.0+) When using a feature that bypasses postoff.
EFFECT_VOLUME_LEVEL 🔗
(OS 7.0+) Show volume level visually on blade, great for using with volume menu feature.
EFFECT_QUOTE 🔗
(OS 7.0+)
EFFECT_SECONDARY_IGNITION 🔗
(OS 7.0+)
EFFECT_SECONDARY_RETRACTION 🔗
(OS 7.0+)
EFFECT_OFF_CLASH 🔗
(OS 7.0+)
EFFECT_NEXT_QUOTE 🔗
(OS 7.0+)
EFFECT_INTERACTIVE_PREON 🔗
(OS 7.0+)
EFFECT_INTERACTIVE_BLAST 🔗
(OS 7.0+)
EFFECT_TRACK 🔗
(OS 7.0+)
EFFECT_BEGIN_BATTLE_MODE 🔗
(OS 7.0+)
EFFECT_END_BATTLE_MODE 🔗
(OS 7.0+)
EFFECT_BEGIN_AUTO_BLAST 🔗
(OS 7.0+)
EFFECT_END_AUTO_BLAST 🔗
(OS 7.0+)
EFFECT_ALT_SOUND 🔗
(OS 7.0+) Triggers the change for sets of sounds within the font from one alternative to another.
See: Alt Sounds
EFFECT_TRANSITION_SOUND 🔗
(OS 7.0+) Triggers an optional sound effect during transitions from within a style via TrDoEffect.
Basic usage example:
TrDoEffect<CURRENT_TRANSITION,EFFECT_TRANSITION_SOUND>
Uses sounds named trNN.wav, where N is a number if more than one tr.wav exist.
EFFECT_SOUND_LOOP 🔗
(OS 7.0+) Toggles an optonal sound effect loop ON/OFF from within a style via TrDoEffect.
Used like a user-defined Lockup state in coordination with a control and visual effect.
Uses sounds named trloopNN.wav, where N is a number if more than one trloop.wav exist.
EFFECT_MENU_CHANGE 🔗
(OS 8.x+) Triggered when switching between menu entries.
EFFECT_ACCENT_SWING 🔗
(OS 8.x+) Triggered when smoothswing is active, and you swing hard enough to trigger an accent swing.
EFFECT_ACCENT_SLASH 🔗
(OS 8.x+) Triggered when smoothswing is active, and you swing hard enough to trigger an accent slash.
Blaster effects 🔗
EFFECT_STUN 🔗
EFFECT_FIRE 🔗
EFFECT_CLIP_IN 🔗
EFFECT_CLIP_OUT 🔗
EFFECT_RELOAD 🔗
EFFECT_MODE 🔗
EFFECT_RANGE 🔗
EFFECT_EMPTY 🔗
EFFECT_FULL 🔗
EFFECT_JAM 🔗
EFFECT_UNJAM 🔗
EFFECT_PLI_ON 🔗
EFFECT_PLI_OFF 🔗
Mini game effects 🔗
EFFECT_GAME_START 🔗
(OS 7.0+)
EFFECT_GAME_ACTION1 🔗
(OS 7.0+)
EFFECT_GAME_ACTION2 🔗
(OS 7.0+)
EFFECT_GAME_CHOICE 🔗
(OS 7.0+)
EFFECT_GAME_RESPONSE1 🔗
(OS 7.0+)
EFFECT_GAME_RESPONSE2 🔗
(OS 7.0+)
EFFECT_GAME_RESULT1 🔗
(OS 7.0+)
EFFECT_GAME_RESULT2 🔗
(OS 7.0+)
EFFECT_GAME_WIN 🔗
(OS 7.0+)
EFFECT_GAME_LOSE 🔗
(OS 7.0+)
User-definable effects 🔗
EFFECT_USER1 🔗
EFFECT_USER2 🔗
EFFECT_USER3 🔗
EFFECT_USER4 🔗
EFFECT_USER5 🔗
EFFECT_USER6 🔗
(OS 7.0+)
EFFECT_USER7 🔗
(OS 7.0+)
EFFECT_USER8 🔗
(OS 7.0+)
Errors 🔗
EFFECT_SD_CARD_NOT_FOUND 🔗
(OS 7.0+)
EFFECT_ERROR_IN_FONT_DIRECTORY 🔗
(OS 7.0+)
EFFECT_ERROR_IN_BLADE_ARRAY 🔗
(OS 7.0+)
EFFECT_FONT_DIRECTORY_NOT_FOUND 🔗
(OS 7.0+)
Blade Styles 🔗
Blade styles specifies the look and behavior of the "blade". I put "blade" in double quotes, because every accent led, motor or other thing you can control is generally also a "blade".
Blade styles are made by combining style templates. Style templates are sort of mix between layers in gimp and "functions" from high school math. When you use one, it looks like this:
StyleTemplateName<FirstArgument, SecondArgument, ThirdArgument>
As you can see, it looks just like using a function, but with < > instead of ( ). The interesting part is that these can be nested, so the arguments can also be used as functions, like this:
StyleTemplateName<OtherTemplate<Arg1, Arg2>, AnotherTemplate<Arg>, ThirdArgument>
Important - always check that you have not forgotten to close every opening < with a > and that there's a comma used in between each argument.
A style template that takes no arguments, can be written in two ways:
Rainbow<>
Rainbow
Now, there is one more thing we need to know, which is that not all arguments are the same. For instance, if you have a template that expects that the first argument is a number, you can't just put a color there and have it work. For our purposes, these are the categories we care about:
- COLOR: Most common type of argument, these sort of work like layers in gimp
- INTEGER: A simple number
- FUNCTION: A style template that returns a number.
- TRANSITION: Defines how to go from one color to another
So if a template expects an argument of a particular type, you must give it an argument of that type, and not some other type, or it won't work. Here are some basic examples:
Rgb<255,0,0>   // COLOR (red in this case), takes three INTEGERs as arguments
10             // INTEGER
Int<10>        // FUNCTION (this function always returns 10)
TrFade<100>    // TRANSITION (fade from one color to next in 100ms)
Rainbow        // COLOR (always changing)
Finally, in order to actually use a blade style, we have to wrap it in something that will create the style and return a pointer to it. This might not make any sense unless you know C++, but all you need to really know is that once you have made a blade style, you have to wrap it in SylePtr
Now, let's dissect a very simple blade style to understand what it does:
StylePtr<InOutHelper<SimpleClash<Lockup<Blast<Blue,White>,AudioFlicker<Blue,White>>,White>, 300, 800>>()
To better see how the arguments work, we can re-format it like this:
StylePtr<
    InOutHelper<
        SimpleClash<
            Lockup<
                Blast<
                    Blue,              // base blade color
                    White              // blast color
                >,                     // end of blast
                AudioFlicker<Blue,White>   // lockup color
            >,          // end of lockup
            White>,         // second argument to SimpleClash
        300,                // second argument to InOutHelper
        800                // third argument to InOutHelper
    >      // end of InOutHelper
>()        // end of StylePtr
This is a still a valid blade style, which can be placed in your config file as is. The config file will not care if there are some extra spaces or newlines or comments inside your style. Let's walk through it from inside to out.
- Blast<Blue, White>: Blue is the base color of this blade. Blast<> adds a white effect to it when the blast effect is triggered.
- Lockup<..., AudioFlicker<Blue, White>>: This adds the lockup (and drag) effects to the blade. The color used for the lockup uses AudioFlicker<Blue, White> to produce an unstable flickering effect between white and blue.
- SimpleClash<..., White>: This adds a white clash effect
- InOutHelper<...., 300, 800>: This adds extension (300ms) and retraction (800ms)
Here is where you can find all the possible style templates:
- COLOR https://github.com/profezzorn/ProffieOS/tree/master/styles
- FUNCTIONS https://github.com/profezzorn/ProffieOS/tree/master/functions
- TRANSITIONS https://github.com/profezzorn/ProffieOS/tree/master/transitions
Note - There are default values for style templates. These can be found in the files located in the styles folder. Arguments with default values can be left out, which makes it easier and shorter to write out the style, however, it can be difficult to know that those arguments are available if you are trying to change something in an existing blade style. The Style Editor will show all arguments for a style, so you can use it find arguments that you otherwise cannot see.
For example, SimpleClash has a default duration of 40. In the example above, that argument is not shown, but it is nevertheless there. If you use the style editor you will see it, or if you look up the documentation for SimpleClash you can see that the full template is:
SimpleClash<BASE, CLASH_COLOR, CLASH_MILLIS>
So for a Red blade that clashes White for 80 milliseconds, you would need to add the 80 (non default) value in the appropriate argument's position in the template, like so:
SimpleClash<Red, White, 80>
For a working list of many templates, some with default values included, along with Functions and Transition syntax, see here: TEMPLATES SYNTAX SUMMARY
To experiment with them and figure out how to use them, I recommend using the Style Editor.
Also, you can find lots of pre-made blade styles in the Style sharing thread on TheRebelArmory.com.
Named Colors 🔗
Obviously you can use any color you want to with the Rgb<> and Rgb16<> styles. However, ProffieOS also has a list of builtin colors, which are listed and shown here. Please note that some colors are only available in ProffieOS 8.x and newer.
Alphabetical Order 🔗
| Name | ProffieOS | SRGB | Sample |
|---|---|---|---|
| AliceBlue | Rgb<223,239,255> | #f0f8ff | |
| Amber | Rgb<255,135,0> | #ffbf00 | |
| Aquamarine | Rgb<55,255,169> | #7fffd4 | |
| Azure | Rgb<223,255,255> | #f0ffff | |
| Bisque | Rgb<255,199,142> | #ffe4c4 | |
| Black | Rgb<0,0,0> | #000000 | |
| BlanchedAlmond | Rgb<255,213,157> | #ffebcd | |
| Blue | Rgb<0,0,255> | #0000ff | |
| BlueRibbon | Rgb<0,33,255> | #0065ff | |
| BrainFreeze | Rgb<0,219,255> | #00eeff | |
| BrutalPink | Rgb<255,0,128> | #ff00bb | |
| BusyBee | Rgb<231,255,0> | #f4ff00 | |
| CanaryYellow | Rgb<255,221,0> | #ffef00 | |
| CathodeGreen | Rgb<0,255,22> | #00ff54 | |
| Chartreuse | Rgb<55,255,0> | #7fff00 | |
| Coral | Rgb<255,55,19> | #ff7f4e | |
| Cornsilk | Rgb<255,239,184> | #fff8dc | |
| Cyan, Aqua | Rgb<0,255,255> | #00ffff | |
| CyberYellow | Rgb<255,168,0> | #ffd300 | |
| DarkOrange | Rgb<255,68,0> | #ff8c00 | |
| DeepPink | Rgb<255,0,75> | #ff0092 | |
| DeepSkyBlue | Rgb<0,135,255> | #00bfff | |
| DodgerBlue | Rgb<2,72,255> | #1c90ff | |
| ElectricBanana | Rgb<246,255,0> | #fbff00 | |
| ElectricLime | Rgb<156,255,0> | #ccff00 | |
| ElectricPurple | Rgb<127,0,255> | #ba00ff | |
| ElectricViolet | Rgb<71,0,255> | #8f00ff | |
| Flamingo | Rgb<255,80,154> | #ff97cb | |
| FloralWhite | Rgb<255,244,223> | #fffaf0 | |
| GhostWhite | Rgb<239,239,255> | #f8f8ff | |
| Green, Lime | Rgb<0,255,0> | #00ff00 | |
| GreenYellow | Rgb<108,255,6> | #adff2e | |
| HaltRed | Rgb<255,0,19> | #ff004e | |
| HoneyDew | Rgb<223,255,223> | #f0fff0 | |
| HotMagenta | Rgb<255,0,156> | #ff00cc | |
| HotPink | Rgb<255,36,118> | #ff69b4 | |
| ImperialYellow | Rgb<255,115,0> | #ffb200 | |
| Ivory | Rgb<255,255,223> | #fffff0 | |
| LavenderBlush | Rgb<255,223,233> | #fff0f5 | |
| Lemon | Rgb<255,237,0> | #fff700 | |
| LemonChiffon | Rgb<255,244,157> | #fffacd | |
| LightCyan | Rgb<191,255,255> | #e0ffff | |
| LightPink | Rgb<255,121,138> | #ffb6c1 | |
| LightSalmon | Rgb<255,91,50> | #ffa07a | |
| LightYellow | Rgb<255,255,191> | #ffffe0 | |
| LimeZest | Rgb<186,255,0> | #ddff00 | |
| Limoncello | Rgb<135,255,0> | #bfff00 | |
| Magenta, Fuchsia | Rgb<255,0,255> | #ff00ff | |
| MasterSwordBlue | Rgb<0,255,219> | #00ffee | |
| MintCream | Rgb<233,255,244> | #f5fffa | |
| MintyParadise | Rgb<0,255,128> | #00ffbb | |
| MistyRose | Rgb<255,199,193> | #ffe4e1 | |
| Moccasin | Rgb<255,199,119> | #ffe4b5 | |
| MoltenCore | Rgb<255,24,0> | #ff5700 | |
| NavajoWhite | Rgb<255,187,108> | #ffdead | |
| NeonRose | Rgb<255,0,55> | #ff007f | |
| Orange | Rgb<255,97,0> | #ffa400 | |
| Orange | Rgb<255,97,0> | #ffa400 | |
| OrangeJuice | Rgb<255,55,0> | #ff7f00 | |
| OrangeRed | Rgb<255,14,0> | #ff4400 | |
| OrangeRed | Rgb<255,14,0> | #ff4400 | |
| OverdueBlue | Rgb<13,0,255> | #4200ff | |
| PaleGreen | Rgb<28,255,28> | #5dff5d | |
| PapayaWhip | Rgb<255,221,171> | #ffefd5 | |
| PeachPuff | Rgb<255,180,125> | #ffdab9 | |
| Pink | Rgb<255,136,154> | #ffc0cb | |
| PlungePool | Rgb<0,255,156> | #00ffcc | |
| PsychedelicPurple | Rgb<186,0,255> | #dd00ff | |
| RareBlue | Rgb<0,13,255> | #0042ff | |
| Red | Rgb<255,0,0> | #ff0000 | |
| SafetyOrange | Rgb<255,33,0> | #ff6500 | |
| SchoolBus | Rgb<255,176,0> | #ffd800 | |
| SeaShell | Rgb<255,233,219> | #fff5ee | |
| Snow | Rgb<255,244,244> | #fffafa | |
| SpringGreen | Rgb<0,255,55> | #00ff7f | |
| Star | Rgb<255,201,0> | #ffe500 | |
| SuperSaiyan | Rgb<255,186,0> | #ffdd00 | |
| Tomato | Rgb<255,31,15> | #ff6246 | |
| VibrantMint | Rgb<0,255,201> | #00ffe5 | |
| ViolentViolet | Rgb<55,0,255> | #7f00ff | |
| VividRaspberry | Rgb<255,0,38> | #ff006b | |
| VividViolet | Rgb<90,0,255> | #9f00ff | |
| White | Rgb<255,255,255> | #ffffff | |
| Yellow | Rgb<255,255,0> | #ffff00 | |
| ZeusBolt | Rgb<219,255,0> | #eeff00 |
Ordered by color 🔗
| Name | ProffieOS | SRGB | Sample |
|---|---|---|---|
| Black | Rgb<0,0,0> | #000000 | |
| Red | Rgb<255,0,0> | #ff0000 | |
| OrangeRed | Rgb<255,14,0> | #ff4400 | |
| Tomato | Rgb<255,31,15> | #ff6246 | |
| MoltenCore | Rgb<255,24,0> | #ff5700 | |
| SafetyOrange | Rgb<255,33,0> | #ff6500 | |
| Coral | Rgb<255,55,19> | #ff7f4e | |
| OrangeJuice | Rgb<255,55,0> | #ff7f00 | |
| DarkOrange | Rgb<255,68,0> | #ff8c00 | |
| Orange | Rgb<255,97,0> | #ffa400 | |
| Orange | Rgb<255,97,0> | #ffa400 | |
| ImperialYellow | Rgb<255,115,0> | #ffb200 | |
| Amber | Rgb<255,135,0> | #ffbf00 | |
| CyberYellow | Rgb<255,168,0> | #ffd300 | |
| SchoolBus | Rgb<255,176,0> | #ffd800 | |
| SuperSaiyan | Rgb<255,186,0> | #ffdd00 | |
| Star | Rgb<255,201,0> | #ffe500 | |
| CanaryYellow | Rgb<255,221,0> | #ffef00 | |
| Lemon | Rgb<255,237,0> | #fff700 | |
| Yellow | Rgb<255,255,0> | #ffff00 | |
| ElectricBanana | Rgb<246,255,0> | #fbff00 | |
| BusyBee | Rgb<231,255,0> | #f4ff00 | |
| ZeusBolt | Rgb<219,255,0> | #eeff00 | |
| LimeZest | Rgb<186,255,0> | #ddff00 | |
| ElectricLime | Rgb<156,255,0> | #ccff00 | |
| Limoncello | Rgb<135,255,0> | #bfff00 | |
| GreenYellow | Rgb<108,255,6> | #adff2e | |
| Chartreuse | Rgb<55,255,0> | #7fff00 | |
| Green, Lime | Rgb<0,255,0> | #00ff00 | |
| CathodeGreen | Rgb<0,255,22> | #00ff54 | |
| SpringGreen | Rgb<0,255,55> | #00ff7f | |
| MintyParadise | Rgb<0,255,128> | #00ffbb | |
| PlungePool | Rgb<0,255,156> | #00ffcc | |
| VibrantMint | Rgb<0,255,201> | #00ffe5 | |
| MasterSwordBlue | Rgb<0,255,219> | #00ffee | |
| Cyan, Aqua | Rgb<0,255,255> | #00ffff | |
| BrainFreeze | Rgb<0,219,255> | #00eeff | |
| DeepSkyBlue | Rgb<0,135,255> | #00bfff | |
| DodgerBlue | Rgb<2,72,255> | #1c90ff | |
| BlueRibbon | Rgb<0,33,255> | #0065ff | |
| RareBlue | Rgb<0,13,255> | #0042ff | |
| Blue | Rgb<0,0,255> | #0000ff | |
| OverdueBlue | Rgb<13,0,255> | #4200ff | |
| ViolentViolet | Rgb<55,0,255> | #7f00ff | |
| ElectricViolet | Rgb<71,0,255> | #8f00ff | |
| VividViolet | Rgb<90,0,255> | #9f00ff | |
| ElectricPurple | Rgb<127,0,255> | #ba00ff | |
| PsychedelicPurple | Rgb<186,0,255> | #dd00ff | |
| Magenta, Fuchsia | Rgb<255,0,255> | #ff00ff | |
| HotMagenta | Rgb<255,0,156> | #ff00cc | |
| BrutalPink | Rgb<255,0,128> | #ff00bb | |
| DeepPink | Rgb<255,0,75> | #ff0092 | |
| NeonRose | Rgb<255,0,55> | #ff007f | |
| VividRaspberry | Rgb<255,0,38> | #ff006b | |
| HaltRed | Rgb<255,0,19> | #ff004e | |
| Snow | Rgb<255,244,244> | #fffafa | |
| White | Rgb<255,255,255> | #ffffff | |
| MistyRose | Rgb<255,199,193> | #ffe4e1 | |
| LightSalmon | Rgb<255,91,50> | #ffa07a | |
| SeaShell | Rgb<255,233,219> | #fff5ee | |
| PeachPuff | Rgb<255,180,125> | #ffdab9 | |
| Bisque | Rgb<255,199,142> | #ffe4c4 | |
| NavajoWhite | Rgb<255,187,108> | #ffdead | |
| BlanchedAlmond | Rgb<255,213,157> | #ffebcd | |
| Moccasin | Rgb<255,199,119> | #ffe4b5 | |
| PapayaWhip | Rgb<255,221,171> | #ffefd5 | |
| FloralWhite | Rgb<255,244,223> | #fffaf0 | |
| Cornsilk | Rgb<255,239,184> | #fff8dc | |
| LemonChiffon | Rgb<255,244,157> | #fffacd | |
| Ivory | Rgb<255,255,223> | #fffff0 | |
| LightYellow | Rgb<255,255,191> | #ffffe0 | |
| HoneyDew | Rgb<223,255,223> | #f0fff0 | |
| PaleGreen | Rgb<28,255,28> | #5dff5d | |
| MintCream | Rgb<233,255,244> | #f5fffa | |
| Aquamarine | Rgb<55,255,169> | #7fffd4 | |
| Azure | Rgb<223,255,255> | #f0ffff | |
| LightCyan | Rgb<191,255,255> | #e0ffff | |
| AliceBlue | Rgb<223,239,255> | #f0f8ff | |
| GhostWhite | Rgb<239,239,255> | #f8f8ff | |
| Flamingo | Rgb<255,80,154> | #ff97cb | |
| HotPink | Rgb<255,36,118> | #ff69b4 | |
| LavenderBlush | Rgb<255,223,233> | #fff0f5 | |
| Pink | Rgb<255,136,154> | #ffc0cb | |
| LightPink | Rgb<255,121,138> | #ffb6c1 |
Color wheel 🔗
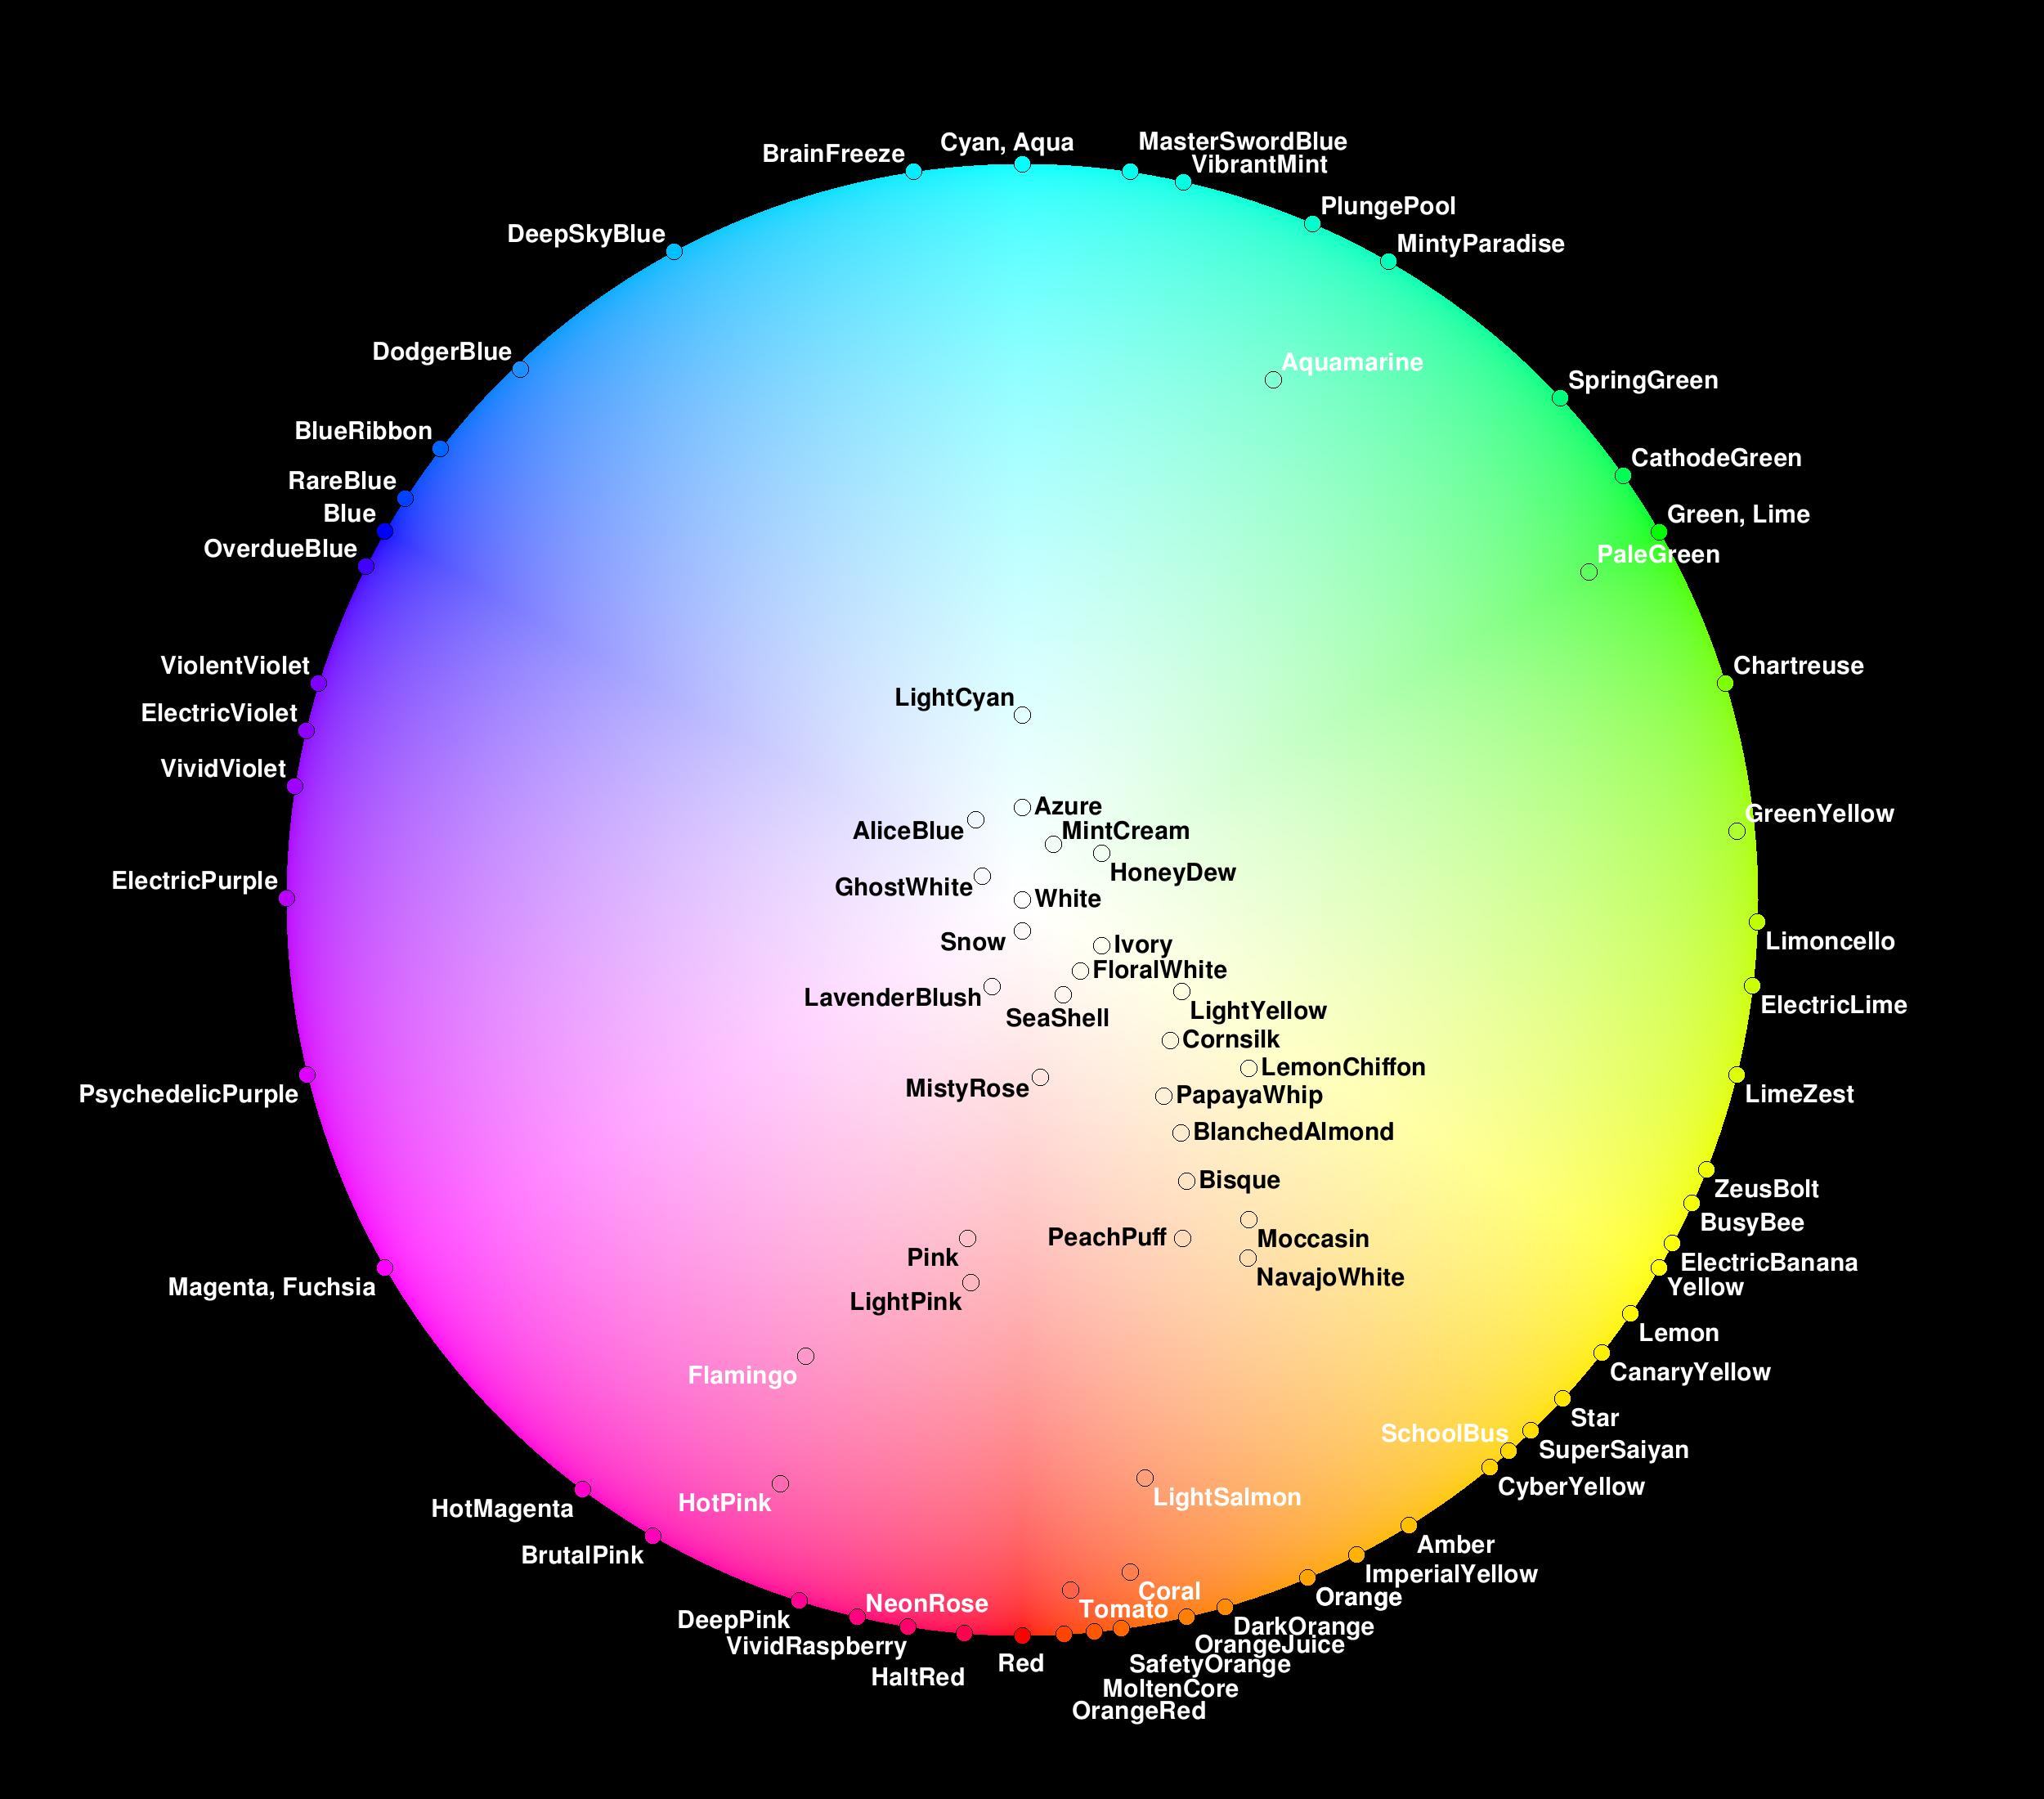
Responsive Styles & Effects for ProffieOS 4.x or later. 🔗
Responsive Styles use BladeAngle<> or TwistAngle<> functions to control, modify or move effects in real-time, they are implemented using the below styles. The Responsive Styles all use Layers<> for implementation.
Defaults are included to make implementation as easy as adding just the COLOR or you can customize using the other parameters in the styles.
Example:
StylePtr<InOutHelper<Layers<BASE,ResponsiveClashL< COLOR >,ResponsiveBlastL< COLOR >,ResponsiveStabL< COLOR >,ResponsiveLockupL< COLOR >,ResponsiveDragL< COLOR >,ResponsiveLightningBlockL< COLOR >,ResponsiveMeltL< > >,OUT_MILLIS, IN_MILLIS, OFF_COLOR>>()
Responsive Styles can also be mixed with Standard styles, you do not need to use only Responsive styles, however, you probably only want one version of any effect otherwise Layer order will control which shows or both may show and conflict if one is partial blade and one is full blade.
Templates (only COLOR is required to implement - all values are defaulted for simple implementation) *except for ResponsiveMeltL<> which defaults all parameters to allow responsive Melt effect:
ResponsiveLockupL<LOCKUP COLOR, TRANSITION1, TRANSITION2, TOP, BOTTOM, SIZE> 🔗
Implements LocalizedLockup that will move based on the angle of the blade
- TRANSITION1 & TRANSITION2 = transition Begin & End
- TOP = uppermost lockup position limit, BOTTOM = lowermost lockup position limit, Int<32768> = tip, Int<0> = hilt
- SIZE controls LOCKUP area size Int<0> ~ Int<32768>
ResponsiveDragL<DRAG COLOR, TRANSTION1, TRANSITION2, SIZE1, SIZE2> 🔗
Implements Drag that will increase or decrease in size based on turning hilt
- TRANSITION1 & TRANSITION2 = transition Begin & End
- SIZE1 & SIZE2 control limits for DRAG size with TwistAngle
ResponsiveMeltL<MELT COLOR, TRANSITION1, TRANSITION2, SIZE1, SIZE2> 🔗
Implements Melt effect for cutting through object, color will change to mimic metal heating* and intensity will increase or decrease based on turning hilt. *This requires the MELT COLOR enable TwistAngle<>, static COLORS or EFFECTS will not perform this effect. In the OS all of the parameters are defaulted so ResponsiveMeltL can be implemented as a Layer with no input as ResponsiveMeltL<>
- TRANSITION1 & TRANSITION2 = transition Begin & End
- SIZE1 & SIZE2 control MELT area limits for TwistAngle<>
ResponsiveLightningBlockL<LIGHTNING BLOCK COLOR, TRANSITION1, TRANSITION2> 🔗
Implements hybrid Force Lightning Block with animation, intensity responds to turning the hilt and location/focus will respond to blade angle
- TRANSITION1 & TRANSITION2 = transition Begin & End
ResponsiveClashL<CLASH COLOR, TRANSITION1, TRANSITION2, TOP, BOTTOM, SIZE> 🔗
Implements LocalizedClash effect that mimics ResponsiveLockup location and size (unless changed by user)
- TRANSITION1 & TRANSITION2 = transition Begin & End
- TOP = uppermost Clash position limit, BOTTOM = lowermost Clash position limit, Int<32768> = tip, Int<0> = hilt
- SIZE controls Clash area size Int<0> ~ Int<32768>
ResponsiveBlastL<BLAST COLOR, FADEOUT_MS, WAVE_SIZE, WAVE_SPEED, TOP, BOTTOM, EFFECT> 🔗
Implements Blast effect that will move based on angle of the blade instead of random location Blast will impact and disperse along the blade from original position
- FADE = fade time ms
- WAVE_SIZE = size
- WAVE MS = speed ms
- TOP = uppermost Blast position limit, BOTTOM = lowermost Blast position limit, Int<32768> = tip, Int<0> = hilt
- EFFECT = effect type, defaults to EFFECT_BLAST
ResponsiveBlastWaveL<BLAST COLOR, FADEOUT_MS, WAVE_SIZE, WAVE_SPEED, TOP, BOTTOM, EFFECT> 🔗
Implements Blast effect that will move based on angle of the blade instead of random location Blast will impact and split up and down the length of the blade from original position
- FADE = fade time ms
- WAVE_SIZE = size
- WAVE MS = speed ms
- TOP = uppermost Blast position limit, BOTTOM = lowermost Blast position limit, Int<32768> = tip, Int<0> = hilt
- EFFECT = effect type, defaults to EFFECT_BLAST
ResponsiveBlastFadeL<BLAST COLOR, SIZE, FADE, TOP, BOTTOM, EFFECT> 🔗
Implements Blast effect that will move based on angle of the blade instead of random location Blast will impact and Fade in position
- SIZE controls blast size bump 0 ~ 32768
- FADE = fade time ms
- TOP = uppermost Blast position limit, BOTTOM = lowermost Blast position limit, Int<32768> = tip, Int<0> = hilt
- EFFECT = effect type, defaults to EFFECT_BLAST
ResponsiveStabL<STAB COLOR, TRANSITION1, TRANSITION2, SIZE1, SIZE2> 🔗
Stab effect Implements Stab effect that will change in size based on angle of the blade
- TRANSITION1 & TRANSITION2 = transition Begin & End
- SIZE1 & SIZE2 control Stab area limits for BladeAngle, Int<0> ~ Int<32768>
Style Arguments 🔗
Styles in ProffieOS can use arguments to make them more useful. Arguments can be integers or colors that can be changed by using the edit mode, or the ProffieOS workbench. There are two style templates that make this possible:
RgbArg<ARGUMENT_NUMBER, DEFAULT_COLOR>
or
IntArg<ARGUMENT_NUMBER, DEFALUT_VALUE>
While you don't have to use these arguments, they can be very useful for saving memory and making your saber or prop more dynamic and configurable.
Let's consider a simple preset, and I want a red, a green, and a blue preset, I would do:
{"font1", "tracks/track1.wav",
 StylePtr<EasyBlade<Red, White, 800, 300>>(),
 "label"},
{"font2", "tracks/track2.wav",
 StylePtr<EasyBlade<Green, White, 800, 300>>(),
 "label"},
{"font3", "tracks/track3.wav",
 StylePtr<EasyBlade<Blue, White, 800, 300>>(),
 "label"},
Not a problem, right? Since these are simple styles, they won't take up much space, and because they were made without arguments, they cannot be modified at run time.
Using arguments, I could instead write this as a single preset:
{"font1", "tracks/track1.wav",
 StylePtr<EasyBlade<RgbArg<BASE_COLOR_ARG, Red>, White, 800, 300>>(),
 "label"},
Then I could use edit mode or the ProffieOS workbench to copy this preset two more times, and change the fonts and the color for each preset. These copies would not take up any extra FLASH memory, which means I can use that memory for something else. (Like more styles...)
From ProffieOS 7.x, this gets even better, because you can specify the default arguments in the config file, like this:
{"font1", "tracks/track1.wav",
 StylePtr<EasyBlade<RgbArg<BASE_COLOR_ARG, Red>, White, 800, 300>>("65535,0,0"),
 "label"},
{"font2", "tracks/track2.wav",
 StylePtr<EasyBlade<RgbArg<BASE_COLOR_ARG, Red>, White, 800, 300>>("0,65535,0"),
 "label"},
{"font3", "tracks/track3.wav",
 StylePtr<EasyBlade<RgbArg<BASE_COLOR_ARG, Red>, White, 800, 300>>("0,0,65535"),
 "label"},
*Note the use of Rgb16 values
Because were using the very same style each time, it doesn't actually use up any more memory, and we don't have to use the style editor or the proffieos workbench to do the edits. It can all be done in the config file. Also, if we mess something up using edit mode, we can delete presets.ini and presets.tmp from the SD card, without losing the defaults.
If you don't know what string to put between the parenthesis, you can use edit mode/workbench to configure it the way you want it, then open up presets.ini/tmp and check the strings saved in there, then copy them to the config file.
By convention, these are the arguments we normally use in proffieos:
- BASE_COLOR_ARG = 1, // Primary Base Color
- ALT_COLOR_ARG = 2, // Alternate or Force Color (free-use)
- STYLE_OPTION_ARG = 3, // Style Option
- IGNITION_OPTION_ARG = 4, // Ignition Options
- IGNITION_TIME_ARG = 5, // used in IgnitionTime alias
- IGNITION_DELAY_ARG = 6, // Ignition Delay Time
- IGNITION_COLOR_ARG = 7, // Ignition "Power Up" Color
- IGNITION_POWER_UP_ARG = 8, // Ignition "Power Up" Options
- BLAST_COLOR_ARG = 9, // Blast Color
- CLASH_COLOR_ARG = 10, // Clash Color
- LOCKUP_COLOR_ARG = 11, // Lockup Color
- LOCKUP_POSITION_ARG = 12, // Clash/Lockup Location for Responsive Effects (mid-point)
- DRAG_COLOR_ARG = 13, // Drag Color
- DRAG_SIZE_ARG = 14, // Drag Size
- LB_COLOR_ARG = 15, // Lightning Block Color
- STAB_COLOR_ARG = 16, // Stab / Melt Color
- MELT_SIZE_ARG = 17, // Stab / Melt Size
- SWING_COLOR_ARG = 18, // Swing Color (Responsive Swing Effects)
- SWING_OPTION_ARG = 19, // Swing Options (Responsive Swing Effects)
- EMITTER_COLOR_ARG = 20, // Emitter Color (Emitter Spark) can be used for PostOff
- EMITTER_SIZE_ARG = 21, // Emitter Size (Emitter Spark), can be used for PostOff
- PREON_COLOR_ARG = 22, // PreOn Color
- PREON_OPTION_ARG = 23, // PreOn Option
- PREON_SIZE_ARG = 24, // PreOn Size
- RETRACTION_OPTION_ARG = 25, // Retraction Options
- RETRACTION_TIME_ARG = 26, // used in RetractionTime alias
- RETRACTION_DELAY_ARG = 27, // Retraction Delay Time
- RETRACTION_COLOR_ARG = 28, // Retraction "Cool Down" Color
- RETRACTION_COOL_DOWN_ARG = 29, // Retraction "Cool Down" Options
- POSTOFF_COLOR_ARG = 30, // PostOff Color
- OFF_COLOR_ARG = 31, // Off Color (Color when blade is Off for crystals and accents)
- OFF_OPTION_ARG = 32, // Off Options (when blade is Off, for crystals and accents)
- // Arguments 33 and up are new in ProffieOS 7.x
- ALT_COLOR2_ARG = 33, // Generic 2nd Alt Color
- ALT_COLOR3_ARG = 34, // Generic 3rd Alt Color
- STYLE_OPTION2_ARG = 35, // Generic 2nd Style Option
- STYLE_OPTION3_ARG = 36, // Generic 3rd Style Option
- IGNITION_OPTION2_ARG = 37, // Ignition BEND Option
- RETRACTION_OPTION2_ARG = 38, // Retraction BEND Option
Note that this is just convetion. You can use IntArg<1, 1> in your style if you want to, but it will probably not work correctly with edit mode and the workbench.
Config, transitions 🔗
TrBlinkX 🔗
Usage 🔗
TrBlinkX<MILLIS_FUNCTION, N, WIDTH_FUNCTION>
TrBlink<MILLIS, N, WIDTH>
Arguments 🔗
- MILLIS_FUNCTION: FUNCTION
- MILLIS: a number
- N: a number
- WIDTH_FUNCTION: FUNCTION, defaults to Int<16384>
- WIDTH: a number, defaults to 16384
- return value: TRANSITION
Description 🔗
Blinks A-B N times in MILLIS, based on WIDTH (0 ~ 32768) If WIDTH = 16384 A and B appear equally, lower decreases length of A, higher increases length of A
Source Link 🔗
TrBoingX 🔗
Usage 🔗
TrBoingX<MILLIS_FUNCTION, N>
TrBoing<MILLIS, N>
Arguments 🔗
- MILLIS_FUNCTION: FUNCTION
- MILLIS: a number
- N: a number
- return value: TRANSITION
Description 🔗
Similar to TrFade, but transitions back and forth between the two colors several times. (As specified by N). If N is 0, it's equal to TrFade. If N is 1 it transitions A-B-A-B, if N is 2, it is A-B-A-B-A-B, and so on.
See Also 🔗
Source Link 🔗
TrCenterWipeInX 🔗
Usage 🔗
TrCenterWipeInX<POSITION_FUNCTION, MILLIS_FUNCTION>
TrCenterWipeIn<POSITION, MILLIS>
Arguments 🔗
- POSITION_FUNCTION & MILLIS_FUNCTION: FUNCTION
- POSITION: Int
- MILLIS: a number
- return value: TRANSITION
Description 🔗
In the beginning entire blade is color A, then color B starts at the ends and moves toward POSITION in the specified number of milliseconds.
See Also 🔗
TrCenterWipeX, TrWaveX, TrSparkX, Mult, Percentage, Sum
Source Link 🔗
TrCenterWipeX 🔗
Usage 🔗
TrCenterWipeX<POSITION_FUNCTION, MILLIS_FUNCTION>
TrCenterWipe<POSITION, MILLIS>
Arguments 🔗
- POSITION_FUNCTION & MILLIS_FUNCTION: FUNCTION
- POSITION: Int
- MILLIS: a number
- return value: TRANSITION
Description 🔗
In the beginning entire blade is color A, then color B starts at the POSTION and extends up and down the blade in the specified number of milliseconds.
See Also 🔗
TrCenterWipeInX, TrWaveX, TrSparkX, Mult, Percentage, Sum
Source Link 🔗
TrColorCycle 🔗
Usage 🔗
TrColorCycle<MILLIS, START_RPM, END_RPM>
Arguments 🔗
- OR: TrColorCycleX<MILLIS_FUNCTION, START_RPM, END_RPM>
- MILLS: number
- MILLIS_FUNCTION: FUNCTION
- START_RPM: a number (defaults to 0)
- END_RPM: a number (defaults to 6000)
- return value: COLOR
Description 🔗
Tron-like transition.
Source Link 🔗
TrConcat 🔗
Usage 🔗
TrConcat<TRANSITION, INTERMEDIATE, TRANSITION, ...>
Arguments 🔗
- OR: TrConcat<TRANSITION, TRANSITION, ...>
- TRANSITION: TRANSITION
- INTERMEDIATE: COLOR
- return value: TRANSITION
Description 🔗
Concatenates any number of transitions. If an intermediate color is provided, we first transition to that color, then we transition away from it in the next transition. If no intermediate color is provided, the first and second transition will both transition from the same input colors. If for instance both the first and second transitions are TrFades, then there will be a jump in the middle as the transition will go back and start from the beginning. Using TimeReverseX on the second transition will avoid this, as the second transition will then run backwards.
Source Link 🔗
TrDelayX 🔗
Usage 🔗
TrDelayX<MILLIS_FUNCTION>
TrDelay<MILLIS>
Arguments 🔗
- MILLIS_FUNCTION: FUNCTION
- MILLIS: a number
- return value: TRANSITION
Description 🔗
Waits for the specified number of milliseconds, then transitions to second color. Meant to be used with TrConcat
See Also 🔗
Source Link 🔗
TrDoEffectAlwaysX 🔗
Usage 🔗
TrDoEffectAlwaysX<TRANSITION, EFFECT, WAVNUM, LOCATION_CLASS>
TrDoEffectsAlways<TRANSITION, EFFECT, WAVNUM, LOCATION>
Arguments 🔗
- TRANSITION: TRANSITION
- EFFECT: effect type
- WAVNUM, LOCATION: a number
- LOCATION_CLASS: INTEGER
- return value: TRANSITION
Description 🔗
TrDoEffectAlways is the same as TrDoEffectX, but runs even if the blade is off.
See Also 🔗
Source Link 🔗
TrDoEffectX 🔗
Usage 🔗
TrDoEffectX<TRANSITION, EFFECT, WAVNUM, LOCATION_CLASS>
TrDoEffect<TRANSITION, EFFECT, WAVNUM, LOCATION>
Arguments 🔗
- TRANSITION: TRANSITION
- EFFECT: effect type
- WAVNUM, LOCATION: a number
- LOCATION_CLASS: INTEGER
- return value: TRANSITION
Description 🔗
Runs the specified TRANSITION and triggers EFFECT (unless the blade is off) Can specify WAV file to use for EFFECT with WAVNUM NOTE: 0 is first wav file, -1 is random wav LOCATION = -1 is random
See Also 🔗
Source Link 🔗
TrExtendX 🔗
Usage 🔗
TrExtendX<MILLIS_FUNCTION, TRANSITION>
TrExtend<MILLIS, TRANSITION>
Arguments 🔗
- MILLIS_FUNCTION: FUNCTION
- TRANSITION: TRANSITION
- MILLIS: a number
- return value: TRANSITION
Description 🔗
Runs the specified transition, then holds the last value for some additional time specified by MILLIS_FUNCTION.
Source Link 🔗
TrFadeX 🔗
Usage 🔗
TrFadeX<MILLIS_FUNCTION>
TrFade<MILLIS>
Arguments 🔗
- MILLIS_FUNCTION: FUNCTION
- MILLIS: a number
- return value: TRANSITION
Description 🔗
Linear fading between two colors in specified number of milliseconds.
See Also 🔗
Source Link 🔗
TrInstant 🔗
Usage 🔗
TrInstant
Arguments 🔗
- return value: TRANSITION
Description 🔗
Instant transition.
Source Link 🔗
TrJoin 🔗
Usage 🔗
TrJoin<TR1, TR2, ...>
Arguments 🔗
- TR1, TR2: TRANSITION
- return value: TRANSITION
Description 🔗
A little hard to explain, but all the specified transitions are run in parallel. Basically, we chain transitions like ((A TR1 B) TR2 B)
See Also 🔗
Source Link 🔗
TrJoinR 🔗
Usage 🔗
TrJoinR<TR1, TR2, ...>
Arguments 🔗
- TR1, TR2: TRANSITION
- return value: TRANSITION
Description 🔗
Similar to TrJoin, but transitions are chained to the right instead of to the left. Like: (A TR2 (A TR1 B))
See Also 🔗
Source Link 🔗
TrLoop 🔗
Usage 🔗
TrLoop<TRANSITION>
Arguments 🔗
- TRANSITION: TRANSITION
- Return Value: TRANSITION
Description 🔗
Runs the specified transition in a loop forever.
See Also 🔗
Source Link 🔗
TrLoopNX 🔗
Usage 🔗
TrLoopNX<N_FUNCTION, TRANSITION>
TrLoopN<N, TRANSITION>
Arguments 🔗
- N_FUNCTION: FUNCTION (number of Loops)
- N: a number (Loops)
- TRANSITION: TRANSITION
- Return Value: TRANSITION
Description 🔗
Runs the specified transition N times.
See Also 🔗
Source Link 🔗
TrLoopUntil 🔗
Usage 🔗
TrLoopUntil<PULSE, TRANSITION, OUT>
Arguments 🔗
- TRANSITION, OUT: TRANSITION
- PULSE: FUNCTION (pulse)
- Return Value: TRANSITION
Description 🔗
Runs the specified transition until the pulse occurs. When the pulse occurs, the loop continues, but OUT is used to transition away from it, and when OUT is done, the transition is done.
See Also 🔗
Source Link 🔗
TrRandom 🔗
Usage 🔗
TrRandom<TR1, TR2, ...>
Arguments 🔗
- TR1, TR2: TRANSITION
- return value: TRANSITION
Description 🔗
Each time a new transition is started, a random transition is picked from the specified list of transitions.
Source Link 🔗
TrSelect 🔗
Usage 🔗
TrSelect<SELECTION, TR1, TR2, ...>
Arguments 🔗
- SELECTION: FUNCTION
- TR1, TR2: TRANSITION
- return value: TRANSITION
Description 🔗
transition option is picked from the specified list of transitions based on Int<> with Int<0> representing first transition
See Also 🔗
Source Link 🔗
TrSequence 🔗
Usage 🔗
TrSequence<TR1, TR2, ...>
Arguments 🔗
- TR1, TR2: TRANSITION
- return value: TRANSITION
Description 🔗
Each time a new transition is started, a transition is selected sequentially, such that the frist time a transition is started TR1 will be selected, then TR2, etc. When the end of the sequence is reached, the next transition selected wraps back around to TR1.
See Also 🔗
Source Link 🔗
TrSmoothFadeX 🔗
Usage 🔗
TrSmoothFadeX<MILLIS_FUNCTION>
TrSmoothFade<MILLIS>
Arguments 🔗
- MILLIS_FUNCTION: FUNCTION
- MILLIS: a number
- return value: TRANSITION
Description 🔗
Similar to TrFade, but uses a cubic fading function so fading starts slow, speeds up in the middle, then slows down at the end.
See Also 🔗
Source Link 🔗
TrSparkX 🔗
Usage 🔗
TrSparkX< COLOR, SPARK_SIZE, SPARK_MS, SPARK_CENTER>
Arguments 🔗
- COLOR: COLOR
- SPARK_SIZE, SPARK_MS, SPARK_CENTER: FUNCTIONS
Description 🔗
TrSparkX generates a wave without Fade over the length of the blade from SPARK_CENTER. Unlike other transitions, this effect starts and ends at the same color, and the wave is drawn using COLOR instead of the start/end colors like most transitions do. It's intended to be used with TransitionLoopL or TransitionEffectL, which take transitions that start and begin with the same color.
See Also 🔗
TrWaveX, TransitionLoop, TransitionEffect
Source Link 🔗
TrWaveX 🔗
Usage 🔗
TrWaveX<COLOR, FADEOUT_MS, WAVE_SIZE, WAVE_MS, WAVE_CENTER>
Arguments 🔗
- COLOR: COLOR
- FADEOUT_MS, WAVE_SIZE, WAVE_MS, WAVE_CENTER: FUNCTION
Description 🔗
TrWave is implements a wave traveling out from a specified point. It's based on the Blast effect and is meant to look like a ripple starting at a point on the blade. Unlike other transitions, this effect starts and ends at the same color, and the wave is drawn using COLOR instead of the start/end colors like most transitions do. It's intended to be used with TransitionLoopL or TransitionEffectL, which take transitions that start and begin with the same color.
See Also 🔗
TrSparkX, Blast, TransitionLoop, TransitionEffect
Source Link 🔗
TrWipeInSparkTip 🔗
Usage 🔗
TrWipeInSparkTip<SPARK_COLOR, MILLIS, SIZE>
Arguments 🔗
- SPARK_COLOR: COLOR
- MILLIS: a number
- SIZE: a number
- return value: TRANSITION
Description 🔗
Like TrWipeSparkTip, but from tip to base.
See Also 🔗
TrWipeX, TrWipeInX, TrWipeSparkTip, TrWaveX, TrSparkX
Source Link 🔗
TrWipeInX 🔗
Usage 🔗
TrWipeInX<MILLIS_FUNCTION>
TrWipeIn<MILLIS>
Arguments 🔗
- MILLIS_FUNCTION: FUNCTION
- MILLIS: a number
- return value: TRANSITION
Description 🔗
Like TrWipe, but from tip to base.
See Also 🔗
TrWipeX, TrWipeSparkTip, TrWipeInSparkTip, TrWaveX, TrSparkX
Source Link 🔗
TrWipeSparkTip 🔗
Usage 🔗
TrWipeSparkTip<SPARK_COLOR, MILLIS, SIZE>
Arguments 🔗
- SPARK_COLOR: COLOR
- MILLIS: a number
- SIZE: a number
- return value: TRANSITION
Description 🔗
Same as TrWipe, but adds a "spark" tip to the leading edge of the wipe color.
See Also 🔗
TrWipeX, TrWipeInX, TrWipeInSparkTip, TrWaveX, TrSparkX
Source Link 🔗
TrWipeX 🔗
Usage 🔗
TrWipeX<MILLIS_FUNCTION>
TrWipe<MILLIS>
Arguments 🔗
- MILLIS_FUNCTION: FUNCTION
- MILLIS: a number
- return value: TRANSITION
Description 🔗
Similar to saber ignition. In the beginning entire blade is color A, then color B starts at the base and extends up to the tip of the blade in the specified number of milliseconds.
See Also 🔗
TrWipeInX, TrWipeSparkTip, TrWipeInSparkTip, TrWaveX, TrSparkX
Source Link 🔗
Display 🔗
PQF files 🔗
PQF is a file format for storing images and animations. It was inspired by the QOI format, but re-written for 16-bit, optimized for high-speed transparency processing, and adds jumps, conditions, labels and a bunch of other things. This page will describe how to create and edit PQF files from images, but a lot of the actual capabilities of the PQF format are actually descriped on the PQOIML page. PQF files are created by using the cpqoi program, and can be disassembled by using the dpqoi program.
Prerequisites 🔗
A linux-like environment 🔗
- If you're already on linux: good job
- If you're on windows, you can install one using WSL, more information here: https://docs.microsoft.com/en-us/windows/wsl/install
- Mac is already mostly linux-like, but I recommend installing homebrew to make it easy to install the rest of the requirements.
Packages you'll need 🔗
- A C++ compiler (g++ or clang++)
- ffmpeg
- mjpegtools
- netpbm
Compiling cpqoi and dpqoi 🔗
- Download ProffieOS
- unzip it
- open up a terminal and go to the "pqoi" directory.
- run "make" to compile cpqoi and dpqoi
Creating a PQF file from an image 🔗
Just run:
cpqoi some_image.png >some_image.pqf
This will create a PQF that will show the image until interrupted somehow. Note that the PQF file will have the same size as the input image, which might be too big for the display, and ProffieOS does not have the ability to scale images. To create a PQF with a specified size, you can add a scaling command, like this:
cpqoi some_inage.png "pamscale -xysize 128 80" >some_image.pqf
This will scale the image down until it fits in a 128x80 image. Any of the pam* commands from netpbm can be used to scale, rotate and modify the image, which can be handy for scripting.
Creating a PQF from a movie 🔗
cpqoi somemovie.mp4 "pamscale -xysize 128 80" >animation.pqf
As you can see, this is exactly the same. One thing to be aware of is that this creates a looped PQF file. If that is not what you want, you will need to use a PQOIML file.
Creating a PQF from a PQOIML file. 🔗
PQOIML files give you much more fine-grained control over the contents of the PQF file. For more information, see the PQOIML page.
cpqoi myfile.pqoiml >animation.pqf
Usually, with pqoiml files you'll put the scaling command in the file itself, but you can also put it on the command line, just like before:
cpqoi myfile.pqoiml "pamscale -xysize 128 80" >animation.pqf
disassembling a PQF file 🔗
You can use 'dpqoi' to inspect a PQF file, and the output can then be modified and re-assembled with cpqoi. It's recommended to run dpqoi in an empty directory, because it will write one PNG file for every frame in the PQF file.
mkdir output
cd output
../dpqoi ../animation.pqf >animation.pqoiml
In addition to all the PNG files, a PQOI file will be written, and if you run cpqoi on that file, it will generate exactly the same PQF file.
SCR files 🔗
SCR files tells displays what to do. When event happens, the corresponding SCR files is read, and the instructions within are relayed to the display. SCR files are named in the same way as sound files, the only difference is that they are normally in a sub-directory called which is called 160x80, or whatever the resolution of your display is. Since displays can have multiple layers, an SCR file can have multiple sets of instructions, each separated by having "layer" on a single line.
The instructions 🔗
file=filename.pqf 🔗
This instruction tells the display to start playing "filename.pqf". The filename can be anything you want to. Note that if you have several PQF files and you want ProffieOS to choose one randomly, you must also have multiple SCR files, one for each PQF file. File names are relative to where the SCR files are, so if your SCR file is called "smthjedi/160x80/clash.scr" and your PQF file is called "smthjedi/160x80/pqf/clash.pqf", then you would use "file=pqf/clash.pqf". (No need to include the smthjedi/160x80 part.)
Note that if the layer is already playing this file, it will just continue playing it.
There should be at most one "file=..." per layer in an SCR file. If there is no "file=..." for a layer, it will just continue doign what it's doing.
restart 🔗
The "restart" keyword doesn't do anything by itself. However, if there is a "file=..." in the same layer, and, it was already playing that file, then instead of just continuing, it will start from the beginning of the file.
time=NNN 🔗
Non-animated and looped files will normally play forever, or until some other event occurs. This statement lets you put a time limit on how long the PQF will be playing. This also works for non-looped animations, but might not be needed since they will end naturally when the file runs out. The "NNN" part simply specifies how many milliseconds to play for.
time=from_sound 🔗
This special form of the "time" assignment will take the time from the length of whatever WAV file was triggered by the same event. This does not make sense for SCR files that are not triggered by an event, like "on.scr" and "idle.scr".
A, B, C, D, E = battery, volume, sound_level 🔗
These variable assignments actually look like this: Examples:
A=battery
B=volume
C=sound_level
PQF files can have conditions based on variable values, and this is how you specify what those variables do. There are five possible variables: A through E, and two possible sources of values "battery" and "volume". Each value is converted to a 0-100 scale and fed to the PQF in real time. More variable sources will be available in the future. By having these variables assigned here, you could create animations that show numbers, gauges or sound meters, and then decide afterwards if you want to use that animation to show the battery level, volume, or sound level.
Examples 🔗
This is an example of boot.scr from a virtual crystal chamber animation setup:
file=vc.pqf
layer
file=batt.pqf
A=battery
layer
file=logo.pqf
- So, the first layer starts to play "vc.pqf". None of the other SCR files ever change this, so it just keeps playing forever.
- The second layer plays "batt.pqf", which has a battery level overlay in the bottom corner. Again, this never changes in any of the other SCR files.
- A=battery specifies that the "A" value (which is used by batt.pqf) will draw it's values from the battery sensor.
- The third layer will play logo.pqf, which shows "ProffieOS" for a few seconds, then becomes transparent, and then stops, which shows the layers below.
The "vc.pqf" file in this virtual crystal example has internal conditions that handles on/off, clash and lockup, so there is no need for the SCR files to do anything about that.
For more information about PQF files, read the PQF Page.
OLED additional features: Bullet Counts 🔗
As of ProffiesOS 6.x, it's possible to show bullet counts on an OLED display. Here's what you would need:
This includes the display code, but doesn't activate it. May become the default in the future.
#define INCLUDE_SSD1306
Here's how we activate the display:
#ifdef CONFIG_BOTTOM
DisplayHelper<128, uint32_t,
  BaseLayerOp<BlasterDisplayController>,
  ClearRectangleOp<10, 80, 8, 24>,
  WriteBulletCountOp<10, 20, 5>
> display_controller;

SSD1306Template<128, uint32_t> display(&display_controller);
#endif
The DisplayHelper class takes a list of display operations, which works a lot like the Layers<> style. Currently, these operations are available:
Two different base layers:
BaseLayerOp<StandardDisplayController>ClearScreenOp
The first one makes it work like a standard display controller (shows, font.bmp, messages, etc., the second one just makes it black.
ClearRectangleOp<x1, x2, y1, y2> 🔗
This op clears a rectangle on the screen.
WriteBulletCountOp<x, y, digits> 🔗
Writes the current bullet count at the specified location.
IfImageOp<OP> 🔗
This executes OP if the base layer is showing an image, but not otherwise. The idea is that you could have a bullet count that draws over images, but not messages and battery monitors.
We will probably need more display OPs real soon for other purposes... In 7.x I plan to make it possible to specify a different display controller for each preset, essentially making it a "style" for the display.
Color Displays 🔗
Supported Displays 🔗
ProffieOS currently has support for four types of color displays:
- DFRobot 847 160x80 0.96" - small display suitable for sabers
- Adafruit 358 160x128 1.8" - You can find similar displays on ebay, which should also work.
- Adafruit 5206 280x240 1.69" - higher resolution display
- Adafruit 4311 320x240 2.0" - biggest, highest resolution
More will be added in the future.
I highly recommend using an eyespi breakout board to connect to the displays, but it is also possible to solder directly to the displays.
Note that you will need a V3 Proffieboard to use color displays.
Wiring and Configuration 🔗
Please use the Proffieboard configuration generator to find out how to wire up the display and to see what to put int the configuration file. For the rest of the examples below, we'll be using the DFRobot display for examples.
SCR, PQF and Layers 🔗
Color displays in ProffieOS are implemented using layers, similar to how the Layer<> blade style works. However, the indidvidual layers do not come from other styles, but are instead read from PQF files on the SD card. PQF is a simple image/video compression format specifically created for this purpose. SCR files are fairly simple text files which specifies what each layer should be doing.
So, when a clash occurs, ProffieOS will find and read the approperiate SCR file, using the same EFFECT file system which is used to play sound effects and OLED images. Then it will read that file, and follow the instructions in it. Each layer can have a different set of instructions, separated by a line that just says "layer", example:
file=background.pqf
layer
file=clash.pqf
This file will play "background.pqf" on the first (bottom) layer, and "clash.pqf" on the second layer. For a full description of how SCR files work, read the SCR Page.
PQF files 🔗
PQF files files can contain images, animations, loops, and even complicated things like counters. This allows for a large set of complicated animations without having to write code for it, which would take up a lot of space on the Proffieboard. The PQF page has descriptions of what PQF can do and how to convert images and animations to PQF.
A note about speed 🔗
Driving color displays is a heavy operation for a Proffieboard. For the smallest displays, achiving a reasonably high frame rate is usually not a problem, but I highly recommen compiling with the "Fastest" setting to make the display work as well as it can. Note that "Fastest" uses a lot of memory, so the number of presets will be limited.
For larger displays, the maximum frame rate will depend on the complexity of the content. If PQF is able to compress the content well, then good frame rates are still possible, but complex content will may not be able to play at full speed.
Using layers also reduces the maximum possible frame rate. Fully transparent and fully opaque pixels are fairly quick to draw, but semi-transparent pixels are slower, so please use them sparingly. Some transparent pixels surrounding an otherwise opaque object should be fine, but drawing a "haze" or a bunch of glass effects is likely going to be too slow.
Effects 🔗
The code that reads SCR files currently supports the following set of files:
- boot - played on boot (falls back on font)
- font - played when switching presets
- blst - played on blast
- clsh - played on clash
- force - played on force push
- preon - played on preon
- out - played on ignition
- in - played on retraction
- pstoff - played on post-off
- lock - played during lockup (repeats)
- pli - played when battery status is requested
- idle - played when off (repeats)
- on - played when on (repeats)
- lowbatt - played when battery is low
Normally, the SCR file should be in a sub-directory of the font, which is named by the resolution, so if your font directory is "smthjedi", and your screen is 168x80, then the clash SCR file should be called "smthjedi/180x80/clash.scr". Of course you can also have multiple "clash.scr" files, like "smthjedi/180x80/clash01.scr", "smthjedi/180x80/clash02.scr", etc.
A sample virtual crystal chamber, with a battery meter on a sparate layer can be found here: https://github.com/profezzorn/ProffieColorImages/tree/main/examples/crystal_chamber_160x80
OLED display fonts: StarJEDI or Aurabesh 🔗
To have the "name" argument at the end of a blade style display the correct characters, it should be understood that
the StarJedi font maps ACSII to glyphs with all kinds of characters aside from alphabetical, as well as some that have stylized differences.
The font shows as all capitals, but for most cases, you should use all lowercase letters to assure it will display as the characters you expect.
For example, an R can either have the long tail as in the Star Wars logo, or it can be shorter to work with other letters.
Lowercase 'o' is 'O', but a capital 'O' is a stylized 'N'.
If you install the font on your computer (it's in ProffieOS/display), and choose it as the font in a text editor, you can run through the whole keyboard and see what each character generates.
Additionally, to have the "name" argument at the end of a blade style be displayed in Aurebesh language,
add #define USE_AUREBESH_FONT to the config file.
Tip:
If you want to split the message up across 2 lines use a newline \n, so like:
"darth\nvader"
or if you want to get fancy, use a couple of spaces to center it on the screen
" darth\n vader"
OLED images and animations 🔗
ProffieOS can load images and animations from the SD card and display them on an OLED display screen.
Currently, the following events can play them:
- boot (when power is applied to the board),
- font (when a new preset is selected)
- on (when blade is running)
- idle (when blade is not running)
- clsh
- blst
- force
- lock
From ProffieOS 7.x, these additional events are available:
- preon
- out
- in
- pstoff
From ProffieOS 8.x, these additional events are available:
- lowbatt
Also, from Proffie 8.x, you can use the BlasterDisplayController to activate these extra events:
- blast
- reload
- empty
- jam
- clipin
- clipout
- destruct
In the future, there will probably be more things that will trigger loading OLED images or animations from the SD card, as well as additional size displays, including color, etc.. For this page's explanations, a typical monochrome 128x32 pixel OLED display is used as the example target.
ProffieOS uses the same code to locate image files as it uses for sound files.
This means that multiple numbered files can be used, and one of them will be selected randomly to show each time.
During boot, ProffieOS will look in the first font directory of your font search path for "boot.bmp", "bootNNN.bmp", "boot.pbm" or "bootNNN.pbm" (where NNN is a number).
During preset changes, ProffieOS will look in the font directory for "font.bmp", "fontNNN.bmp" "font.pbm" or "fontNNN.pbm", and so on for the other effects as well.
*Note - "font" is used as the example throughout this page. The same steps apply for on, boot, and the rest of the effects.
For monochrome displays, two image formats are supported: bmp and pbm. In each case, files must be formatted to fit the 128x32 screen and only use 1 bit-per-pixel (black and white only, not greyscale).
In addition, pbms must be saved in binary format, not ASCII.
One thing to note is that bmp files may play inverted (black->white, white->black) so the resulting files can be inversed later if they don't appear as intended on the OLED display.
pbm files seem to avoid this inversion.
Images shown on the display can be single frame stills, or they can be animated.
They can be created in an image editor like Paint or Photoshop, or online such as at https://www.pixilart.com.
To get started, save each animation frame as its own image file, 128x32, and make sure the names of the exported files are sequential, like
font001.jpg font002.jpg font003.jpg etc...
The file type here doesn't really matter (jpg, bmp, png, etc...) as long as they are all the same. However, png gives weird results when previewing as a gif.
The file name extension will be used in the commands below to process the image down to a 1bpp monochrome image, formatted as either bmp or pbm.
Install Imagemagick 🔗
We can streamline the processing with command line tools. (Converting exported slices/layers from Photoshop for example)
For a step-by-step video, you can see : https://www.youtube.com/watch?v=-OCy1dyW7EQ
By using Imagemagick, we can process images appropriately, and convert to 1bpp (1 bit-per-pixel) monochrome image file in one step.
The source file type doesn't matter, as long as they are all the same and part of a numbered sequence of file names.
For example, Photoshop slices out to .jpg files, so we process all the numbered files of the specified file type.
Imagemagick used to use "convert" for the command, but now uses "magick" instead (although as of this writing, "convert" still works, just with a note of the changeover).
Windows: Download the installer here : https://imagemagick.org/script/download.php
Be sure to turn the checkmark ON for "Install legacy utilities" during the installation.
Once installed, type cmd in the search box near the Start menu to open a command prompt,
then navigate to the directory containing your numbered image files by using the cd command.
MacOS: To install Imagemagick on MacOS, open Utilities/Terminal, copy and paste this:
/bin/bash -c "$(curl -fsSL https://raw.githubusercontent.com/Homebrew/install/HEAD/install.sh)"
When it’s done, this: brew install imagemagick
When that’s done, this: brew install ghostscript
Animations for the OLED display can play either looped, or non-looped.
Looped Animations 🔗
To make a looped animation, use bmp files, stacking frames vertically. For instance, a bmp image that is 128x64 is a 2-frame looped animation. 128x96 is a 3-frame looped animation, etc.
Use the "magick" command with "-append" (which stacks the frames vertically) and "-monochrome" flags, which looks like this:
( * is a wildcard so all files ending in ".jpg" will be processed)
convert -append -monochrome *.jpg font.bmp
The resulting file named "font.bmp" is now ready to play on the OLED.
Non-looped Animations 🔗
To make non-looped animations, we need to concatenate the files together into a pbm file without the vertical stacking.
We can use the same Imagemagick "magick" command as above, just without the "-append" option.
convert -monochrome *.jpg font.pbm
Convert from bmp to pbm, or vice-versa 🔗
The idea here is simply to break out a file (back) to its individual frames and then make the desired file type.
Example: Make a currently looping 128x3648 boot.bmp into a non-looping boot.pbm file.
- Stick a copy of the file in a new, empty working directory, and calculate the number of frames by dividing the total vertical pixels by 32. (3648/32=114)
cdto that directory, then use that number in this command
convert boot.bmp -crop 1x114@ frame-%04d.jpg
This is going to give you 114 files (one per frame) named “frame” with 4 digits and .jpg extensions.- Take all the files that start with “frame” and make a .pbm file.
convert -monochrome frame* boot.pbm
On Linux , this can be optionally done with the "cat" command, however we need to either process files that are monochrome already, or convert the result of this:
cat frame????.jpg >font.pbm
Converting video to frames 🔗
While Imagemagick can also use "convert" to break out a video file to individual frames for processing, ffmpeg does a better job.
To install ffmpeg for Windows, see here https://www.geeksforgeeks.org/how-to-install-ffmpeg-on-windows/
To install ffmpeg on MacOS, see here https://phoenixnap.com/kb/ffmpeg-mac
Videos with .mp4 and .mov extensions have been tested, others likely work as well.
This command will make numbered files for EACH frame of the video.
ffmpeg -i SourceFileName.mp4 frame%04d.jpg
Now, that command as-is may generate too many frames depending on your video length, so you can optionally choose an interval by using the -r flag like this:
ffmpeg -i SourceFileName.mp4 -r 1 frame%04d.jpg
Using the option -r 1 will set the output frame rate to 1 every second. Assuming the input video has a frame rate of 30 per second, -r 1 will output about every 30th frame.
Calculate the interval you need according to the frame rate of the input. For example, to get approximately every 10th frame, use -r 3.0.
The output file name uses %04d which creates a numbered sequence with four digits, so frame0001.jpg, frame0002.jpg, and so on.
Once all of the frame files are available, making a .bmp or .pbm from them is the same as explained above.
Seeing a preview of the results 🔗
An easy way to preview the bmp image/animation is to just drag it into a Chrome browser window. The bmp file should look tall, stacked for as many frames as you processed (some lengthy animations are very tall skinny images).
The non-looping pbm file won't view in the same way, so while it's pretty easy to just copy it to the SD card and actually view it on the OLED itself, there is another way to preview it, again using Imagemagick.
Make a gif file from the frames, and then it CAN be dragged onto the browser window to watch the playback.
*Note - while gifs of pbm files will loop in the browser, the pbm will play once on the OLED using ProffieOS.
The delay speed used here is pretty close to on-display speed when set to ~3 as seen below.
convert -delay 3 *.jpg preview.gif
If we wanted to "boomerang" the animation by adding a reversed order of frames to the end,
we make the gif as above, then use this command:
convert preview.gif -coalesce -duplicate 1,-2-1 -quiet -layers OptimizePlus -loop 0 boomerang.gif
The gif could even be converted back to bmp or pbm.
convert boomerang.gif font.pbm
Inverted color results 🔗
If the final bmp image/animation is an inverted black and white color scheme from what you intended,
simply redo the conversion as above, but this time add the -negate flag, like:
convert -append -monochrome -negate *.jpg font.bmp
Orientation 🔗
Lastly, if the image is displayed upside down on the installed screen, we can easily rotate it 180 degrees by adding
a define to the CONFIG_TOP section of the uploaded config file:
#define OLED_FLIP_180
There's also an option to flip it mirror image:
#define OLED_MIRRORED
Activating the BlasterDisplayController 🔗
In CONFIG_TOP use:
#define INCLUDE_SSD1306
In CONFIG_BOTTOM use:
BlasterDisplayController<128, uint32_t> display_controller;
SSD1306Template<128, uint32_t> display(&display_controller);
Using two OLED displays 🔗
- Your displays need to have different I2C IDs
- Add
#define INCLUDE_SSD1306the CONFIG_TOP section. - In CONFIG_BOTTOM, use something like this:
StandardDisplayController<128, uint32_t, STRTYPE("oled1/")> display_controller1;
SSD1306Template<128, uint32_t> display1(&display_controller1, ID1 /* enter I2C ID of first display here */);
StandardDisplayController<128, uint32_t, STRTYPE("oled2/")> display_controller2;
SSD1306Template<128, uint32_t> display2(&display_controller2, ID2 /* enter I2C ID of first display here */);
Put the images for the first display in FONT/oled1/ and the images for the second display in FONT/oled2/.
PQOIML 🔗
The PQOI markup language is very simple, here are all the possible commands:
fps A:B 🔗
Specifies the frame rate as a fraction, here are some examples:
fps 25:1  # 25 fps
fps 24000:1001 # common movie frame rate (23.976 fps)
fps 30000:1001 # NTSC frame rate (29.97 fps)
file FILENAME 🔗
Imports the image or movie into the PQF. Uses the scaling pipeline to scale each image.
label LABEL 🔗
Generate a label. Labels don't actually exist in the output file, as GOTO and IF statements just use positions in the file instead.
goto LABEL 🔗
Generates an unconditional jump to the label. Looped animations have goto to the beginning at the end.
if COND goto LABEL 🔗
In pqoiml, if statements are very simple, they work just like a goto, but with a condition. The conditions are application defined, but are always exactly four characters long. The list of conditions supported by ProffieOS has not yet been finalized, but this is what is supported so far:
- ison - do the jump if the saber is ignited
- lock - if we're in normal lockup mode
- drag - drag lockup mode
- melt - melt lockup mode
- A<30 - if A is less than 30
- A>30 - if A is greather than 30
- A=30 - if A is equal to 30
Note that "A" is a generic variable, and the meaning of A can be assigned at runtime by using a .SCR file. There are 5 possible variables: A, B, C, D, E and their values can be battery percent, volume, and other things. There is also a special R variable which has a random value between 0 and 100.
scaling SCALING PIPELINE 🔗
This sets the commands that scales the images. The scaling command is not saved in the output file, it's only used when a "file" statement is encountered. The scaling pipeline can also be specified on the command line, which makes it possible to use the same pqoiml file to generate multiple PQF files in different resolutions.
An example pqoiml file: 🔗
This is a pqoiml file for a simple battery overlay:
scaling pamcut -pad 0 0 174 250 | pamflip -r180 | pamcut -pad 0 0 1280 640 | pamflip -r180 | pamscale -xysize 160 80

fps 1:2

label empty
file 0.png
label twenty
file 20.png
if A<10 goto blink
if A<40 goto twenty

label forty
file 40.png
if A<40 goto twenty
if A<60 goto forty

label sixty
file 60.png
if A<60 goto forty
if A<80 goto sixty

label eighty
file 80.png
if A<80 goto sixty

label full
if A<90 goto eighty
file 100.png
goto full
Explainers 🔗
The history of clash detection in ProffieOS 🔗
In the beginning, there was CLASH_THRESHOLD_G.
Originally, the clash algorithm would simply compare the new accelerometer value with the last accelerometer value, and if it was greater than CLASH_THRESHOLD_G, it would trigger a clash, like:
$|Acceleration_{now} - Acceleration_{last} | > \verb|CLASH_THRESHOLD_G| $
Note that the acceleration values are vectors with X, Y and Z components, and the || takes the length of the vector. In other words, this is the same as doing:
$X = XAcceleration_{now} - XAcceleration_{last}$
$Y = YAcceleration_{now} - ZAcceleration_{last}$
$Y = YAcceleration_{now} - ZAcceleration_{last}$
$\sqrt{X^2 + Y^2 + Z^2} > \verb|CLASH_THRESHOLD_G|$
The problem with this algorithm is that the frequency of readings changes what it does. If you get more readings per second, then the difference between each one will be smaller, so the same CLASH_THRESHOLD_G wouldn't work. Back then, Proffieboards were new, and there were lots of Teensysabers still around, and because of differences in how they worked, they would often get different number of readings per second.
So a long long time ago, I changed this algorithm, instead of using the "last" value, I used a slow average of values instead, so the algorithm became:
$| Acceleration_{now} - Acceleration_{average} | > \verb|CLASH_THRESHOLD_G| $
In ProffieOS 3, this algorithm was improved by adding the Fusor class. The Fusor uses the accelerometer and the gyro to calculate a down vector. When nothing is happening, the down vector and the accelerometer should be the same thing. But this allowed me to change the algorithm to:
$| Acceleration_{now} - Down | > \verb|CLASH_THRESHOLD_G| $
So far, the improvements have been just that: improvements, however, at this point the story takes a bit of a turn... I discovered two potentially problematic things.
- The range for acceleration values was set to -4 to 4. Values higher than this would be truncated by the motion chip. For some reason though, many people seemed to find that they needed values around four for clash detection to work well for them. Values around 3.9 were quite common for some reason. To me, that meant that the algorithm wasn't really working as designed. Also, it gets a little wonky, because the truncation is cube-shaped, so if you hold your saber at a 45 degree angle, then the maximum value would be $ \sqrt{3 * 4^2} = 6.9 $ and having an algorithm that works differently depending on the angle didn't seem like a good idea.
- The accelerometer was set to 1600 readings per second. However, because of implementation details, we were usually only getting 800 readings per second, but sometimes it was much less, if your saber had lots of blades, OLED displays and stuff. A related problem was that OLED displays were updating slowly when the saber was on.
So I implemented an interrupt-driven i2c handler, which lets us reliably read 1600 accelerometer reading per second, and I also changed the range of values returned by the accelerometer from 4 to 16. Both of these seemed like a good idea, more and better data, right?
This turns out to not always be the case.
It turns out that when you sample the accelerometer very quickly, sound has a bigger impact on the readings. In the past, readings got smaller when I read the accelerometer more often, but this time, they got bigger, which causes more false clashes. Also, whatever fluke made the 3.9 values work well disappeared because I changed the range to 16.
In order to figure out what was going on, I added some defines to control the speed and range of accelerometer readouts:
#define PROFFIEOS_ACCELEROMETER_RANGE 16
This one can be set to 2, 4, 8 or 16, and specifies the range of values measured by the accelerometer. Higher values means less precision, but we don't really need high precision, so it doesn't really matter. However, if you want the 3.9-value-fluke, you should set this to 4.
#define PROFFIEOS_MOTION_FREQUENCY 1600
This define controls how often we read the accelerometer. I don't remember exactly what all the valid values are, but the interesting ones are basically 800 and 1600. The default is 1600, 800 is basically what ProffieOS 5 and below would get.
Once we started figuring out what was going on. We also added some potential solutions to the problem. In ProffieOS 6 there were two changes meant to solve this problem. The first one is a filter that averages the clash values over a short period of time to try to get rid of the high values that sometimes comes from sound. This filter is controlled by this define:
#define ACCEL_MEASUREMENTS_PER_SECOND 800
The default is 800, and the code just creates a box filter of size (PROFFIEOS_MOTION_FREQUENCY / ACCCEL_MEASUREMENTS_PER_SECOND = 2) to do the averaging. Setting this define to the same value as PROFFIEOS_MOTION_FREQUENCY (1600) means that no filtering will occur. Setting it to a lower value is also valid, but will cause some (very minor) latency in clash detection.
The other solution is:
#define AUDIO_CLASH_SUPPRESSION_LEVEL 10
This define checks the volume of sound currently being emitted and increases the CLASH_THRESHOLD_G accordingly. Higher values means more suppression when the volumes goes up, but that also means it's more difficult to actually make a clash happen.
Together these two things worked fairly well, but some people still had problems, and lots of people found that their old CLASH_THRESHOLD_G values were too low, and had to increase them to 5-7 for things to actually work. This wasn't really my intention, but that's what happened.
At some point after releasing ProffieOS 6, Fett263 told me that he used the gyro to detect clashes in his blade code. I'm like you do what? Here I had been using the accelerometer for years, and it turns out there is different way...
So I did a bunch of experimentation, and I found that the gyro values tends to spike when a clash occurs. This makes sense, because there is a change in rotation when the blade hits something. However, I found that the type of clash would affect the size of the gyro spike quite a bit, making it not always reliable. However, if I used both the gyro and the accelerometer, I got a clash detector that seemed to work much better than either one individually.
The formula is basically:
$| accel - down |/2+ | \Delta gyro|/2 > \verb|CLASH_THRESHOLD_G| $
For many people, this formula works really well, and it helps filter out most of the false clashes. However, for some people, this formula seems to be the opposite of helpful, forcing them to increase their clash threshold and make clashes harder to trigger. I'm not sure why that is though, but somehow the clash spike and the acceleration spike must not arrive at the same time.
Anyways, I made a define for disabling this new formula and use the previous one:
#define PROFFIEOS_DONT_USE_GYRO_FOR_CLASH
For some people the old formula works better, and they need this define.
That's it. Almost.
There is one detail I left out, because I don't remember when I added it, and there is no define to control it. (It was a long time ago though.)
There is a piece of code in there that checks the swing speed, and increases the clash threshold accordingly. Before I added this, false clashes during swings were very very common. That code lives here:
Save File Format 🔗
Up until ProffieOS 6.x all save files in ProffieOS were basically simple INI files. Just a bunch of lines like:
variable=value
anotherVariable=value
end
While super simple, it did cause some problems, because saving these files deleting or overwriting files, and every time you write to the SD card, there is there is a chance that the write could be interrupted in the middle, making one or more blocks turn into gobblygook. Now, if the data inside the file turns into gobblygook, that isn't really a problem. We have a .bak file for that. Also, the "end" written at the end of the file lets us check if the file was written all the way to the end or not.
However, if the gobblygook occurs while creating or deleting a file, then the directory itself becomes corrupt, and that can mean files and directories just can't be found anymore. In some cases, this makes the SD card completely unreadable.
In ProffieOS 7.x, this problem has been mostly solved. The solution is to create the files once, make them big enough to contain all the data we could ever want to write to them, and then re-write them. By never creating new files, and never resizing the files, only the contents of the files can become corrupt, not the directories. At least as long as the SD card itself doesn't go crazy.
To make this work, we'll need two files for each save file, and we'll take turns writing to them. That way, we never overwrite the last savefile, we only write over the last-last savefile.
Of course, we'll need some way to tell which file was is actually the newest one. We'll solve this by writing a number into the file which increases by one every time we save. That way, the file with the highest number will be the last one.
We'll also need some way to know if the file gets corrupted for some reason. If that happens, we'll read the previous file. If we loose power in the middle of writing to a file, when we read the file, we should be able to discover that it was corrupted. For this, we'll use a checksum, if you don't know what a checksum is, google it.
Finally, we'll need a way to know how long the data in the file is. Since the file is going to be much longer than we need, we can't rely on the length of the file itself to tell us how much data is in the file anymore.
The actual format 🔗
struct Header {
  uint32_t magic_number;  // 0xFF1E5AFE
  uint32_t checksum;
  uint32_t iteration;
  uint32_t length;        // Length of the data, starting from the second block.
};

struct FirstBlock {
  Header header1;
  Header header2;
  char install_time[480];
};
The header is repeated twice, followed by the install time, and then enough zeroes to fill up the first block (512 bytes). Unless KEEP_SAVEFILES_WHEN_PROGRAMMING is defined, save files with a different install_time than the currentntly running program will be ignored. Files where header1 is different from header2 will also be ignored. Or where the checksum doesn't match the checksum of the data in the file. If neither of the two files pass all of these tests, ProffieOS will try to read the files as plain ini-files instead, which makes all of this backwards compatible. However, when it writes new files, those files will be in the new format.
If you wish to edit a config file by hand, please be aware that you can't just skip the first 512 bytes and make a change in the file, because the checksum won't match anymore. However, you can delete the first 512 bytes from the file, then make the edits and save the file. The result will be a regular ini file, which ProffieOS can read in compatibility mode. Note that you'll need to delete the other file though, or ProffieOS will prefer that one.
Basically, ProffieOS will do the following:
- check if the .ini file is in the new format, and is valid
- check if the .tmp file is in the new format, and is valid
- If both are true, it will read the one with the highest iteration number
- If only one is true, it will read that file
- If neither is true, it will try to read the .ini file as a plain ini file.
- If that fails, it will try to read the .tmp as a plain ini file.
Understanding usb and uploads 🔗
Any processor that has a direct USB connection can pretend to be anything. It can work like a mouse, a keyboard, a drive, a microphone, a serial port, or any combinations of these things. Every USB device has a descriptor. The descriptor is just a chunk of data that is downloaded from the device when you first connect it. The descriptor tells the OS what kind of device is connected. The descriptor has a list of end points in it. Each end point ends up becoming a separate device on the host computer. This is how a USB device can implement multiple devices as the same time.
The descriptor depends on the program that is uploaded. For instance, in ProffieOS, you can select which endpoints to make available in Arduino -> Tools -> USB Type. Usually, what you want to select is "Serial + WebUSB + Mass storage", which means that there will be three endpoints. One that looks like a serial port, one that looks like a WebUSB endpoint, and one that looks like a drive. The descriptor also provides some other information, like who made the device, what it's called and so forth. All this information can be changed by reprogramming the device.
If the program running on the Proffieboard is not working properly, either because the program has a bug in it, or because it was corrupted somehow. Then the computer may be unable to communicate properly whith the board. This may happen even before it downloads the descriptor, in which case the computer won't even be able to identify the board at all. Without doing something about it, the computer will be unable to communicate with the board when this happens.
Fortunately, Proffieboards have a fall-back option called "bootloader mode". This is simply another program programmed into the board which cannot be changed. The bootloader code is a part of the CPU, and is not special to Proffieboards. Any board that uses a STM32 processor will have a similar bootloader. By holding BOOT while the board is booting (which we can make it do by pressing and releasing RESET), we can tell the board to ignore any uploaded program, and run the bootloader code instead.
When the board is running in bootloader mode, it doesn't actually know that it is a Proffieboard, and the descriptor it presents to the OS is very different. It calls itself "STM32 BOOTLOADER", and it only has one endpoint. That endpoint is a special device called a "DFU" device. It's not a standardized device, which is why we sometimes needs to install a special driver to be able to talk to it. On windows, this is accomplished by using Zadig. Note that the operating system has no idea that the "STM32 BOOTLOADER" and the "Proffieboard" are actually the same physical device. To the computer, it looks like you disconnected the Proffieboard and connected some other device. This is why you cannot run Zadig on the Proffieboard device and expect it to work when the Proffieboard is in bootloader mode. Any changes applied to one of these devices does not affect the other at all.
Uploads 🔗
Normally, when you upload a program from Arduino, both the "ProffieOS" device, and the "bootloader device" comes into play. It goes something like this: When you hit upload in Arduino. Arduino will check what port you selected under Arduino -> Tools -> Port. Then it will send a special sequence to that port which is intended to cause the connected board to reboot into bootloader mode. This sequence is the same for nearly all Arduino boards. Once the reboot happens, the port goes away. Arduino then proceeds to run the upload program, which is not the same for all boards. The Proffieboard upload programs waits until the board has rebooted and the computer has identified the bootloader device. If this takes a long time, or if it fails for some reason, you'll seee a 1-10 countdown in the Arduino window, and the upload will fail. Once the bootloader device bcomes available, the upload process starts, and you'll see a 0-100% progress bar in the Arduino window. Once the upload is done, the board is rebooted again, but this time, it starts the new program that was just uploaded. If everything goes well, the board plays a boot sound and the port shows up in Arduino -> Tools -> Port again.
Version Numbers 🔗
There has been some confusion about ProffieOS and Proffieboard version numbers, so I thought I'd write down how they are intended to work.
Version numbers are not decimal numbers 🔗
Version numbers are two separate numbers separated by a dot. This means that after 2.9 comes 2.10, and 2.25 is a much later version than 2.3. The first number is called the "major" version, and the second number is called the "minor" version.
Versions are orthogonal 🔗
Think of as a street. As you go down the street, you see first avenue (version), then second avenue (version), etc. If you turn down one of the streets, you'll see version 1.1, 1.2, 1.3, etc. Unlike a city grid, there is no relation between the numbers on each street, so version 4.5 and version 6.5 have no connection in any way. This also means that 3.0 does not follow the last version of the 2.x series. Instead it is most closely related to 2.0.
Minor revisions are meant to be harmless 🔗
Only bugfixes are allowed when the minor version changes. So it should always be safe to upgrade to a later version of the same major version. (Like from 6.7 to 6.9) Only exception to this rule is in the beginning of the release cycle when we're still in alpha or beta stage.
Proffieboards 🔗
Proffieboards also have versions, although it's much less obvious what they do since they rarely change. Generally, when I design a new Proffieboard I start with a new major number, and every time I make some changes I change the minor version. Usually all of this happens before the board is ever released, which is why we get "1.5", "2.2" and "3.9" versions. However, if a problem/bug is found, we may see new revisions after the initial release.
Versions are not releated. 🔗
Even though ProffieOS, Proffieboards and the Arduino-Proffieboard plugin all have similar version numbers, they can all mix or match. Just because you have a V3 proffieboard, doesn't mean you need to use version 3 of the Arduino-proffieboard plugin, or version 3 of ProffieOS.
Hardware 🔗
Adressable LED Strips 🔗
WS2811BladePtr<97, WS2811_800kHz | WS2811_RGB, blade2Pin, PowerPINS<bladePowerPin1>>()
- First argument specifies the number of LEDs in the strip
- Second argument specifies configuration options that are specific to the LED strip
Color order onfiguration options:
- WS2811_RGB
- WS2811_RBG
- WS2811_GRB
- WS2811_GBR
Data clock rate configuration options:
- WS2811_800kHz
- WS2811_400kHz
- WS2813_800kHz
- WS2811_580kHz
- WS2811_ACTUALLY_800kHz
- Data pin that is used to drive the specific LED strip:
- bladePin
- blade1Pin (ProffieBoard)
- blade2Pin (ProffieBoard)
- blade3Pin (ProffieBoard)
- blade4Pin (ProffieBoard)
- blade5Pin (ProffieBoard)
On a teensysaber, pin 8 and 9 can be used if not used as a serial port.
- FET transistor output that enables power to the LED strip:
- bladePowerPin1
- bladePowerPin2
- bladePowerPin3
- bladePowerPin4
- bladePowerPin5
- bladePowerPin6
If no option is set Pin Array object is created for bladePowerPin1, bladePowerPin2 and bladePowerPin3
Addresable LEDs have 4 signals (WS2813 have additional bypass line)
- VCC
- GND
- DATA IN
- DATA OUT
The ProffieOS supports the following types:
- WS2812
- WS2812B
- WS2813
- PL9823
- SK6812
Protection 🔗
- As the led strips get immense amount of current, it is good suggestion to use thick wires for VCC and GND to avoid heat/power loss.
- It is good practice to put large electrolytic capacitor ( 470uF to 2200uF) as close as possible to the strip to avoid spontaneous current draws, that might occur.
- In order to protect the first addressable led in the chain from voltage spikes and additionally to make sure those spikes don't disrupt the integrity of the communication signal, a series resistor must be put as close as possible to the LED strip (100ohm to 470ohm)
Neopixel 🔗
NeoPixel is Adafruit's brand of individually-addressable red-green-blue (RGB) LED. They are based on the WS2812 LED and WS2811 driver, where the WS2811 is integrated into the LED, for reduced footprint. The control protocol for NeoPixels is based on only one communication wire.
GND vs BATT- 🔗
Many people ask me: Do I need to hook up all those negative pads?
The answer is that you need to hook up at least two, and sometimes, you might want to hook up something like a switch or a connector between them. If you know how electricity flow, just look at the circuit diagram and you can see why. However, if you don't know how electricity flows, here are a few simple rules:
There are two GND pads on the board, and you only need to hook up one of them. You can use the other one(s) to hook up buttons, bluetooth modules or other things that needs GND, or it can be spliced into the wires, either way is fine.
Proffieboards also have two BATT- pads, and for the most part it's fine to hook up only one of them. The only reason there are two is to handle high current better. Hooking up both means less resistance, less heat and better cooling performance.
BATT- and GND must be connected together while the board is on. Normally this is done by just hooking them up together. However, sometimes BATT- is hooked up directly to the battery, while GND goes through a switch, charge port or blade connector. Hooking it up this way means that the switch/port/connector doesn't have to transmit the high current that goes through BATT-. The board will automatically disable the FETs when GND is disconnected, which means that almost no current will leak through BATT- even though it is hooked up directly to the battery.
UPDATE: The pull-down resistors for the FET on TeensySaber and Proffieboards up to version 1.5 are hooked up to GND not BATT-, this means that the FETs will be left floating if GND is disconnected. Floating FETs can be either on or off or something in between, which is generally speaking not a good thing. If you disconnect GND on these boards, you must also disconnect BATT-, or the power to the LEDs. (Which is what happens if you use an 8-pin blade connector as shown in the wiring charts.)
Proffieboard v2.2 BOM alternative parts 🔗
The list of components onboard a Proffieboard v2.2 can be found here.
To see where the components go, refer to the ProffieBoard V2.2 part map.
As of late, a couple of the parts are coming up as either unavailable or only available in bulk.
This can serve as a running tab of alternative parts: 🔗
| Designator | Package | Original Part | Alternative parts |
|---|---|---|---|
| U40 | uQFN6 | HSP061-2M6 | HSP061-2N4 |
| RN4 | R_Array_Convex_2x0402 | CRA04S04322R0JTD | MNR02MRAPJ220 |
| Q7 | U-DFN2020-6 | DMP2075UFDB | DMP2065UFDB-7 |
| Y1 | ST2012SB | ST2012SB32768Z0HPWB4 | ABS05W-32.768KHZ-D-2-T |
| U2 | LGA-14L | LSM6DS3HTR | LSM6DS3TR |
Proffieboard v2.2 part map 🔗
These part numbers are referenced in the Bill Of Materials (BOM) for Proffieboard V2.2, which contains links to buy them (when available). It can be found here: https://docs.google.com/spreadsheets/d/18MwtF8ENlrQoEh_lPH9iURkPmyv8qekj8NvmkMRsl70/edit?usp=sharing
As of late, a couple of the parts are coming up as either unavailable or only available in bulk. There's a running tab of alternative parts here.
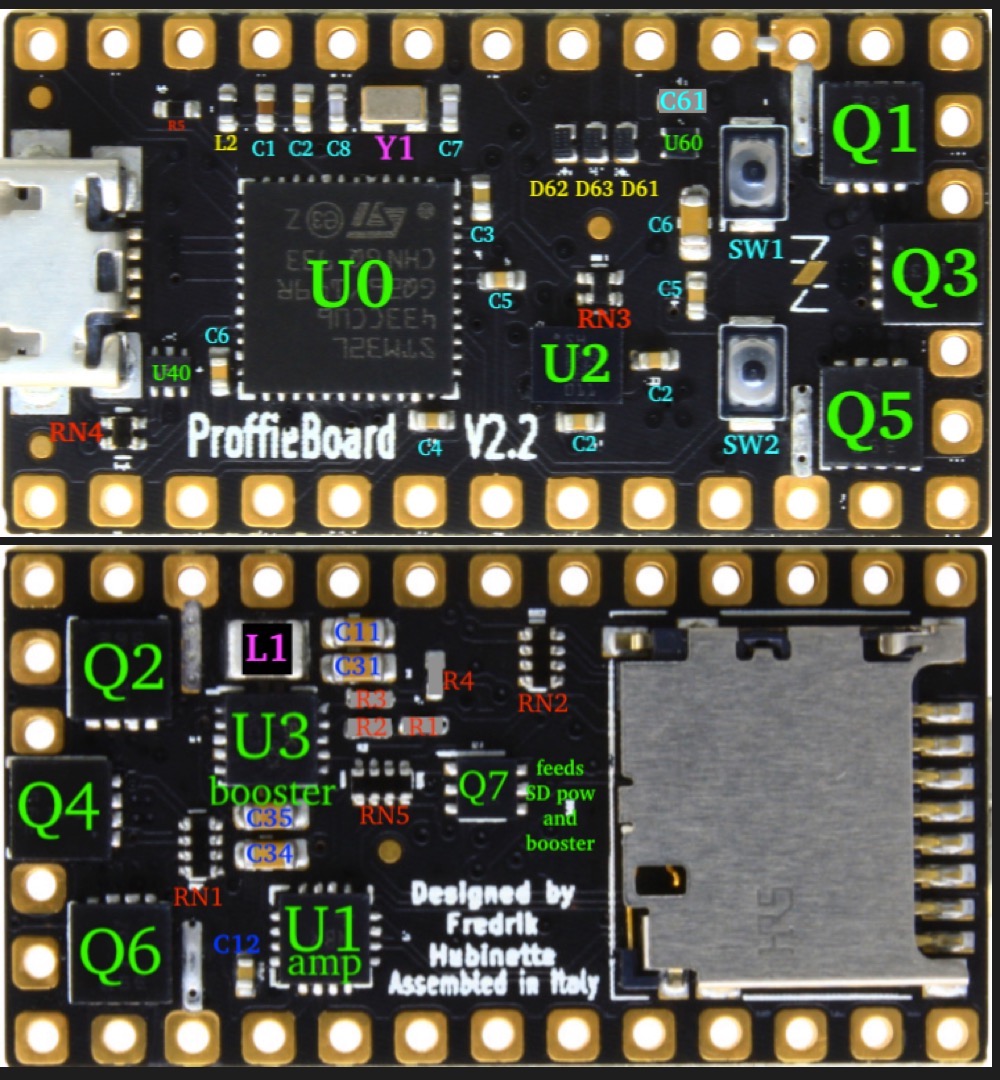
List of Parts and Descriptions 🔗
| Part | Description | Notes |
|---|---|---|
| U0 | Main CPU | Does everything |
| U2 | Motion chip | Senses when you move the saber around |
| U1 | Audio Amplifier | |
| U3 | Booster | |
| U60 | 3.3V Regulator | Feeds the CPU, SD card |
| L1 | Booster coil | |
| Q7 | Dual pFET | Used to control current to SD card and as reverse-current protection for most of the board. (Except for Q1-Q6) |
| Y1 | Clock crystal | (together with C7/C8) |
| RN4 | USB protection resistors | |
| U40 | USB ESD protection diodes | |
| RN3 | i2C pullup resistors | |
| R5 | Serves two functions: It protect the board from battery power, and also limits how much current the blade pixels can leech from the board when they are supposed to be off. | Can be replaced with a bridge, but the board will be vulnerable unless there is an external resistor somewhere. Note that if you have a pogo pin connector, the resistor should be between the board and the pogo pins, having one in the blade is not sufficient to protect the board. |
| L2 | Filters out noise on the power provided to the CPU. | In most cases, this can be replaced with a bridge. The extra noise is still unlikely to cause problems for the CPU. |
| Q1-Q6 | Controls the power to the LEDs or Pixels. | There are six of these, and if some of them are not used, these become your spares if one of these breaks. So if you short your blade and Q2/Q3 fries, just hook up your blade to LED4/5 instead and update your configuration accordingly. |
| D61 | Prevents current flow to the battery when on USB. | Sometimes, this breaks down in an odd way, where the board will work just fine IF you plug it in to USB to boot it up. While the board can potentially operate if this is replaced with a bridge, it's not safe to do so, and the component must be replaced to make the board work again. |
| RN4 | Protects the USB and CPU from each other. | Can potentially be replaced with two bridges, but the board will be more vulnerable to electrical spikes over the USB connection. Also, if you bridge the pads, make sure to bridge them the right way, or USB communications will not work. |
| SW1 | BOOT button | The board will work just fine without it, until you end up with a bad programming and need to press it. If you remove the button completely, you can short the pads with a paperclip or tweezers when you need to push it. |
| SW2 | RESET button | The board will work fine without it. If it's not working, you can short the reset pad to GND instead. Also, if your goal is to put the board in bootloader mode, you can hold BOOT while providing power to the board instead of holding BOOT while pressing reset. |
| C61 | Battery power noise filter | This capacitor helps filter out incoming noise and helps the 3.3v regulator work properly. It's entirely possible that the board will work without it, especially if you don't have anything extra drawing power from the 3.3v pad. |
Resistors 🔗
Proffieboard and TeensySabers wiring charts features three types of resistors:
Current-limiting resistors 🔗
These are resistors used to limit how much current an LED receives. They can heat up and needs to be rated for enough watts to handle the. Values are usually in the 0.1-1ohm range, with watt ratings starting at 0.5 watts. More about how to calculate the right values for these will be added later.
Data-line resistors 🔗
These resistors are placed in-line on the data line for Neopixels. They are not always required, but help prevent the neopixels from sapping power from the data line. The power sap can be bad for the CPU and cause neopixels to glow even when they are supposed to be off. These resistors are generally in the 150-470 ohm range, and rated for 1/8th of a watt or more.
Blade ID resistors 🔗
These resistors are used with replaceable blades to identify the blade. They are entirely optional. If you do use one, they are connected between the neopixel data line and GND. The board will test the Blade ID resistor and choose blade configuration and preset based on what it finds. Useful range is 2k to 100k ohm, watt ranting is pretty much irrelevant.
SD Cards 🔗
Most SD cards will work fine with ProffieBoards / TeensySaber. Some very cheap cards, or cards below class 4 may cause issues with read speed. Unfortunately, the problem usually doesn't show up in regular benchmarks since the Proffieboard and TeensySaber uses SPI mode instead of sdio to access the cards. This limits the speed, and some cards have a problem with it.
If you suspect that your SD card is causing problems, try the "sdtest" command. This will read the hum file from your current font over and over again and see how long it takes. Normal SD cards should give you 10-11 parallel streams. If you see less than 9, get a new SD card.
Please note that the "sdtest" command will not be available in the Serial Monitor if you have DISABLE_DIAGNOSTIC_COMMANDS in your config file.
Speakers 🔗
TeensySaber V3 and Proffieboards uses a digital amplifier that works best with 4 ohm speakers. Higher ohm values are ok, but lower are not. The amplifier can put out 3 watts, which can overload or destroy small speakers, which is why the default volume is set fairly low. (1000) Assuming your speaker can handle it, volume values up to 2200, or possibly even 2500 can be used. (There is no actual upper limit, higher volumes just increase the chance of distortion from clipping.)
One potential workaround for the limits of small speakers would be to use two 8-ohm speakers in parallel. It is currently not known if that will actually make the sound better or not. It probably depends a lot on how they are mounted. If they face one another, it is recommended to wire one of them 180 degrees out-of-phase by reversing the + and - leads. This will allow the air waves from each speaker to work with one another, not fight against each other, especially in a mostly closed tube that is a saber hilt.
Supported Hardware 🔗
While the Proffie OS was developed, a couple of hardware variants followed it. They are all PCB extensions of the Teensy 3.2 Development board. ProffieBoard is the latest variant using its own dedicated CPU and removing the need of "Sandwitch build" installs.
Selecting hardware 🔗
To configure your program to run on specific hardware make sure to have its include header in your configuration file:
#include "v1_config.h"#include "v2_config.h"#include "v3_config.h"#include "proffieboard_v1_config.h"#include "proffieboard_v2_config.h"#include "proffieboard_v3_config.h"
Teensy Saber V1 🔗
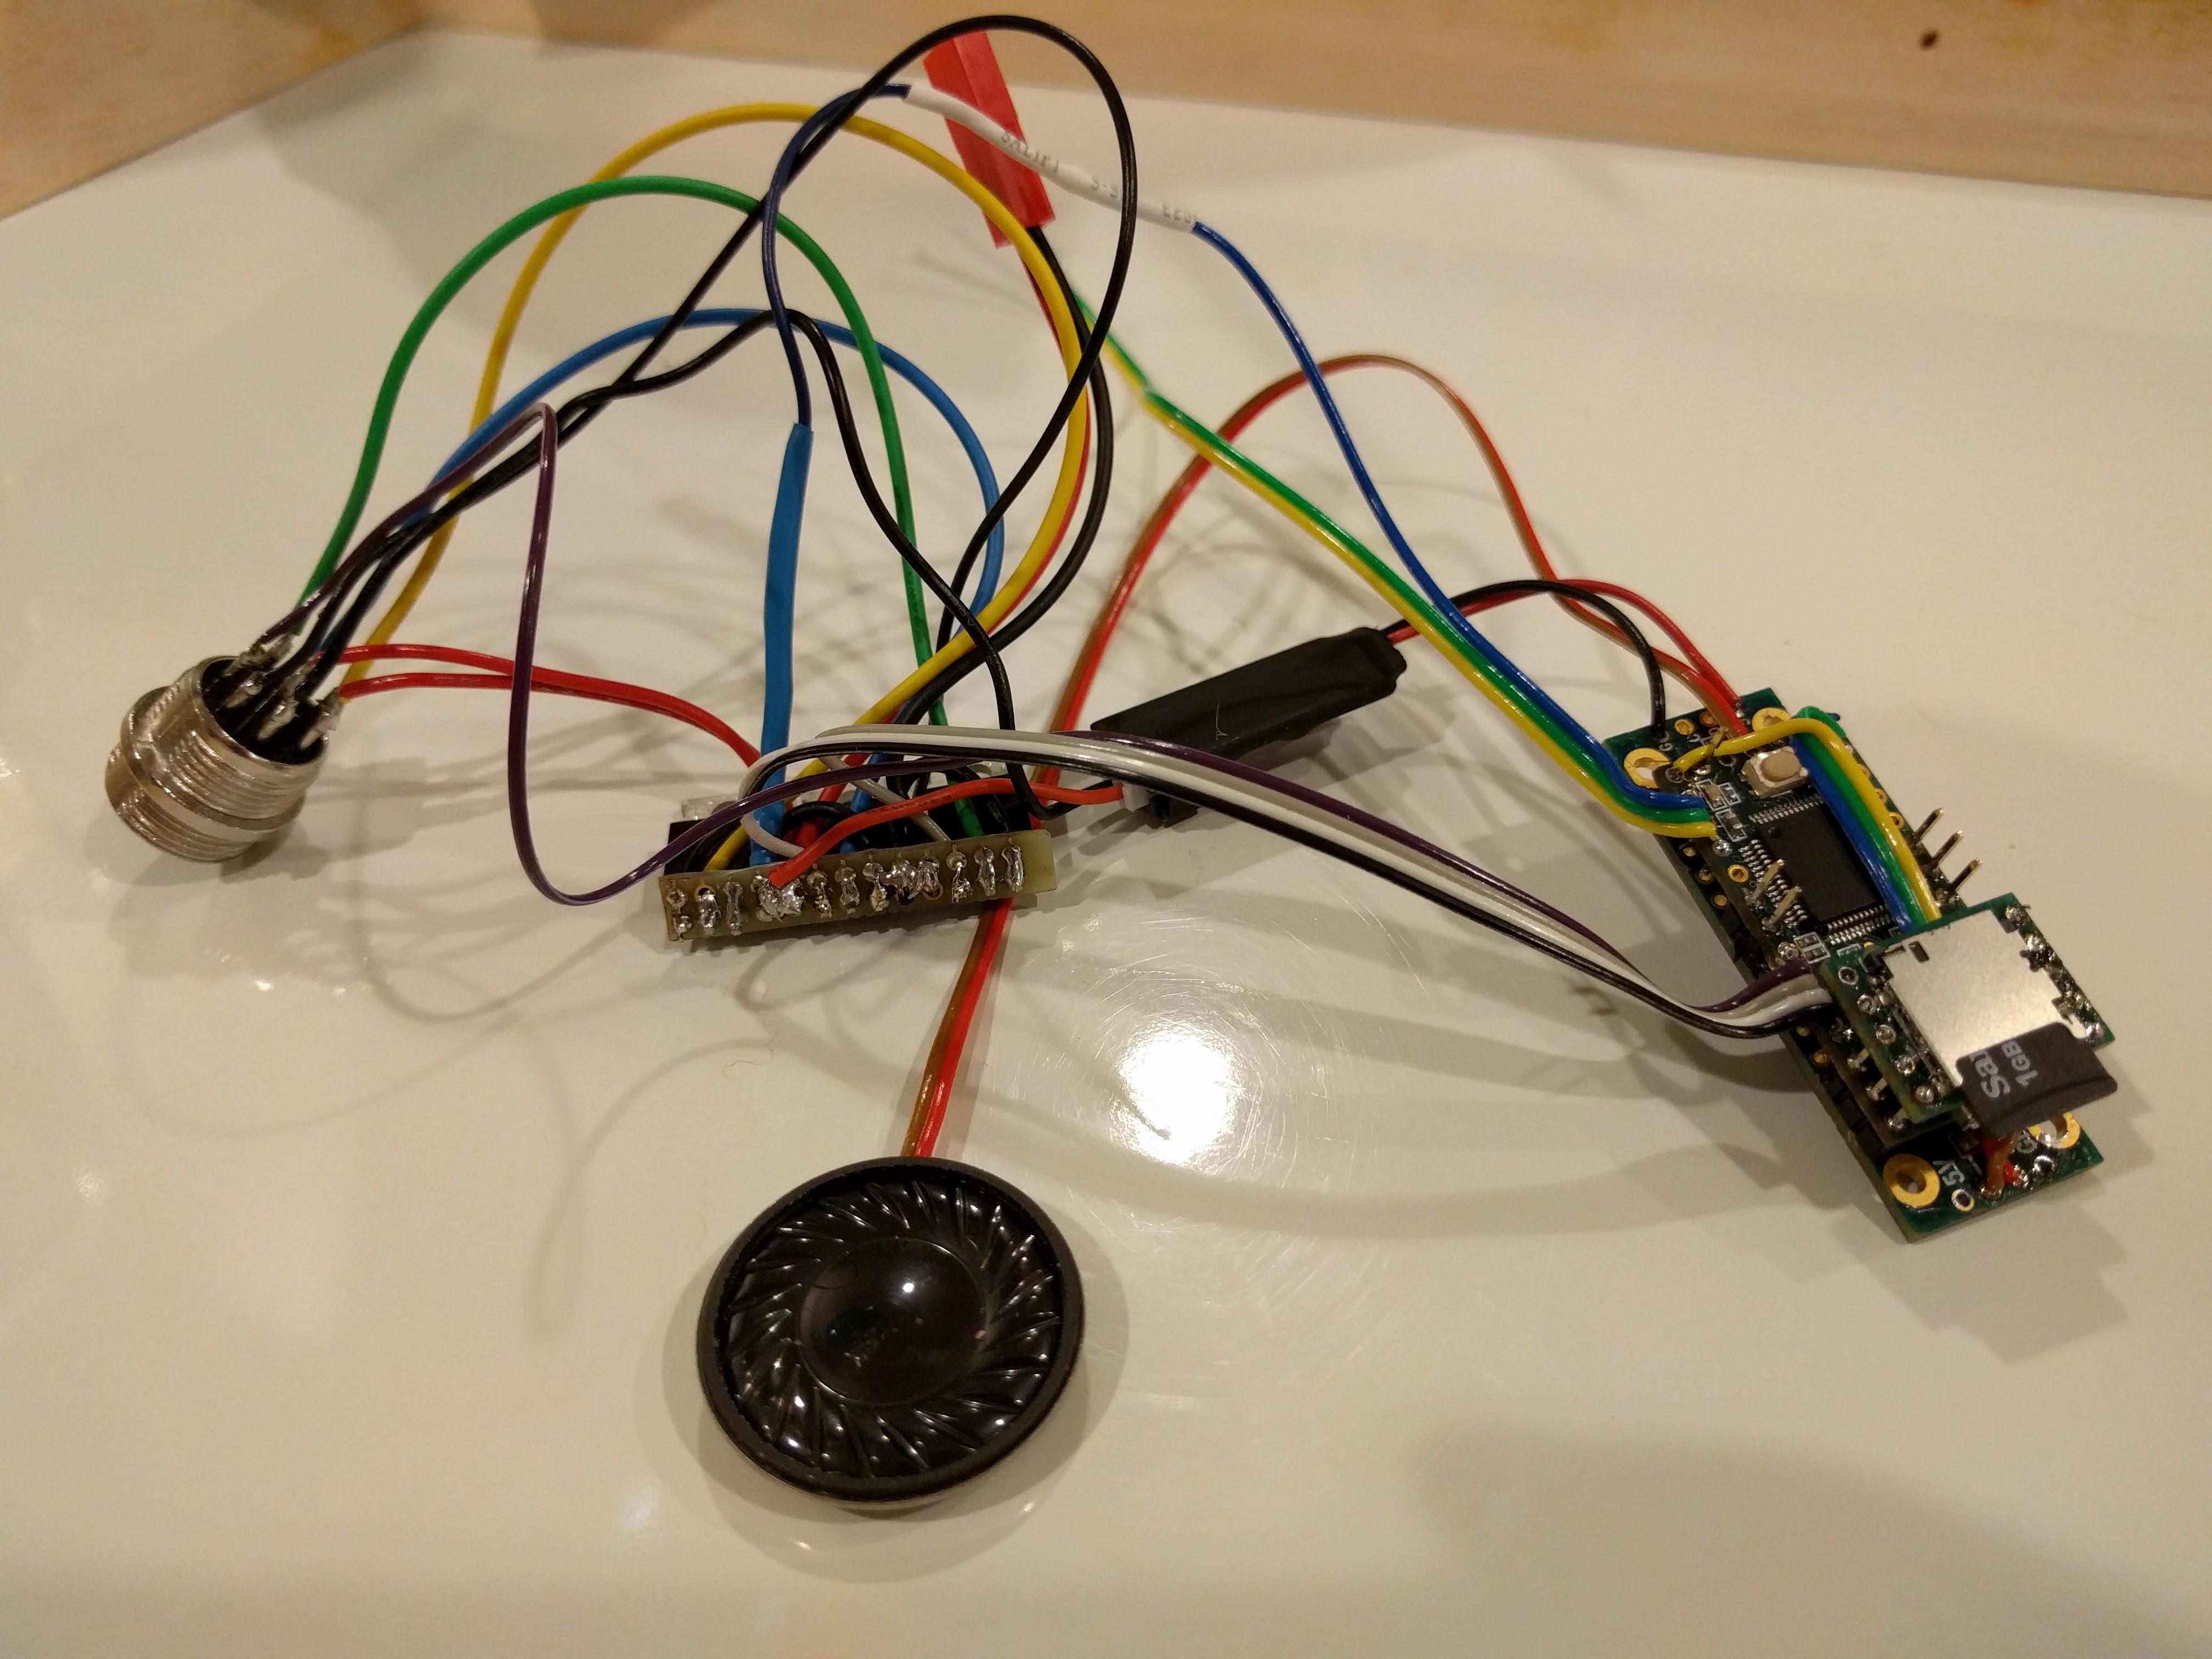
Teensy Saber V2 🔗
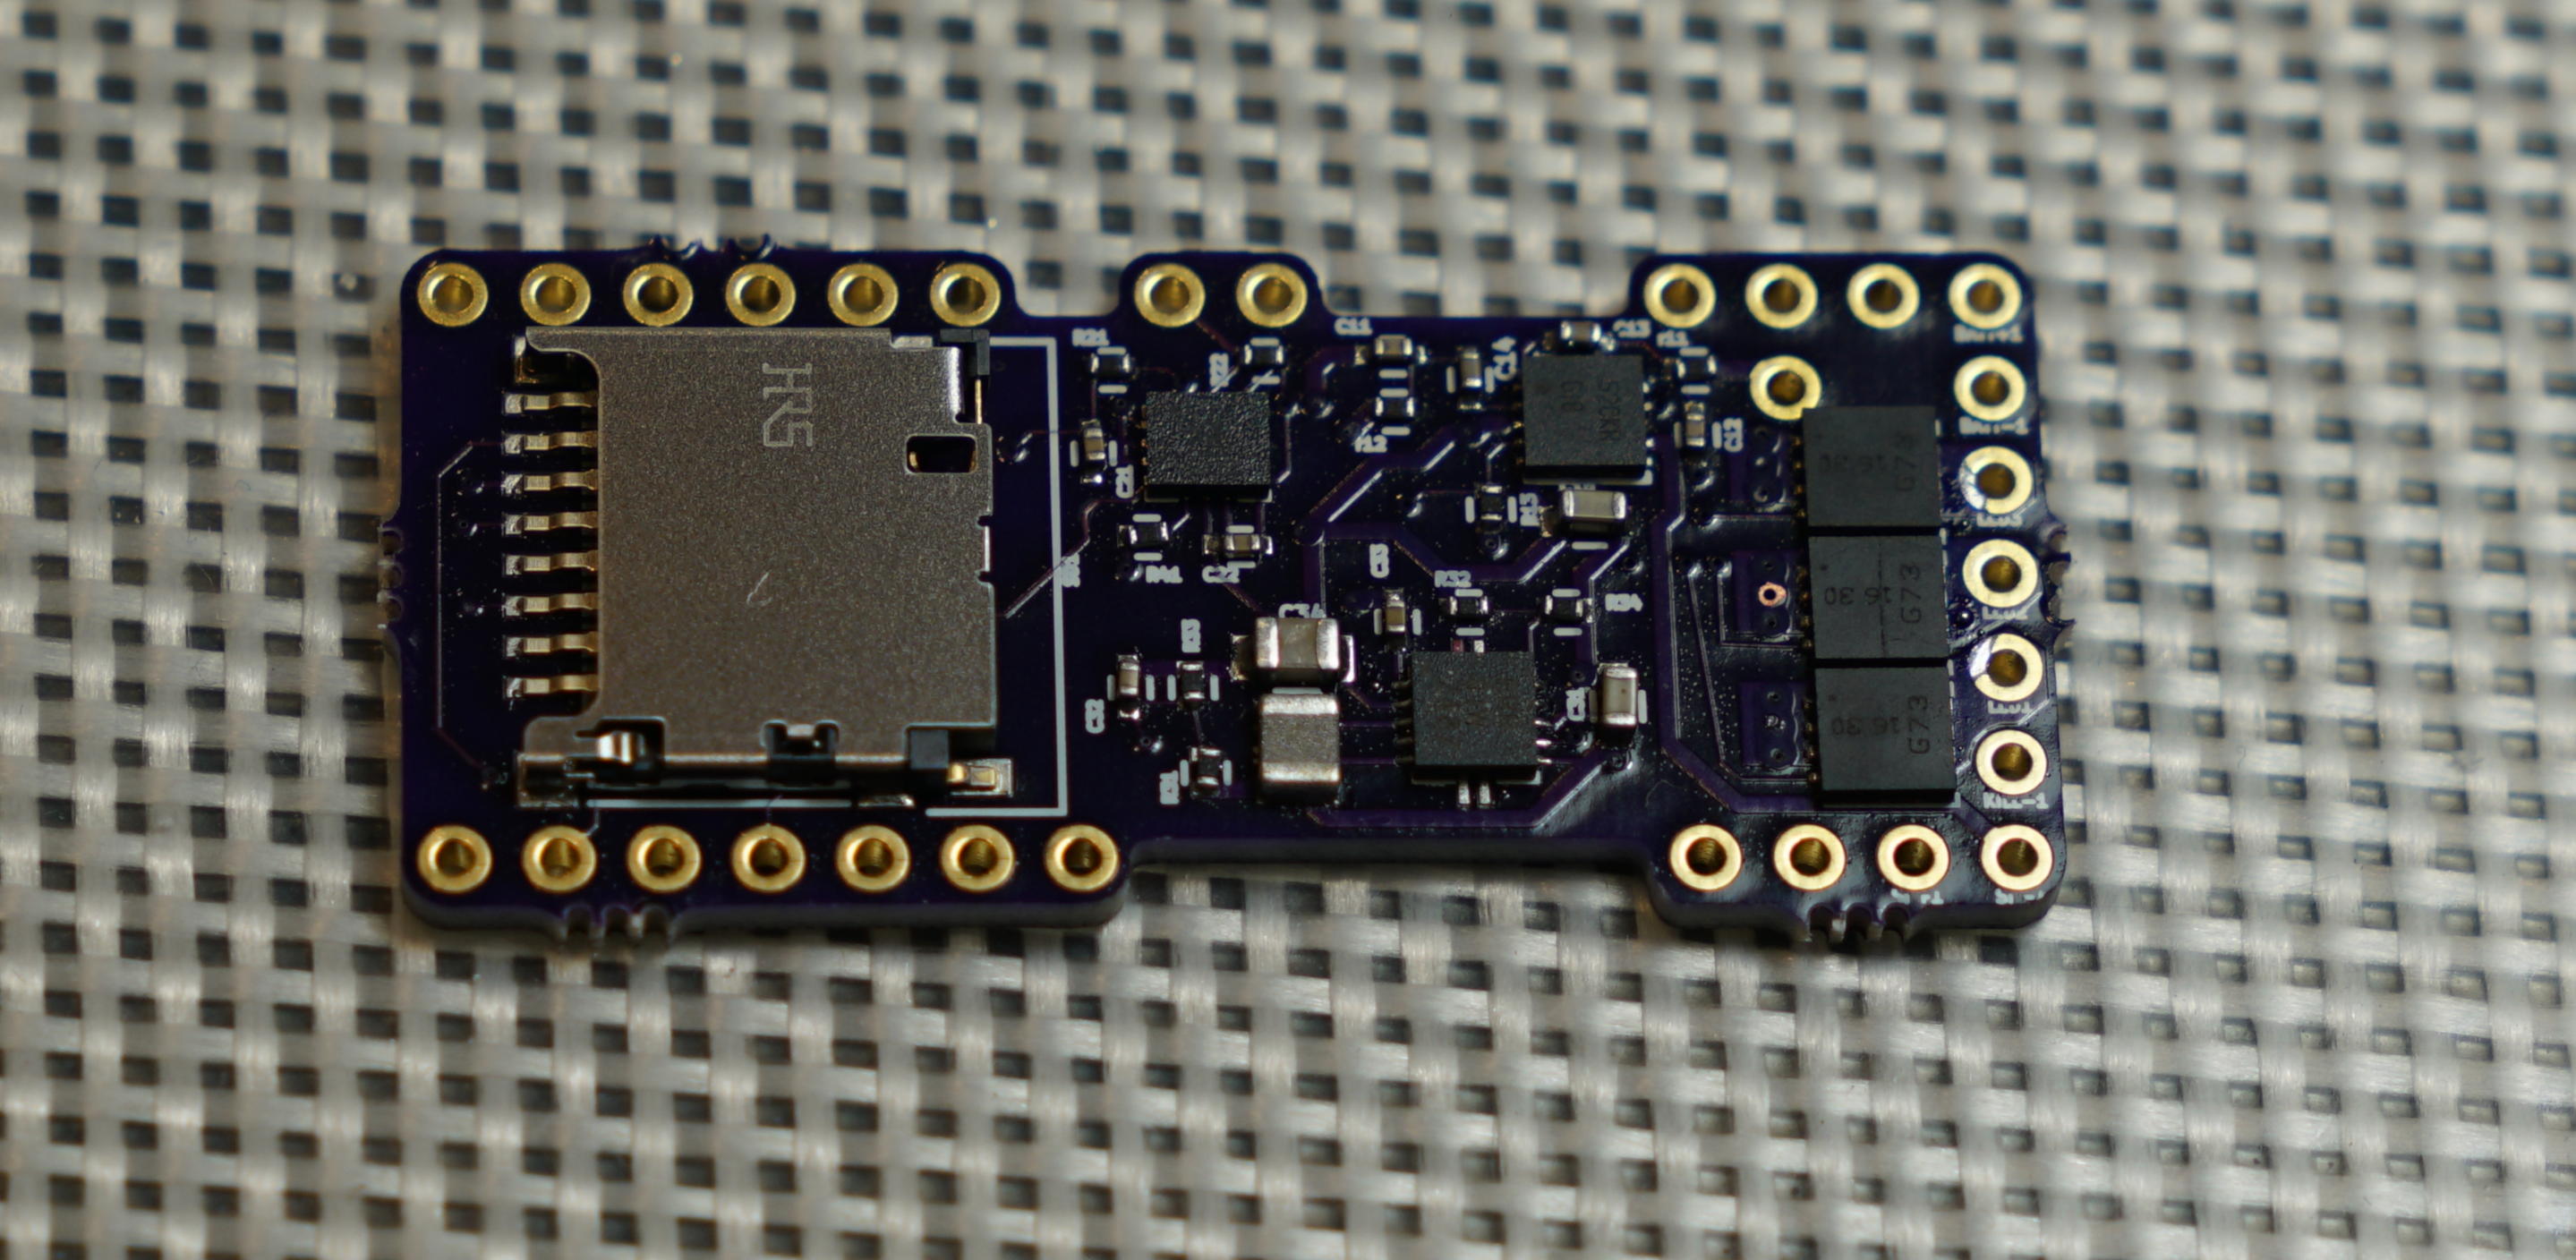
Teensy Saber V3 🔗
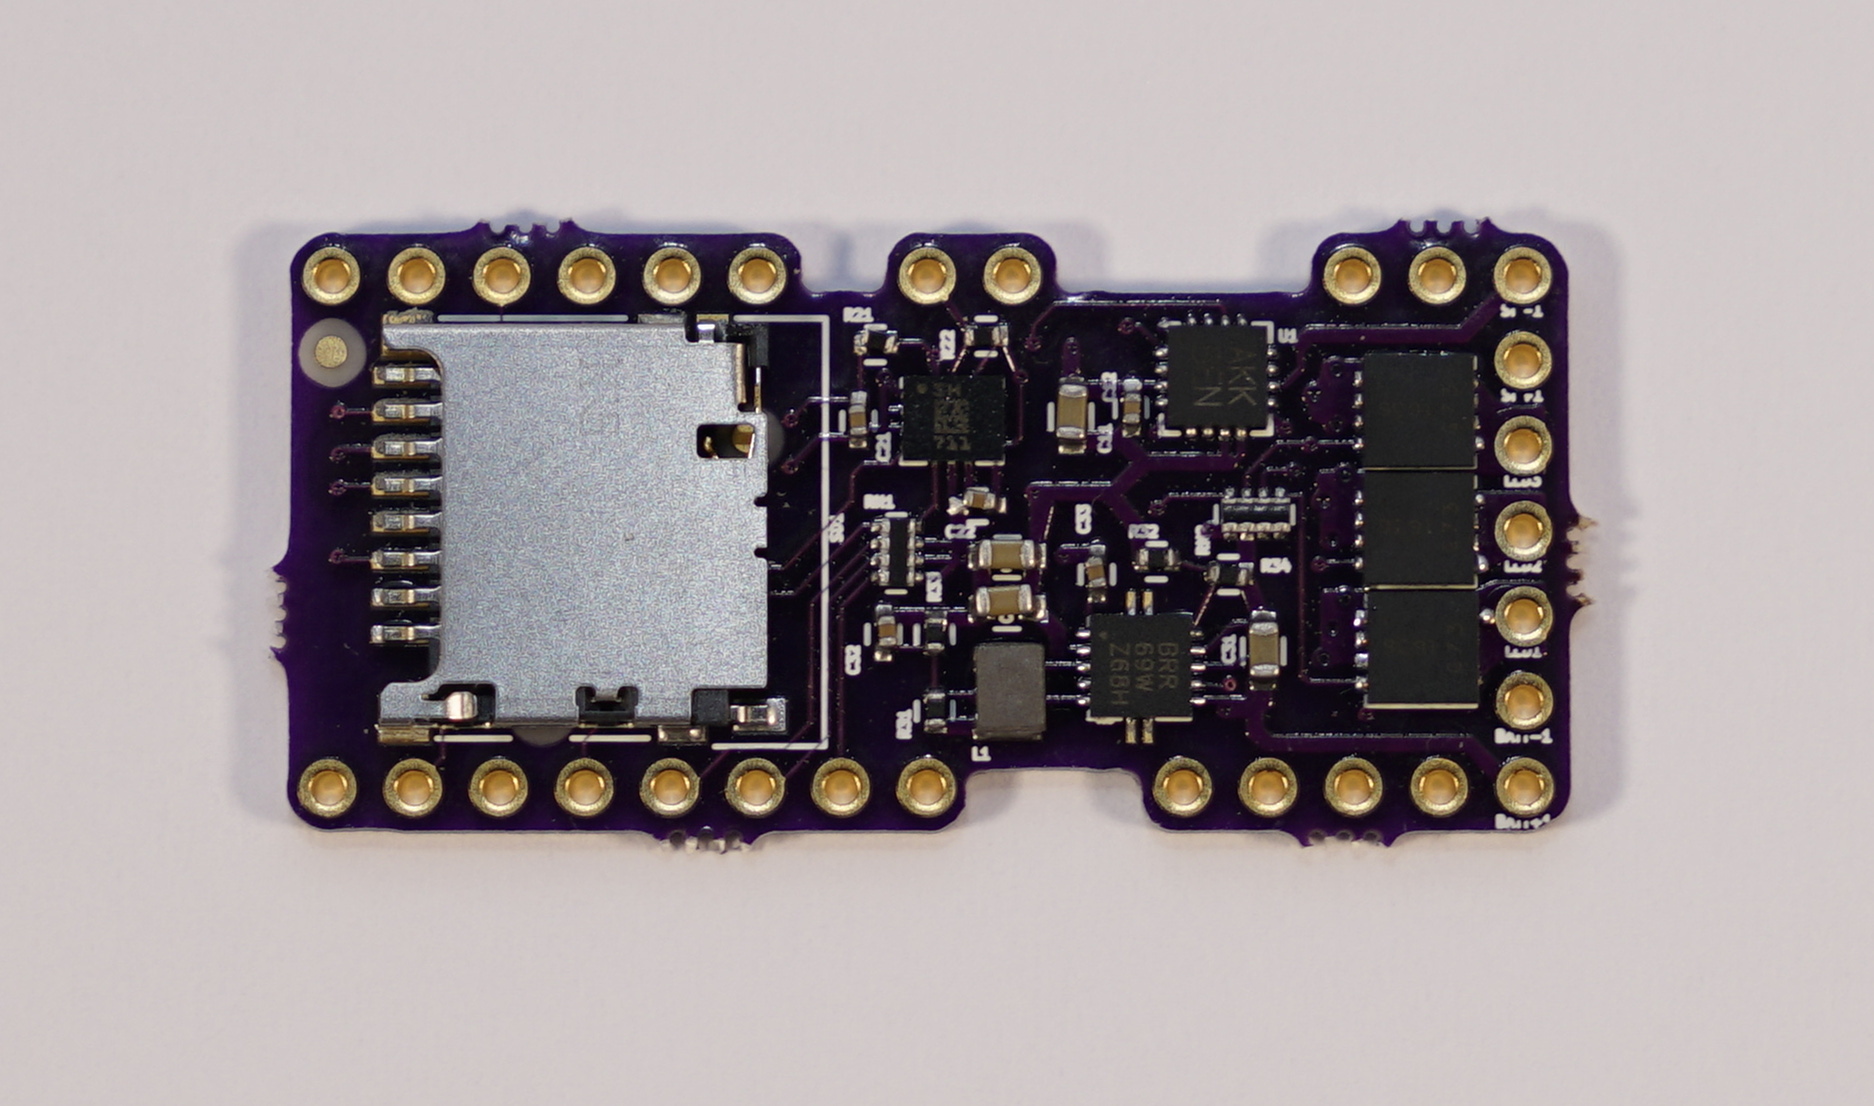
ProffieBoard V1.5 🔗

ProffieBoard V2.2 🔗
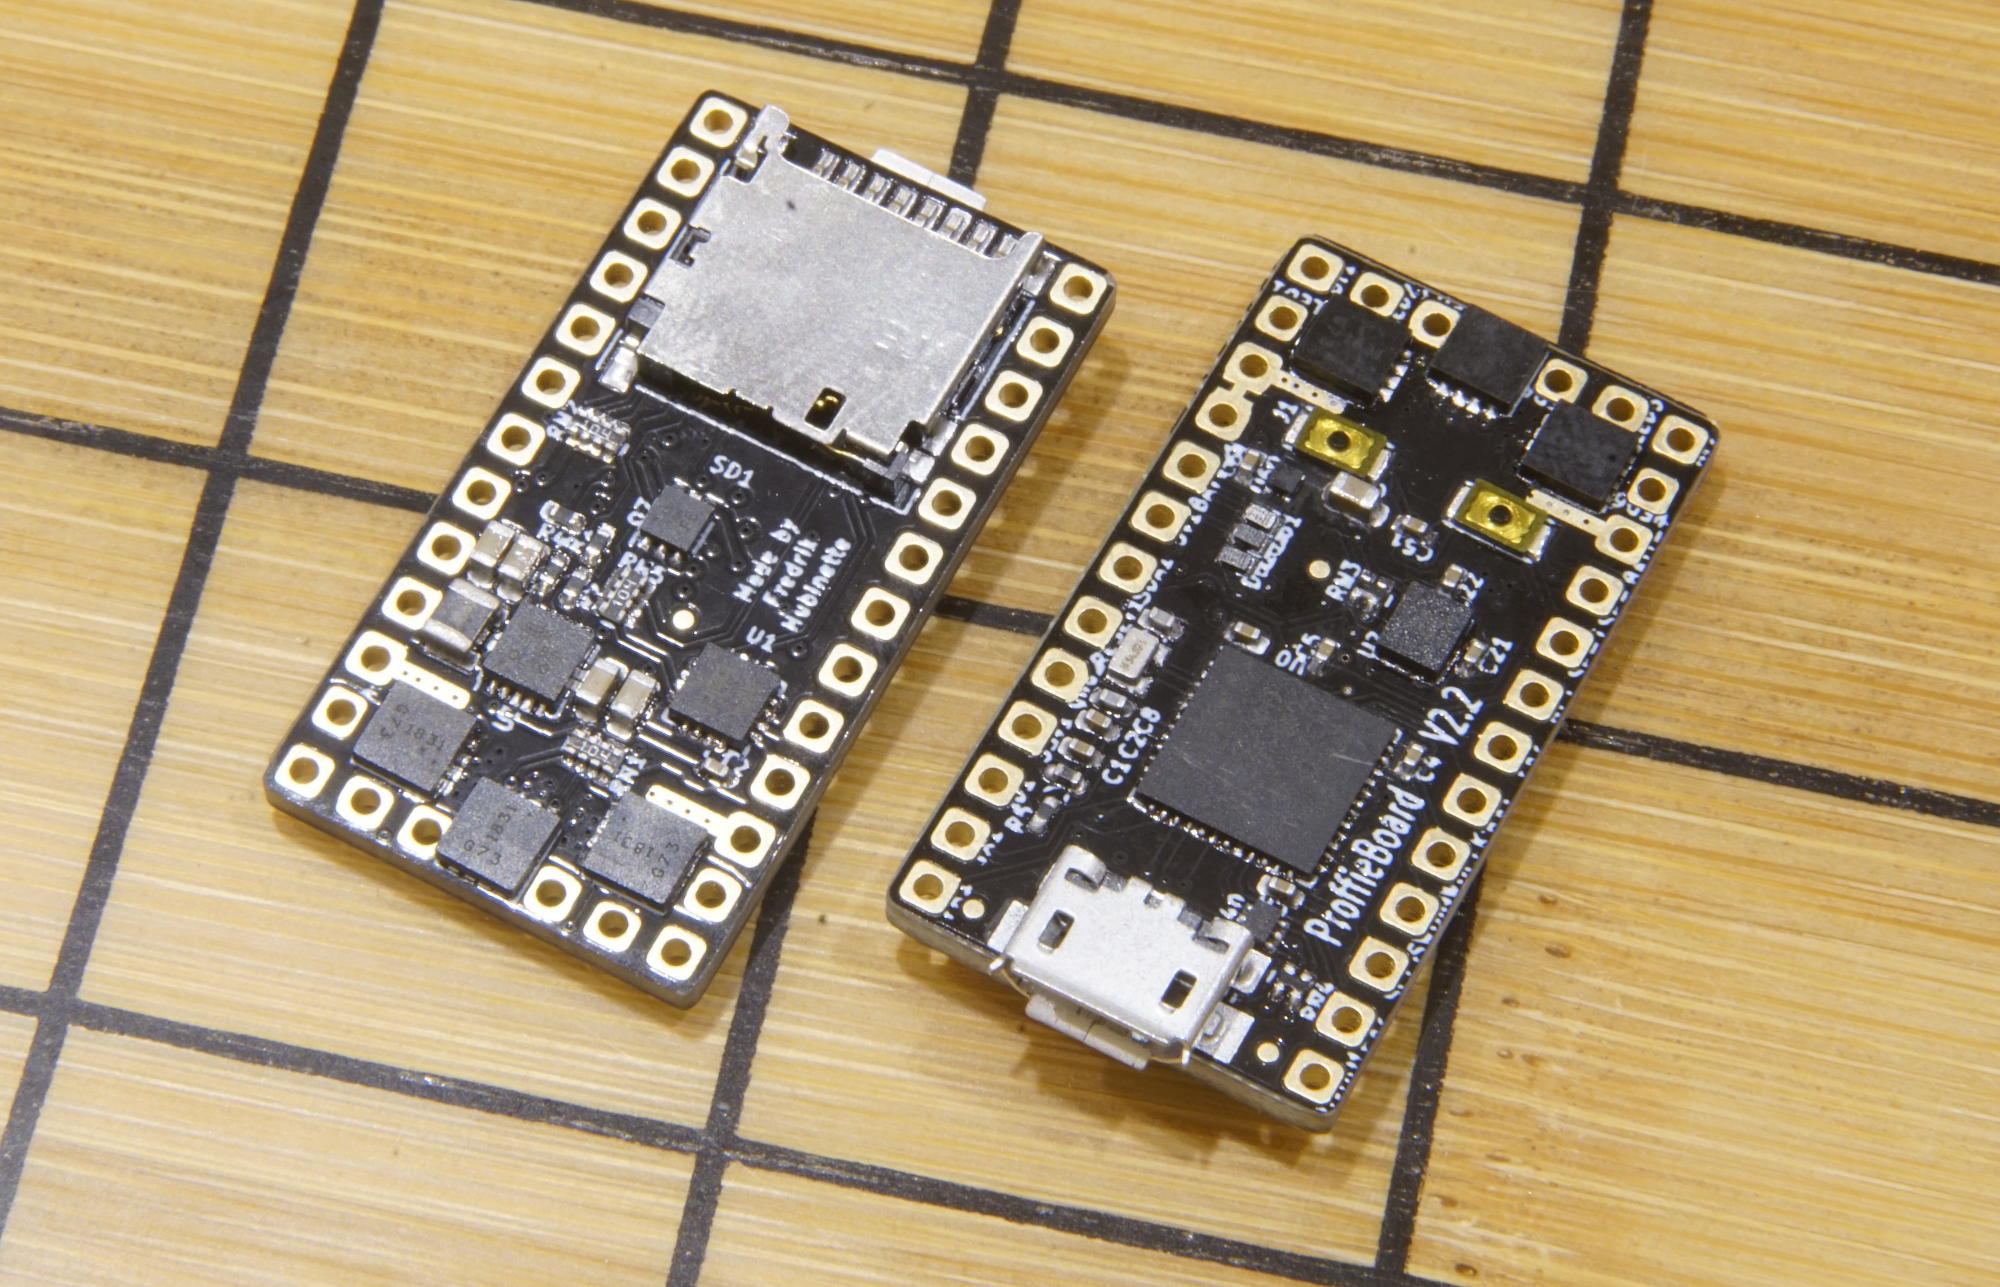
ProffieBoard V3.9 🔗
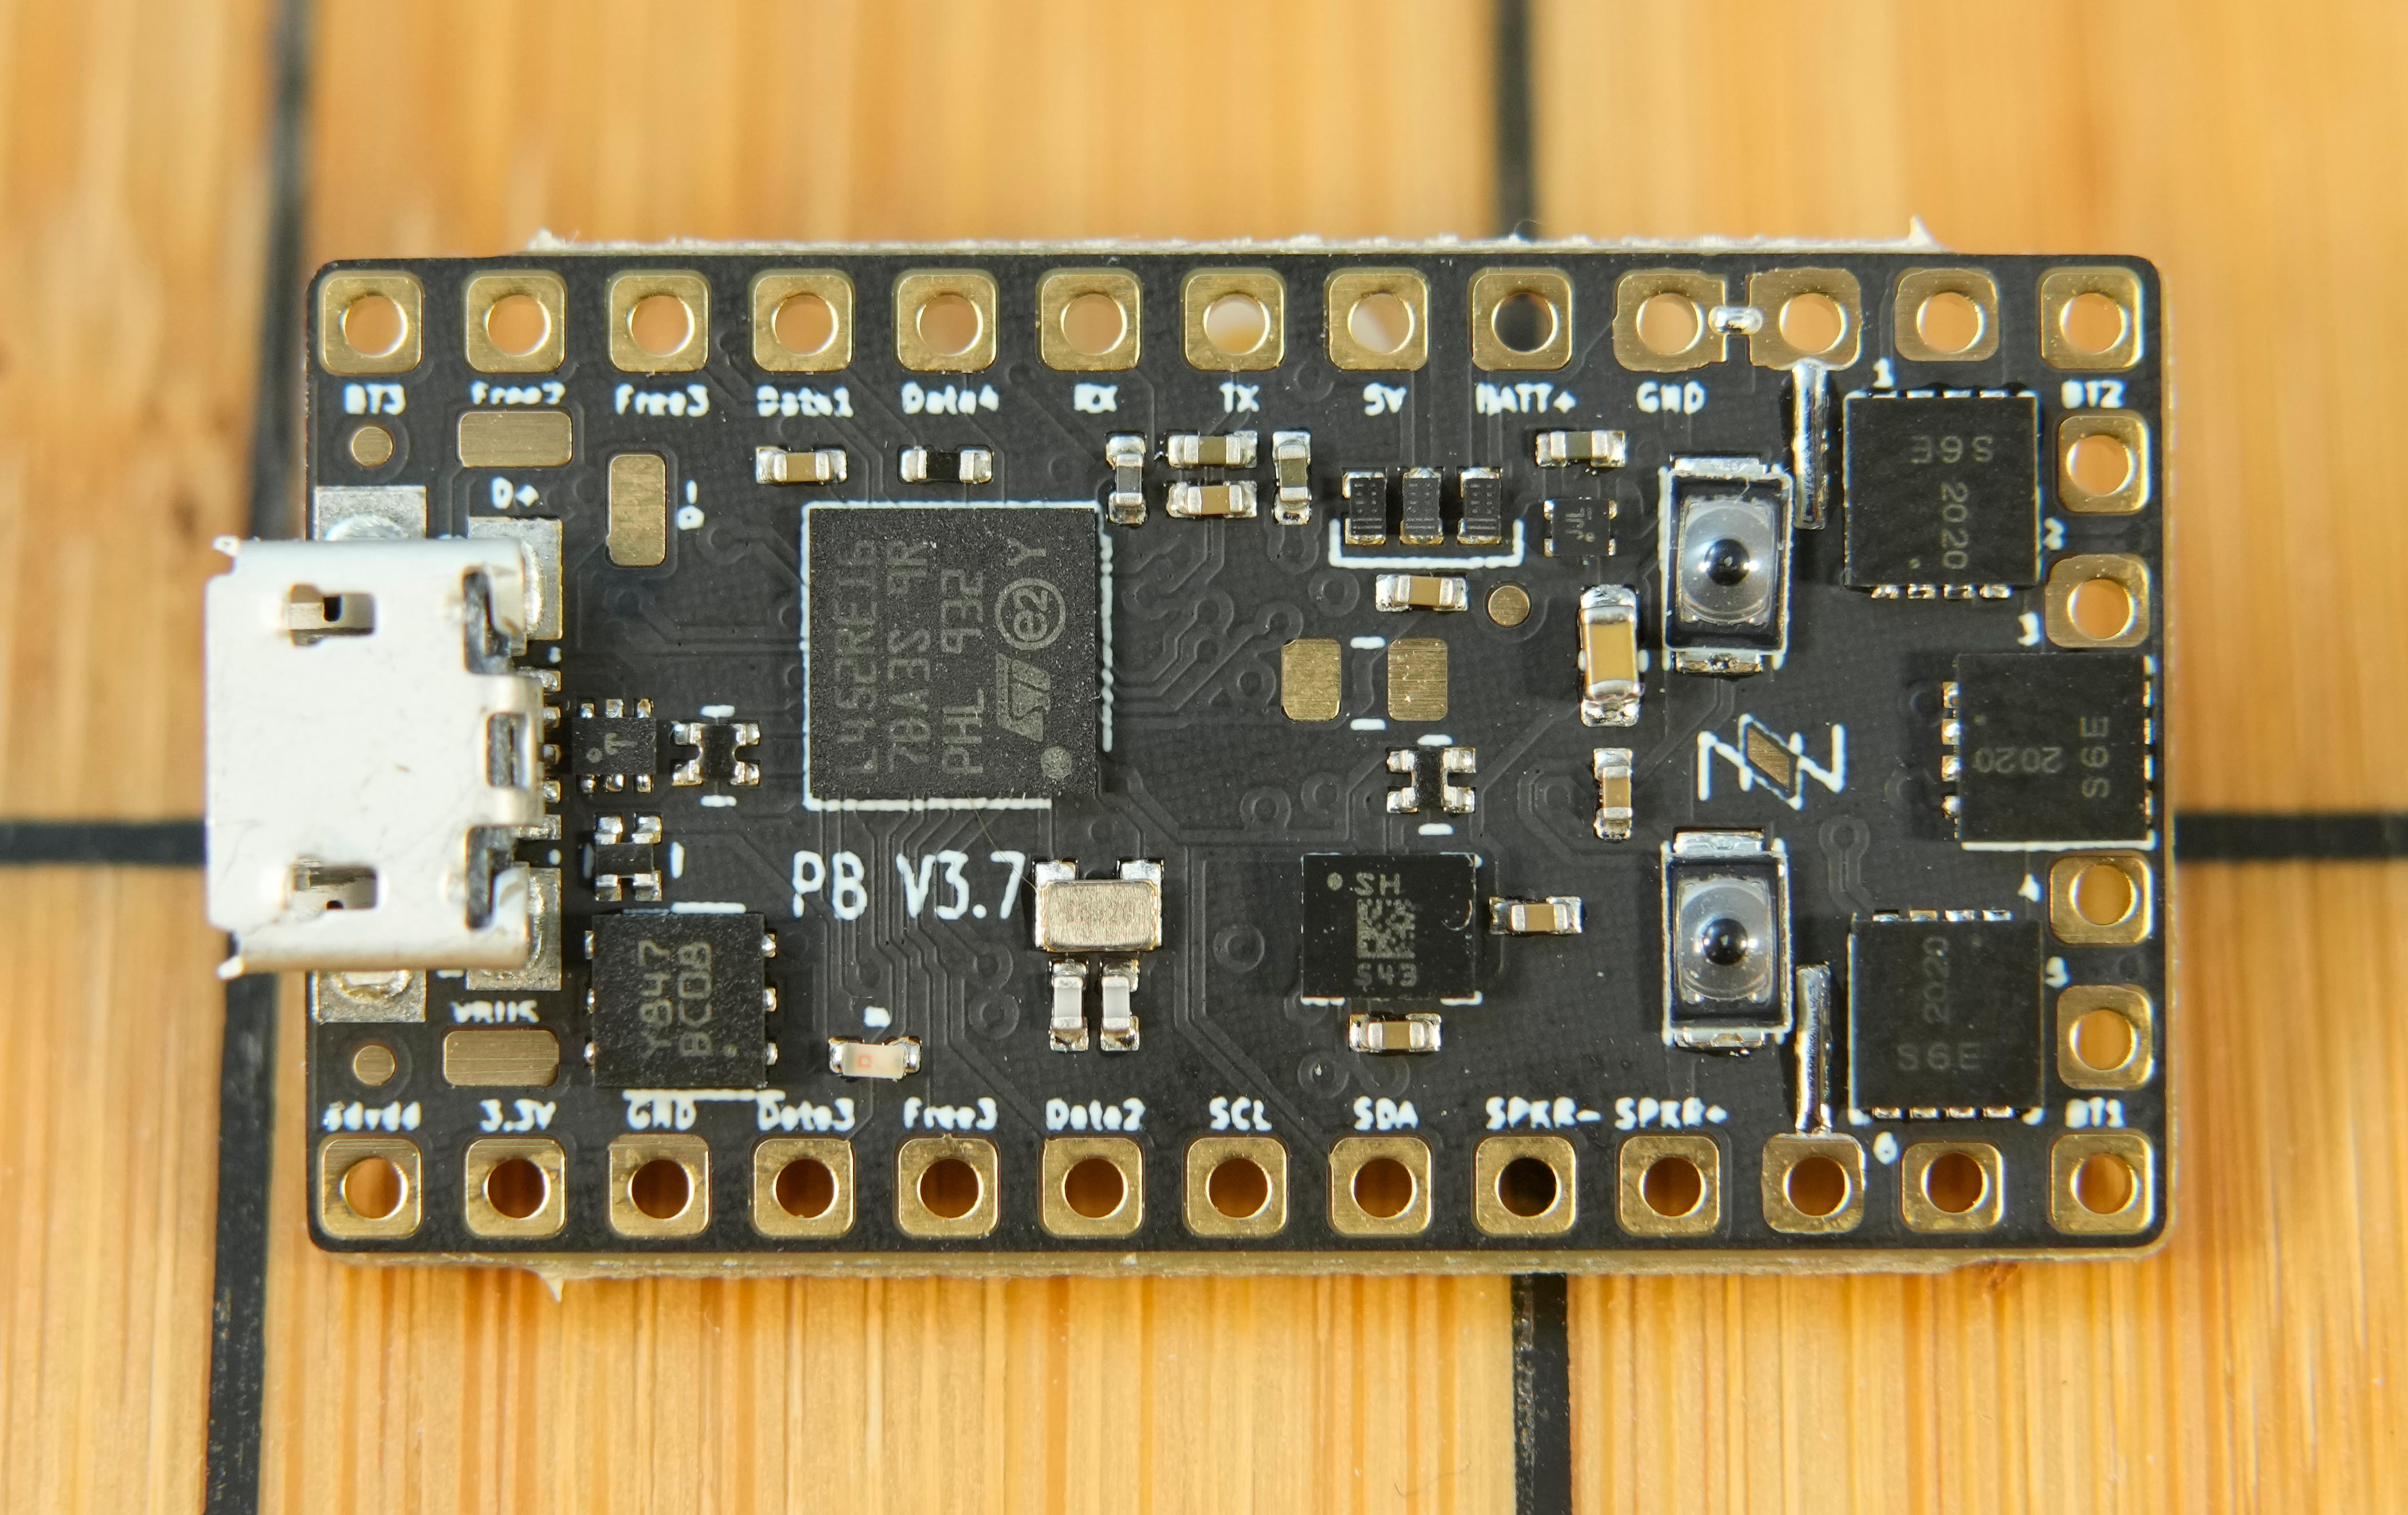
Touch Buttons 🔗
ProffieOS supports touch buttons. They work both with Proffieboards and with Teensy based builds, but slightly differently, for now this page will focus on Proffieboards. On a Proffieboard, the three button pads all support touch buttons. To use a touch button you need to specify it in your config file, like:
TouchButton PowerButton(BUTTON_POWER, powerButtonPin, 1700, "pow");
As with regular button, the first argument specifies what kind of event this button will generate, the second argument specifies which pad to use. The third argument however, is only for touch buttons and specifies a threshold that separate pressed values from non-pressed values. Note that Teensysabers and Proffieboards work differently, on a Proffieboard, small values means the button is pressed and high values means the button is not pressed. On a TeensySaber, it's the other way around.
To build a touch button, all you need is a piece of metal that is insulated from the rest of the saber. Surprisingly, the button will also need to be insulated from your fingers, otherwise static electricity can damage the board. A common way to do this is to use a clamp card as your touch button. The clamp card can be wrapped in packing tape, which forms a thin insulating barrier between the clamp and the card, and also your finger and the card. The thinner the barrier is, the better the touch button will work.
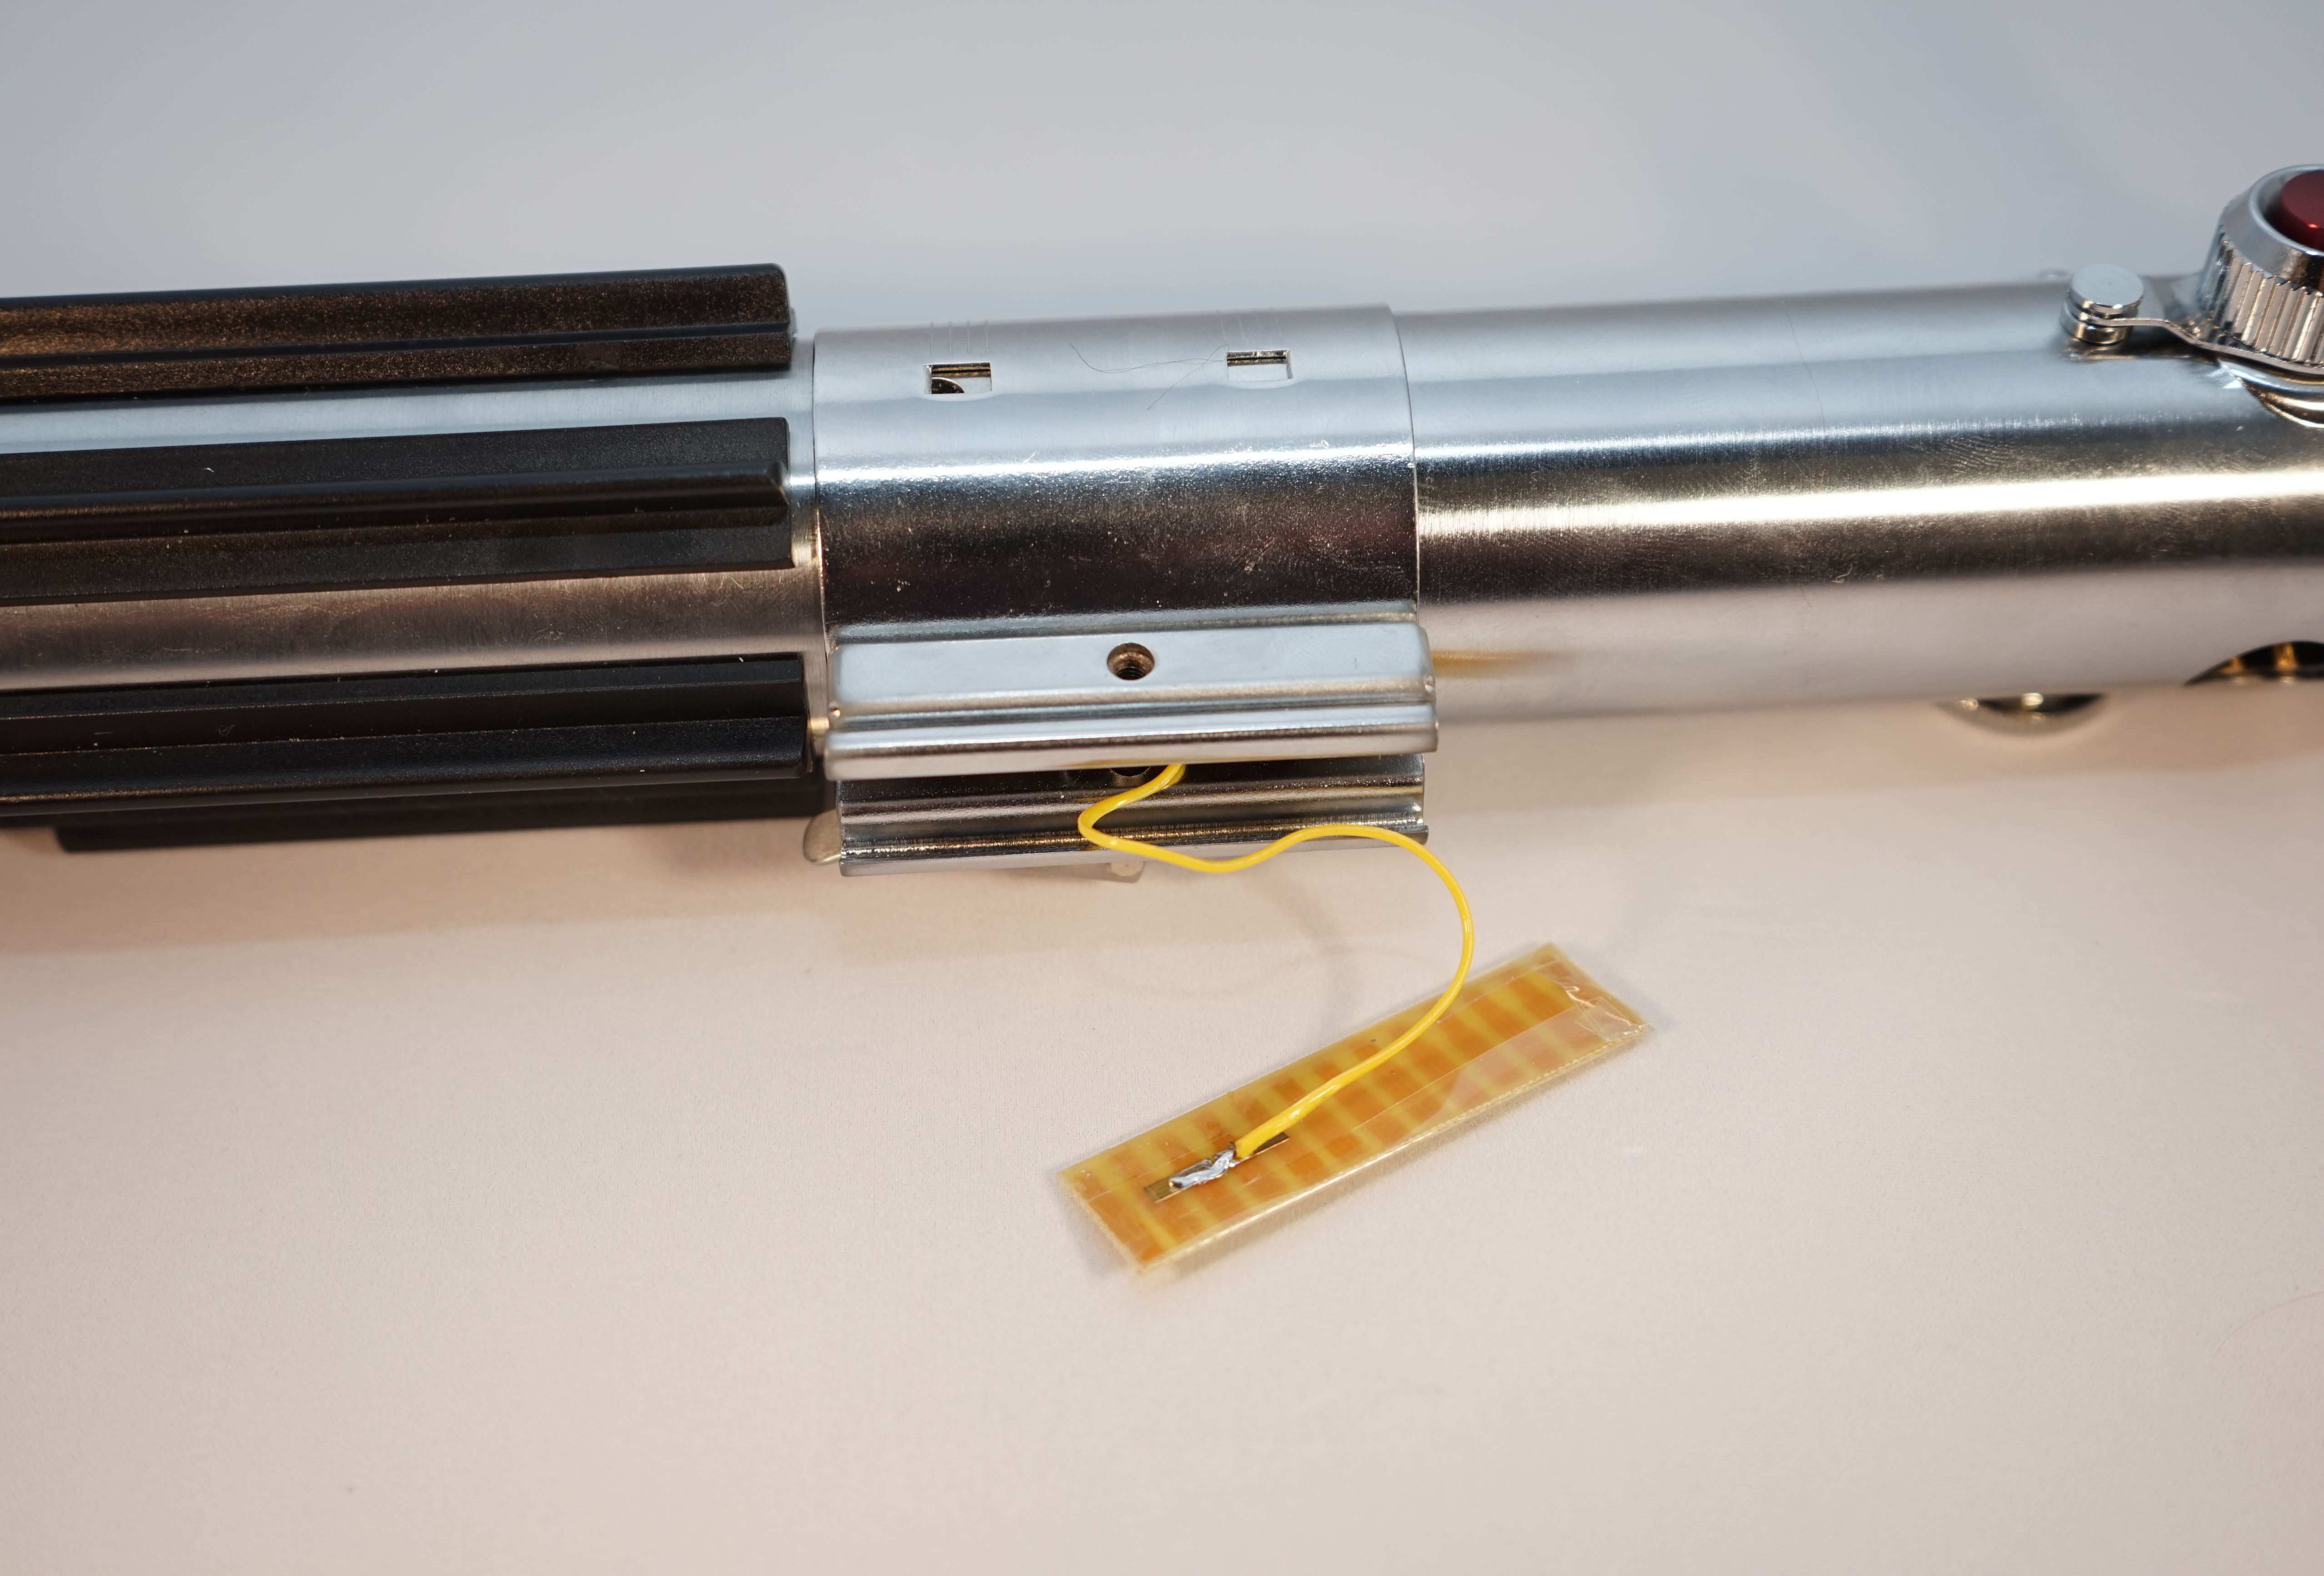
Once everything is hooked up, we'll need to calibrate the button. To do this, connect the usb cable to your computer and enter the "monitor touch" command in the serial monitor. Note that won't work if you have the DISABLE_DIAGNOSTICS_COMMAND in your config file, if so you'll need to change that first. ProffieOS will continuously print out the touch readout values in the serial monitor, now all you need to do is to note the typical values when you touch the button and when you don't touch the button, and then set the threshold in the config file to something in between. (Preferably a little closer to the 'touch' values, than the 'no-touch' values to avoid accidental activation.)
These touch buttons might seem like magic, but they really aren't. Basically what they are is half a capacitor, and the capacitance of the capacitor depends on what the other half of the capacitor, which is your finger when you touch the button and air when you don't. The Proffieboard will measure the capacitance of the capacitor repeatedly, and the values you see when you use "monitor touch" are based on those measurements.
Howto 🔗
How to add a blade 🔗
So you got a second saber, and it has more LEDs than your first one? Maybe it has a crystal chamber, or an illuminated pogo pin PCB. So now you want to take your existing configuration file and add another blade for the extra LEDs. You've come to the right place.
We'll need to do four things:
- remove KEEP_SAVEFILES_WHEN_PROGRAMMING if present
- increase NUM_BLADES by one
- add another blade in each entry in the blades[] array
- add another style to each preset in your config file
Step 1, remove KEEP_SAVEFILES_WHEN_PROGRAMMING if present 🔗
If you have KEEP_SAVEFILES_WHEN_PROGRAMMING in your config file, you need to remove it, because it's not going to work when you add another blade.
Step 2, increase NUM_BLADES by one. 🔗
Simple, just change:
#define NUM_BLADES 1
to:
#define NUM_BLADES 2
Step 3, add another blade in each entry in the blades[] array 🔗
This is a little trickier. Your blades array may look like this:
BladeConfig blades[] = {
 { 0, WS281XBladePtr<132, bladePin, Color8::GRB, PowerPINS<bladePowerPin2, bladePowerPin3> >(), CONFIGARRAY(presets) },
};
Now, let's say we have a crystal chamber with two LEDs, once we add the second blade, it might look like this:
BladeConfig blades[] = {
 { 0,
   WS281XBladePtr<144, bladePin, Color8::GRB, PowerPINS<bladePowerPin2, bladePowerPin3> >(),
   WS281XBladePtr<2, blade4Pin, Color8::GRB, PowerPINS<bladePowerPin6> >(),
   CONFIGARRAY(presets) },
};
This assumes that the data for your crystal chamber comes from LED4, and the (-) pad is hooked up to LED6. If that's not the case, you'll need to modify this example accordingly. You can also use the configuration generator to generate blades arrays which might look more like your specific setup to make it easier.
Step 4, add another style to each preset 🔗
The style will determine the color for your new LEDs, and obviously, you can use anything you want, but for simplicity, I'm going to show three easy options to get you started:
Option 1, copy the existing style. 🔗
So if your preset looks like this:
  { "TeensySF", "tracks/venus.wav",
    StyleNormalPtr<CYAN, WHITE, 300, 800>(),
    "cyan"},
Then you just copy the style, and the comma after it, like so:
  { "TeensySF", "tracks/venus.wav",
    StyleNormalPtr<CYAN, WHITE, 300, 800>(),
    StyleNormalPtr<CYAN, WHITE, 300, 800>(),
    "cyan"},
Now the new LEDs will behave exactly like the main blade. That might not be what you actually want, but it's always a good idea to keep it simple first and make one more change at a time.
Option 2, get a style from somewhere 🔗
You can use the style generator, take a style posted somewhere, or one that came with a sound font. You just insert the new style after the old one, exactly like we did above, the result might look like:
  { "TeensySF", "tracks/venus.wav",
    StyleNormalPtr<CYAN, WHITE, 300, 800>(),
    StylePtr<SimpleClash<Lockup<Blast<Cylon<Rgb<0,0,64>,15,10, DeepSkyBlue,15,100,2000,Cylon<Rgb<64,0,0>,15,6, Red,15,57,2000,Cylon<Rgb<0,40,0>,15,7, Green,15,37,2000>>>,White>,AudioFlicker<Blue,White>>,White>>(),
    "cyan"},
This is just an example of course, the style you use might be much shorter. (Or, in some cases, much longer.)
Option 3, make the new LEDs black 🔗
This can be nice for some presets that don't need the extra bling. In this case we simply set the new style to black, like so:
  { "TeensySF", "tracks/venus.wav",
    StyleNormalPtr<CYAN, WHITE, 300, 800>(),
    StylePtr<Black>(),
    "cyan"},
Now, please note that you may have a charging style that looks something like this:
  { "TeensySF", "tracks/mars.wav",
    &style_charging,
    "Battery\nLevel"}
Note that "&style_charging" is a style, even if it looks different from most other styles. All the options above apply the same. Here is what it would look like if make the crystal chamber off/black while charging.
  { "TeensySF", "tracks/mars.wav",
    &style_charging,
    StylePtr<Black>(),
    "Battery\nLevel"}
Ok, so there you go. Save the config file and upload your new configuration.
Blade Detect 🔗
Blade Detect typically uses a floating pin on the hilt side PCB that only gets connected when the ring of the blade side PCB contacts it and another pin in the same ring footprint. A latching button or switch could also be used.
This latching action is detected by the board and triggers a sound and a swap of which blade configuration is used; NO_BLADE or a blade present one. The active blades[] array specifies which CONFIGARRAY (bank of presets) to use, so you get to have a different group of presets used depending on the presence of a blade or not.
Example BladesConfig using Blade Detect:
    BladesConfig blades[] = {
      { 0,
        WS281XBladePtr<144, bladePin, Color8::GRB, PowerPINS<bladePowerPin2, bladePowerPin3> >(),
        CONFIGARRAY(blade_in) },

      { NO_BLADE,
        WS281XBladePtr<144, bladePin, Color8::GRB, PowerPINS<bladePowerPin2, bladePowerPin3> >(),
        CONFIGARRAY(no_blade), "nbsave" }
    };
Please note the "nbsave" part, which will make ProffieOS save presets.ini and other related save files into the "nbsave/" directory on the SD card. If that directory doesn't exist, saving will fail, but that might be ok for the no-blade case.
Blade detection is activated by using the BLADE_DETECT_PIN define in the CONFIG_TOP section of the config file.
The pin number can either be just a number, or a symbolic name like "blade2Pin". See these 2 examples:
#define BLADE_DETECT_PIN 0
or
#define BLADE_DETECT_PIN blade4Pin
All pins that are hooked up directly to the CPU can be used for blade detect, so data pins, free pins, button pins and RX/TX, with the exception of Data1 because it’s already bridged to a resistor.
The blade detect pin will be monitored continuously, when it changes, the Blade ID routines will be re-triggered. In addition, when not connected to anything, Blade ID will be offset by the value of NO_BLADE, which equals a billion.
The detection works by repeatedly switching between pull-up and pull-down mode and see if the input follows, or if it stays put at high or low. That means that it doesn't matter if the blade ID pin is connected to GND or BATT+, which is a good thing, because when connected to the '-' pad on an LED pixel strip, that can flip between high and low when the FETs are turned on/off.
Here's an example template of a config file formatted to use Blade Detect:
// This is a simplified config file template set up for Blade Detect.

#ifdef CONFIG_TOP
#define BLADE_DETECT_PIN blade4Pin
// other defines go here
#endif

#ifdef CONFIG_PROP
#include "../props/PROP_FILE_OF_CHOICE_GOES_HERE.h"
#endif


#ifdef CONFIG_PRESETS

Preset no_blade[] = {

{ "font", "tracks/track",
  StylePtr<Blue>(), "preset name"},

};

//---------------------------------------------------------------

Preset blade_in[] = {

{ "font", "tracks/track",
  StylePtr<Red>(), "preset name"},

};


BladesConfig blades[] = {
  { NO_BLADE,
    WS281XBladePtr<144, bladePin, Color8::GRB, PowerPINS<bladePowerPin2, bladePowerPin3> >(),
    CONFIGARRAY(no_blade), "no_blade_Save" },
  { 0,
    WS281XBladePtr<144, bladePin, Color8::GRB, PowerPINS<bladePowerPin2, bladePowerPin3> >(),
    CONFIGARRAY(blade_in), "blade_in_Save" }

};
#endif

#ifdef CONFIG_BUTTONS
Button PowerButton(BUTTON_POWER, powerButtonPin, "pow");
Button AuxButton(BUTTON_AUX, auxPin, "aux");
#endif
Please note that Blade Detect is separate from Blade ID and cannot use the same pin.
See more about Blade ID here.
Blade ID constant monitoring 🔗
As of ProffieOS7, a new method of detecting different "blades" by using Blade ID is available.
This can also include detecting other changes besides just blades, such as a removable chassis being inserted into a hilt.
Where previously Blade ID scanning only would occur at power on, this new way provides continuous scanning in the background, and will detect a change in blade state in real time, at any time.
The following defines can be added to the config file:
#define BLADE_ID_SCAN_MILLIS 1000
#define BLADE_ID_TIMES 10
In the example above, 1000 is the milliseconds between scans, and 10 is the number of scans that get averaged together to come up with a useable scanned value. These specific values have been tested to work well, but of course can be modified as desired.
Additionally, a BLADE_ID_CLASS will need to be defined, as well as SHARED_POWER_PINS for this method to work.
See Blade ID for more information.
Blade ID 🔗
So you know that first number in the blade configuration?
Do you know what it's for?
It's the Blade ID.
When ProffieOS starts, it measures the resistance between the Blade ID pin (which is usually the same as the neopixel data pin for the first blade) and GND. It then finds the entry in the blades table with the closest first number, and then it uses that entry until the next time it scans for a blade. This may be at power on, or triggered by Blade Detect. An example of a BladeConfig with multiple, different resistor value blades is shown here:
 BladeConfig blades[] = {
      { 5000,
        WS281XBladePtr<132, bladePin, Color8::GRB, PowerPINS<bladePowerPin2, bladePowerPin3> >(),
        CONFIGARRAY(blade1_in) },
      { 10000,
        WS281XBladePtr<128, bladePin, Color8::GRB, PowerPINS<bladePowerPin2, bladePowerPin3> >(),
        CONFIGARRAY(blade2_in) },
      { NO_BLADE,
        WS281XBladePtr<144, bladePin, Color8::GRB, PowerPINS<bladePowerPin2, bladePowerPin3> >(),
        CONFIGARRAY(no_blade) },
    };
So how do you use this?
Well, the idea is that if you have multiple blades, you can place a resistor between the data pin and GND, and ProffieOS can use that resistor to identify which blade is connected. In the simplest possible case, this could be used to support WS281X blades of different lengths, but it's also possible to support entirely different types of blades, assuming your blade connector has enough pins.
Note that the Blade ID resistor is different from the in-line resistor normally used for WS281X blades. The resistors are also different sizes. The in-line resistor should be 150-470 ohms, but the Blade ID resistor should be somewhere in the 2k to 100k range. Any lower may interfere with the blade data.
The V1 electronics is still one of the best pictures for showing how this can work: https://fredrik.hubbe.net/lightsaber/electronics.html
Unfortunately, it turns out that Proffieboard V1.5 and V2.2s are unable to do Blade ID in the same way as TeensySabers do, because there is no way to enable a pullup/pulldown resistor while doing an analog read from the pin. Several options can be defined to help with this as of ProffieOS 3.x.
NOTE - These are not needed for a Proffieboard V3. V3 already has a Bridged Pullup internally.
The first BLADE_ID_CLASS option is the default on Proffieboards V1.5 and V2.2s. Therefore it does not need to be specified in the config file, but here is what it is and what it does:
#define BLADE_ID_CLASS SnapshotBladeID<bladeIdentifyPin>
The default blade ID class SnapshotBladeID charges up the internal sampling capacitor, then connects the sampling capacitor to the Blade ID pin for a very short time, and then does the analog-to-digital conversion. This should give consistent values for the same blade, but unfortunately, the values will not reflect the actual value of the Blade ID resistor in the blade. The blades array has to be configured with these measured values instead. Measured values can be found by using Serial Monitor in Arduino, and entering scanid while the blade is off. This will report "BLADE ID: N" where N is the measured value.
Alternatively, an external pull-up resistor can be used. This resistor should be in the 20k to 50k range and placed between the blade pin and 3.3v. Then you add this to the config file:
#define BLADE_ID_CLASS ExternalPullupBladeID<bladeIdentifyPin, 22000>
(Replace 22000 with the value of your pullup resistor.) With this workaround, Blade ID should return values that are close to the Blade ID resistor values, which will make configuration easier.
Another option is to bridge the blade pin with another pin and use that pull-up resistor. This is the default method on a V3 board as it is built-in already, so it does not to be specified.
On a Proffieboard V2.2, the ID pin is right next to the TX pin. If you bridge those two together, and put this is your config file:
#define BLADE_ID_CLASS BridgedPullupBladeID<bladeIdentifyPin, 9>
(9 is the pin number for the TX pin) With this, Blade ID should return the actual value of the Blade ID Resistor. Use this value in the blade definition.
- Note - this means that you can't use the TX pin for anything else of course, such as a Bluetooth radio.
Another quirk of Blade ID is that unpowered neopixels throws it off. When the neopixels are powered, the inputs are high impedance, which doesn't affect the Blade ID, but when unpowered, they leech power from the data line, which throws off the Blade ID value. The solution is to turn the power on while we're doing Blade ID by using the ENABLE_POWER_FOR_ID define. If your blade is hooked up to the LED2 and LED3 pads, it would look like this:
#define ENABLE_POWER_FOR_ID PowerPINS<bladePowerPin2,bladePowerPin3>
IMPORTANT NOTE - BladeID requires a direct, uninterrupted connection from the board's data pin to the main blade (usually the center pin on the hilt-side of the main blade PCB). Therefore using SubBlades with neopixel accents, crystal chamber, or NPXL LED PCBs in series with the main blade won't work. They can be their own SubBlade chain on a data pin other than data1, but only data1 can use BladeID.
Here's an example template of a config file formatted to use Blade ID:
// This is a simplified config file template set up for Blade ID.

#ifdef CONFIG_TOP
#define SHARED_POWER_PINS
// #define BLADE_DETECT_PIN blade4Pin
#define ENABLE_POWER_FOR_ID PowerPINS<bladePowerPin2, bladePowerPin3>
// #define BLADE_ID_CLASS ExternalPullupBladeID<bladeIdentifyPin, 33000> // value of resistor used
// #define BLADE_ID_CLASS BridgedPullupBladeID<bladeIdentifyPin, 9> // TX pad for example

/*  This will make it use the speed-of-charging-a-capacitor method of blade ID which sometimes works without resistors.
    Blade ID can detect if a blade is connected or not, but it won't actually reach the NO_BLADE value,
    so I would recommend using something like 200000 instead of NO_BLADE. */
#define BLADE_ID_CLASS SnapshotBladeID<bladeIdentifyPin>

/*  Millis is Blade ID scan interval. If the blade ID comes out the same as before, it will do nothing.
    If it comes out different, it will do FindBladeAgain(), which will basically initialize the saber from
    scratch and load the right settings for the new id().
    It will only work with neopixel blades, and requires SHARED_POWER_PINS to work. */
#define BLADE_ID_SCAN_MILLIS 1000
//    How many Blade ID scans to average
#define BLADE_ID_TIMES 15
// other defines go here
#endif

#ifdef CONFIG_PROP
#include "../props/PROP_FILE_OF_CHOICE_GOES_HERE.h"
#endif


#ifdef CONFIG_PRESETS

Preset blade_1 [] = {

{ "font", "tracks/track",
  StylePtr<Red>(), "preset name"},

};

//---------------------------------------------------------------

Preset blade_2 [] = {

{ "font", "tracks/track",
  StylePtr<Green>(), "preset name"},

};

//---------------------------------------------------------------
Preset no_blade[] = {

{ "font", "tracks/track",
  StylePtr<Blue>(), "preset name"},

};


BladeConfig blades[] = {
  { 10000,
    WS281XBladePtr<123, bladePin, Color8::GRB, PowerPINS<bladePowerPin2, bladePowerPin3> >(),
    CONFIGARRAY(blade_1), "blade_1_Save" },
  { 33000,
    WS281XBladePtr<144, bladePin, Color8::GRB, PowerPINS<bladePowerPin2, bladePowerPin3> >(),
    CONFIGARRAY(blade_2), "blade_2_Save" },
  { 200000,
    WS281XBladePtr<1, bladePin, Color8::GRB, PowerPINS<bladePowerPin2, bladePowerPin3> >(),
    CONFIGARRAY(no_blade), "no_blade_Save" }
};
#endif

#ifdef CONFIG_BUTTONS
Button PowerButton(BUTTON_POWER, powerButtonPin, "pow");
Button AuxButton(BUTTON_AUX, auxPin, "aux");
#endif
As of ProffieOS7, a new method of detecting different "blades" by using Blade ID is available.
See Blade ID constant monitoring.
How to edit presets.ini by hand 🔗
Ok folks, so here is how you can use the .ini files stored on the SD card to update your installed fonts and blade presets manually.
IMPORTANT: to use presets.ini, you have to flash the saber with the #define SAVE_PRESET in your config file, so the saber writes the preset information to the SD card.
This define is blanketed under SAVE_STATE. ( See The CONFIG_TOP Section )
Note* As of ProffieOS 7, files are saved differently and need to be "unlocked" before editing.
There's an easy app that do this for you here: https://github.com/NoSloppy/Unlock_Savefiles
See here for more info on the new save format. Save File Format
Once the .ini is unlocked and editable, find the presets.ini on the SD card and edit it using a text editor like Sublime Text, or Notepad ++ on PC or Textedit on Mac. It has a very basic structure:
First line is the 'installed date,' which is when the saber was last programmed Then we have blocks of statements that look like this:
new_preset
font=TFAFlex
track=tracks/rey_training.wav
style=builtin 0 1
style=builtin 0 2
name=Graflex8
variation=23299
That block of statements describes a preset. It shows the font, the track, blade style(s) (in this case, the saber in question has two 'blades:' the main blade an a pixel chamber), the name of the preset (used for OLED displays) and the 'variation' which is used for color-change. You'll see that the style entries show 'builtin and then two numbers. The first number corresponds to the first entry in your presets list and the second is which blade style in that entry should be used.
So for this saber, the config file entry for this preset looks like this:
{ "TFAFlex", "tracks/rey_training.wav",
StyleNormalPtr<CYAN, WHITE, 300, 800>(),
StyleNormalPtr<Blue, WHITE, 300, 800>(), "Graflex8"},
So you can see how the config file entry matches what we see in the presets.ini style statements: builtin style, entry 0 (the first entry) and blade style 1 / 2
You will see several of these blocks, corresponding to the number of presets in your config file. At the end of the file, there is a single line with the word end which tells the saber that there are no more presets to use.
Now, if you want to alter your presets, you can change any of the lines in the block that describe a preset AND you can add new blocks. Here's how we would change this preset to use a new font:
new_preset
font=GraflexIV
track=tracks/rey_training.wav
style=builtin 0 1
style=builtin 0 2
name=Graflex8
variation=23299
You could also change the track:
new_preset
font=GraflexIV
track=tracks/rots.wav
style=builtin 0 1
style=builtin 0 2
name=Graflex8
variation=23299
Or even alter the styles to use entries from an entirely different preset:
new_preset
font=GraflexIV
track=tracks/rots.wav
style=builtin 3 1
style=builtin 3 2
name=Graflex8
variation=23299
You could even use a blade style from one preset and a crystal chamber style from an entirely different preset:
new_preset
font=GraflexIV
track=tracks/rots.wav
style=builtin 3 1
style=builtin 5 2
name=Graflex8
variation=23299
So as you can see, the presets.ini can be modified by editing a couple lines and totally change how that preset functions when the saber is used. You can also insert as many preset blocks as you like, so long as they reference the blade styles in your config file and there is a single line at the end of presets.ini with the word end to tell the saber that the list of presets is finished.
For anyone struggling with 'running out of memory' or if you want to tinker with the saber without reflashing, take a look at the presets.ini file and try out some modifications. You can add fonts and tracks to the SD card and update your saber to use those fonts without reflashing, or re-order/increase/decrease your presets list without ever needing to open Arduino.
If for some reason you mess up the file, the saber will read from the backup .tmp file and boot up normally.
Of course, if you prefer to use a UI to do all of these changes, you can use the WebUSB interface.
How many leds does my blade have? 🔗
If you buy a blade from someone else, you might not know how many LEDs are in it, and unfortunately there is no way for ProffieOS to "just know" how many LEDs there are. Also, when you configure your blades, if you specify too few LEDs, the tip of the blade will not light up, and if you specify too may LEDs, effects which only light up the tip of the blade will not show, as they will light up LEDs that you do not have.
Fortunately, there is an easy way to find out how many LEDs your blade has. Add a new preset to your config file, and make the style for that blade this:
StylePtr<LengthFinder<>>(),
Change the blade config to 144 LEDs, something like this:
WS281XBladePtr<144, bladePin, Color8::GRB, PowerPINS<bladePowerPin2, bladePowerPin3> >(),
If you have COLOR_CHANGE_DIRECT in your config file, I recommend removing that temporarily while determining the blade length. Now compile and upload.
The LengthFinder<> style will light up a single LED, and speak the number of which one it is lighting up. So to start with it will say "one" and light up the first LED. Now, activate the color change mode. (Normally done with AUX+POWER, but may be different depending on your prop file). Rotate the hilt, the LED will move one at a time, and the saber will speak the LED number every 3 seconds. Keep rotating until you find the point where the light reaches the tip and disappears, then rotate it back one step, so that the last LED of your blade is lit. At that point it will tell you how exactly how many LEDs are in your blade.
Now, go back to your config file, remove the LengthFinder<> preset, update your blade configuration with the length of your blade, compile, upload, and you're done.
How to back up a Proffieboard 🔗
If you want to backup the program that is currently on your Proffieboard, you can do so by going here:
https://profezzorn.github.io/webdfu/dfu-util/
Connect your Proffieboard to your computer with USB and make it go into bootloader mode.
The easiest way to do this is by issuing a command in Arduino's Serial Monitor, RebootDFU.
The physical way requires accessing the Proffieboard onboard buttons. (Hold BOOT, press and release RESET, then release BOOT.)
If you're running a Windows computer and this is the first time you are connecting a Proffieboard via USB, then you will also need to run Zadig.
Now click 'Connect' in the programmer. You should be prompted to connect to 'STM32 BOOTLOADER'.
Click 'Read'. This will save a .bin file to your computer that is a backup of the programming on the board.
A good idea might be to make a new folder to store your backups, something like:
'/User.../lightsabers/backups/Graflex/' then name the download file 'Graflex_Nov11-2021.bin'.
Note that this is not a config file and there isn't a way to tell how the board was configured from the downloaded file.
If you later want to restore this backed up programming to your Proffieboard, you can go back to the page listed above, connect again, then click 'Write' and select the file you previously downloaded. This will restore the programming to the way it was.
Note that some options may be stored on the SD card as .ini files, so you probably want to preserve those too.
Simply copying them to your backup folder mentioned above would be ideal.
How to install a new sound font 🔗
Copying the font to the SD card. 🔗
First thing we need to do is to make the SD card show up on the computer. There are two ways to do this: Either we can take the SD card out of the saber and put it in an SD card reader attached to the computer, or if your saber is configured with the "mass storage" option, then you can use the Proffieboard as an SD card reader and just connect the saber to the computer with an USB cable. SD card readers are faster, but can be impractical if it's hard to get the SD card out of your saber.
Now, once the SD card shows up on the computer, we can put the font on it. Usually, what we want to do is to unzip the font into a new directory on your desktop, then copy or move that directory to the SD card. If the directory name is long, complicated or has weird characters in it, I suggest renaming it to something simple, preferably with only 8 characters. Sometimes font zip files contains a bunch of directories, and only one of those is intended to be used with ProffieOS, in which case you should only copy that directory to the SD card, not the whole thing.
Once it's copied, you should have a new directory in the top level directory of the SD card. That directory should contain the sounds and config files that make up the font. Although each of the sounds may be in a sub-directory in the font directory.
Now make sure to eject the sd card safely from the computer.
Telling ProffieOS about the new font. 🔗
There are several ways to do that:
- Use ProffieOS Workbench
- Use Edit Mode
- Add or change a preset and re-program the saber.
- Edit presets.ini on the sd card.
- Replace an existing font on SD card.
Use ProffieOS Workbench. 🔗
I already wrote a guide for how to do this: https://fredrik.hubbe.net/lightsaber/webusb.html
Use Edit Mode 🔗
If you have ProffieOS 6.x or later, and are using the Fett263 prop with edit mode enabled, then you can create and modify presets using the edit mode menu. For more information, go here: https://www.fett263.com/proffieOS6-intro.html
Add or change a preset and re-program the saber. 🔗
See the CONFIG_PRESETS section for how to edit configure presets, then just follow the instructions for how to install ProffieOS to re-program the saber. Note that this can be tricky if you don't have the config file that was used to program the saber last time.
Edit presets.ini directly 🔗
Using the ProffieOS workbench, or edit mode both ends up modifying a file on the sd card called presets.ini. This file can also be edited directly. I wouldn't normally recommend doing this, but if you want to, there is more information about how to do it here: Editing presets.ini by hand
Replacing an existing font on the SD card. 🔗
Some people find it easier to just name their font directories something generic, like "font1", "font2", etc. Then you can just replace the contents of those directories to switch the font sounds, and then ProffieOS doesn't need to be told how to find the sounds since your new sounds are in the same place. Of course, you could do this even if the directories aren't generically named, but it might be confusing to have a "darthvader" directory with a Luke font in it.
How to recover from a bad programming 🔗
If your ProffieBoard is unresponsive, either because of creating a program that doesn't work, or because of interrupting a programming in a middle. Don't worry here's what you need to do:
- Plug in your Proffieboard to your computer
- Hold the BOOT button.
- Press and release the RESET button.
- Release the BOOT button.
- Make sure that the board shows up as "STM32 BOOTLOADER" on your computer. Click here to learn how to check. If you don't see "STM32 BOOTLOADER" connected to your computer, try again. If you cannot get past this step, regardless of how many cables you try, then there is most likely something wrong with your board, or you're not actually pushing the buttons correctly.
- Click the upload button in Arduino. Note that the board will not show up under "Arduino -> Tools -> Port". This is expected and not a problem, upload should work anyays.
- If the upload went well, your board should now be working normally.
How to use a ProffieOS saber 🔗
If no other prop file has been set manually in the config file, then the default file gets used, which is the "saber.h" prop file, and this is how the buttons will work:
On/Off -                  Zero buttons saber = Twist (2 directional, like revving a motorcycle)
                          ** Note that the motion has to be done long enough to count, so a very quick flick of the wrist will not work.
                          1 button saber = Click to turn the saber on or off.
                          2 button saber = Click POW
                          ** Note, if #define DUAL_POWER_BUTTONS is added to config file,  Clicking either POW or AUX will power on.
                             Also note that POW and AUX become swapped while the saber is on if AUX used to power on.
Turn On muted -           Double-click POW button
Next preset -             Zero button saber = Point up and shake
                          1 or 2 button saber = Hold POW button and hit the blade while saber is off.
Previous Preset -         Hold AUX button and click the POW button while saber is off.
Clash -                   Hit the blade while saber is on.
Lockup -                  Hold either POW or AUX, then trigger a clash. Release button to end.
Drag -                    Hold either POW or AUX, then trigger a clash while pointing down. Release button to end.
Melt -                    Hold either POW or AUX and stab something.
Force Lightning Block -   Click AUX while holding POW.
Force -                   Long-click POW button.
Start Soundtrack -        Long-click the POW button while blade is off.
Blaster block -           Short-click AUX button.
Enter/Exit Color Change - 1 button saber = Hold button and Twist.
                          2 button saber = Hold Aux and click POW while on.
** Note Color Change only works with ProffieOS 3.x and above)
Note that other button configurations are available by using different prop files. Several prop files are already provided with ProffieOS and can be found in the props directory. To learn how to use a different prop file, see the The CONFIG_TOP section.
Making your own prop file 🔗
By default, the Proffieboard has a wide array of button actions, based on your config (1, 2, or 3 buttons.) However, some of the default button actions can be less than ideal when spinning or dueling the saber. For example, a simple short click on the power button will shut off the saber, which is easy to trigger by accident when handling the saber.
So, how do we fix this? Easy.
Button actions are handled by a prop file. The default prop file is called saber.h and can be found in the "ProffieOS/props/" directory. While you can modify saber.h directly, the recommended way is to make a copy of saber.h, then add the following to your config file:
#ifdef CONFIG_PROP
#include "../props/yourfile.h"   // this assumes your copy is called "yourfile.h"
#endif
Inside the prop file, you'll find case statements that specify how buttons are handled. Case statements are a condition and an action, followed by "return true". If the condition is met, then the action is triggered and the break stops other actions from firing in separate case statements. Here's an example of the power off case statement from line 72 in props/saber.h:
  case EVENTID(BUTTON_POWER, EVENT_CLICK_SHORT, MODE_ON):
  case EVENTID(BUTTON_POWER, EVENT_LATCH_OFF, MODE_ON):
  case EVENTID(BUTTON_AUX, EVENT_LATCH_OFF, MODE_ON):
  case EVENTID(BUTTON_AUX2, EVENT_LATCH_OFF, MODE_ON):
#if NUM_BUTTONS == 0
  case EVENTID(BUTTON_NONE, EVENT_TWIST, MODE_ON):
#endif
#ifndef DISABLE_COLOR_CHANGE
    if (SaberBase::GetColorChangeMode() != SaberBase::COLOR_CHANGE_MODE_NONE) {
      // Just exit color change mode.
      // Don't turn saber off.
      ToggleColorChangeMode();
      return true;
    }
#endif
    Off();
    return true;

  case EVENTID(BUTTON_POWER, EVENT_CLICK_LONG, MODE_ON):
    SaberBase::DoForce();
    return true;
So we see that there are four separate case statements that have the same action: Turn off color change mode and then call Off(); That Off() call turns off the saber, and can be triggered by the power button or aux button, depending on config (both momentary and latching.) Most configs have two buttons: power and aux (both momentary), so we can ignore the three statements regarding latching switches.
To alter the button behavior, we simply change
case EVENTID(BUTTON_POWER, EVENT_CLICK_SHORT, MODE_ON):
to
case EVENTID(BUTTON_POWER, EVENT_CLICK_LONG, MODE_ON):
Now a long press of the power button (any press longer than 500 ms) will shut off the saber when it's running. However, this isn't the only change that needs to be made. As you can see in the code, there is another action assigned to a long power button press while powered on: Force effects. We need to 'move' this action because there can only be one case statement for a given button, condition and power state in the code, which means that two identical case statements will prevent the code from compiling and uploading to your saber. In my case, I moved the Force effects from long press power to long press aux, like so:
  case EVENTID(BUTTON_AUX, EVENT_CLICK_LONG, MODE_ON):
    SaberBase::DoForce();
    break;
Now we've changed power off to a long press and moved force effects to long press aux. Hopefully this example shows how easy it is to change the case statements in the prop to customize your buttons to do exactly what you want them to do.
To help further customize your preferences for button presses, the timings for different button events are as follows:
You get a EVENT_PRESSED event when the button is first pressed.
If it was less than 500ms since the button was released, you also get an EVENT_DOUBLE_CLICK event.
After 300ms you get an EVENT_HELD (If it's still held)
After 800ms you get an EVENT_HELD_MEDIUM (If it's still held)
After 2000ms you get an EVENT_HELD_LONG (If it's still held)
Then, once the button is released you get: An EVENT_RELEASED event.
If held <= 500 ms you get an EVENT_CLICK_SHORT
If held > 500 and < 2500 you get an EVENT_CLICK_LONG
Happy sabering!
Navigating the menu system 🔗
ProffieOS has a configurable menu system which can be configured with any menus you want. Also, some props have their own menues.
Please note that in order to not get lost in a menu system, a 'common' folder from a ProffieOS V2 Voicepack needs to be on the SD card and included in the Preset's Font Search Path.
Voicepacks are available at the following pages:
Default ProffieOS V2 Voicepacks
BC Custom ProffieOS V2 Voicepacks
This page describes the default menues, which is what you get by using this define with a prop that supports it:
#define MENU_SPEC_TEMPLATE DefaultMenuSpec
(Currently, this is supported by the default "saber" prop, and the "saber_BC_buttons" prop.)
The prop will have some button for entering the menu system, when using the default "saber" prop, this is by double-clicking the AUX button while the saber is off. Once you enter the menu system, these are your controls:
- Click POWER - select
- Click AUX - back / cancel
- Rotate hilt left/right around it's axis - go to the next / previous menu entry
- You can use "left", "right", "select" and "cancel" in the serial monitor to navigate the menues as well.
The saber will tell you what menu entry it's on through the speaker, so make sure to have a speaker connected when navigating the menu.
The top menu 🔗
When you enter the menu system, this is where you end up. The default top menu has two entries, both of which leads to sub-menus:
Edit Presets 🔗
Settings 🔗
The Settings Menu 🔗
The settings menu is fairly simple. Note that depending on what defines you use, some of these settings might not be available. Depending on your defines, these settings may be saved between reboots, or not.
Change Volume 🔗
This allows you to change the volume. Select, rotate left / right to adjust the volume, then click power to select the volume you want. See also the VOLUME_MENU_GAMMA define.
SD Access 🔗
Lets you select if the SD card can be accessed from a computer or not. Defaults to off to protect the SD card from accidental corruption when programming the board. Available with the MOUNT_SD_SETTING define.
Blade Length 🔗
Lets you shorten the blade to match the inserted blade. Available with the DYNAMIC_BLADE_LENGTH define.
Clash Threshold 🔗
Lets you adjust the clash threshold. Reasonable values range from around 1 to 8. Available with the DYNAMIC_CLASH_THRESHOLD define.
Blade Dimming 🔗
Lets you make all your LEDs darker, can be helpful to save on battery, or when using your saber in a dark environment. Available with the DYNAMIC_BLADE_DIMMING define.
The Edit Presets Menu 🔗
Select Font 🔗
This will go to a sub-menu, where each entry is a font on your SD card. Note that all fonts must be in the top-level to be found, and must have a "font.wav" file so you know which font it is. If you click AUX, it will exit the menu without changing anything, if you click POW, the selected font will be used for the current preset.
Select Track 🔗
Similar to the "Select Font" sub menu, but for tracks. Tracks must be in /tracks/*.wav or /FONT/tracks/*.wav to be found.
Edit Blade Style (one per blade) 🔗
If you have multiple blades (or accents, illuminated PCBs, buttons, etc.) there will be multiple "Select blade style" menus, one per blade. Selecting this entry will enter the "Edit Blade Style" menu, see below.
Move Preset Up 🔗
Moves the current preset up one step.
Move Preset Down 🔗
Moves the current preset down one step.
Select Preset 🔗
Selects the current preset for insertion.
Insert Selected Preset 🔗
Inserts a copy of the selected preset before the current preset. It's recommended to immediately change the font for the new preset so that you can tell them apart.
Delete Preset 🔗
This will enter a confirmation menu that has several cancel entries and one select entry. If you select the select entry, the current preset will be deleted. While the deleted entry can be reconstructed, there is no easy "undo", apart from deleting your presets.ini and presets.tmp files, which would reset all edits made using the menu system.
The Edit Blade Style Menu 🔗
(Edit Style Options)[#the-edit-style-options-menu] 🔗
If this style has options that can be changed, like base color, retraction time, etc. then selecting this will enter a menu which lets you change those options.
Select Style Entry 🔗
Remembers the colors from this style entry, so that they can later be applied to another style, possibly in a completely different preset.
Apply Colors From Selected Style Entry 🔗
Copies the colors from a previously selected entry to this style.
Apply Colors To All Blades 🔗
Applies the colors of this style to all other styles in the same preset.
Reset Colors 🔗
Resets all colors of this style to their defaults.
Reset Style Options 🔗
Resets all colors, options and timing values for this style to their defaults.
Select Style 🔗
This will let you select a different style from any of the presets in the config file.
The Edit Style Options Menu 🔗
Note that only those options that your style actually uses will show up in this menu, so while this menu is fairly long, it might not be when you access it on your saber. If you select a color option in this menu, it will go to the color menu, if you select any other option, you will enter a menu that lets you select the value for that option.
Base Color 🔗
Alt Color 🔗
Style Option 🔗
Ignition Option 🔗
Ignition Time 🔗
Ignition Delay 🔗
Ignition Color 🔗
Ignition Power Up Option 🔗
Blast Color 🔗
Clash Color 🔗
Lockup Color 🔗
Lockup Position 🔗
Drag Color 🔗
Drag Size 🔗
Lightning Block Color 🔗
Stab Color 🔗
Melt Color 🔗
Swing Color 🔗
Swing Option 🔗
Emitter Color 🔗
Emitter Size 🔗
Preon Color 🔗
Preon Option 🔗
Preon Size 🔗
Retraction Option 🔗
Retraction Time 🔗
Retraction Delay 🔗
Retraction Color 🔗
Retraction Cool Down Arg 🔗
Postoff Color 🔗
Off Color 🔗
Alt Color 2 🔗
Alt Color 3 🔗
Style Option 2 🔗
Style Option 3 🔗
Ignition Option 2 🔗
Retraction Option 2 🔗
The Color Menu 🔗
This menu lets you make changes to a single color. The color will be showing on all blades while you are in this menu. You need to select the "Save" entry at the end for anything to change. If you just exit the menu by pressing AUX, your changes will not be saved.
Color List (select color by name) 🔗
This lets you select a color by name. The list of available names might depend on what voice pack you choose.
Change Color by Hue 🔗
This lets you chage the hue of the current color using a color wheel, similar to the "color change mode".
Change Color Brightness 🔗
Lets you make the current color lighter or darker, please remember that making it too bright will desaturate the color and make it less colorful.
Change Red 🔗
Lets you change the red value.
Change Green 🔗
Lets you change the green value.
Change Blue 🔗
Lets you change the blue value.
Select Color 🔗
Remembers the current color.
Use Selected Color 🔗
Recalls the remembered color from the prevoius menu entry.
Reset Color to Default 🔗
Resets the color to the default as specified by the style.
Save 🔗
Please remember to select this after changing the color, or the change will not be saved.
Saving FLASH Memory 🔗
If you see this when trying to compile ProffieOS
`.text' will not fit in region `FLASH'
Then the combination of all the features and styles takes up too much space to fit on the board. Here is a list of things you can try to make it fit, or just to reduce memory use in general:
Update to the latest available Arduino Proffieboard plug-in. 🔗
Arduino menu Tools>Board>Boards Manager, type "proffie" in the search box. Install or update to the latest version available in the dropdown menu. Specifically, 3.6.0 introduced a lot of optimizations to save compiled code size.
Use "smallest size". 🔗
In the Arduino menu Tools->Optimize, you can select "smallest size". This will disable some optimizations that usually make the compiled code bigger. The program will run a little slower, but that is generally not a problem.
Don't use "Serial + Mass Storage" if not neccessary. 🔗
Arduino menu Tools>USB Type can be set to "Serial" only to save additional memory that is used if Mass Storage is turned on.
If you can use a standalone USB SD card reader, you'll access your files faster, and with less chance of file corruption, plus get the memory savings as well.
Don't use the POV style. 🔗
The POV style uses a lot of memory, and most people never really use it. Look for "&pov_style" in your config file and either replace those styles with something else, or remove the preset completely.
Disable diagnostic commands. 🔗
ProffieOS contains several serial monitor commands which are very useful for diagnosing problems, like "top", "monitor" and "dir". However, disabling these commands can save some memory. To do so you can add
#define DISABLE_DIAGNOSTIC_COMMANDS
to your config file. Note that this define is only available in ProffieOS 3.x and over.
Reduce number of presets, or use simpler styles. 🔗
If all else fails, you'll need to reduce the number of presets you use, or use less complicated blade styles.
Use the same, or similar style for multiple presets. 🔗
Using the same style multiple times in your config file uses no extra memory. This means that you can have multiple presets, with different fonts and tracks, but with identical blade styles, and it will use very little memory. Since ProffieOS 4.x, this sort of memory saving also applies when making minor changes, like changing the base color of a blade. Basically: Having similar blade styles, but with different colors uses less memory than having unique blade styles for each preset.
A variation of this is to use use the same style, but change some of the colors or numbers using Edit Mode, or the 8.x menues. These sort of changes will generally be saved in the presets.ini file on your SD card, but you can also do this directly in your config file. Here is an example, let's say you have three styles like this:
   StyleNormalPtr<AudioFlicker<RED, WHITE>, BLUE, 300, 800>(),
   StyleNormalPtr<AudioFlicker<GREEN, WHITE>, BLUE, 300, 800>(),
   StyleNormalPtr<AudioFlicker<YELLOW, WHITE>, BLUE, 300, 800>(),
If you change this to:
   StyleNormalPtr<AudioFlicker<RgbArg<BASE_COLOR_ARG,Red>,White>,Blue,300,800>("65535,0,0"),
   StyleNormalPtr<AudioFlicker<RgbArg<BASE_COLOR_ARG,Red>,White>,Blue,300,800>("0,65535,0"),
   StyleNormalPtr<AudioFlicker<RgbArg<BASE_COLOR_ARG,Red>,White>,Blue,300,800>("65535,65535,0"),
Then the styles will be exactly the same, and the only difference will be the string at the end, which should reduce the memory usage quite a lot. The format of the string is the same as what is stored in presets.ini (except for the "builting X Y" part.) so you can copy the strings from there if you like. You can also use the "using" syntax to not have to re-type the style over and over again. Note that it makes no difference in how much memory you save though.
Disable basic parser styles. (ProffieOS 6.x or newer) 🔗
ProffieOS contains a few simple blade styles can be selected, used and customized from the ProffieOS Workbench by using Bluetooth or WebUSB. If you never use the ProffieOS Workbench, you don't need these styles. Also, if you use styles updated for Edit Mode, then you will have lots of options for customization in the Workbench even if you don't have these basic styles. To disable them, you can add
#define DISABLE_BASIC_PARSER_STYLES
to your config file.
Disable Talkie onboard synthesized voice propmts. (ProffieOS 7.x or newer) 🔗
This will bypass the onboard spoken propmts such as "Font Directory Not Found", which can save a few KB.
ProffieOS will use short melodies to indicate an error instead. The "decoder" for those musical passages can be found here:
What is it beeping?
#define DISABLE_TALKIE
Use ProffieOS Workbench webpage, Edit Mode, or edit presets.ini by hand to add more presets. 🔗
Additional presets can be added to the saber by re-using existing code from the config file that was uploaded.
This will use no additional FLASH memory.
This is done by instructing the OS to use an existing preset's blade style in a new preset, assigning any font, and even changing the color of the blade for that new preset. More information can be found at these links:
https://fredrik.hubbe.net/lightsaber/webusb.html
https://www.fett263.com/proffieOS6-edit-mode.html
Editing presets.ini by hand
Speeding things up 🔗
Sometimes, ProffieOS will run slowly, because it has too many things to do and too little time to do it. Here is a list of possible things you can do about it.
Use the "top" command to identify what is using up all the CPU time. 🔗
Note that "top" will not be available if you have #define DISABLE_DIAGNOSTICS_COMMANDS active in your config file. Also note that "top" produces very different numbers when the saber is on and when it's off. Finally, "top" shows the CPU statistics since the last time you ran it, so generally you will want to turn the saber on, run "top", wait a few seconds, then run "top" again.
Turn on Optimization 🔗
There are 4 levels to choose from under Arduino menu Tools>Optimize, however, the labels are a bit misleading.
- “Smallest Code” uses the -Os flag, which is similar to -O2, but the goal of the optimizations is to make the code smaller instead of making the code faster.
- “Fast” means that the we’ll use the -O0 flag when calling gcc, which actually means “don’t do any optimization at all."
- “Faster” means we’ll use the -O2 flag which means, “do lots of optimizations."
- “Fastest” means use -O3, which means even more optimizations.
For a better description, check out actual documentation:
https://gcc.gnu.org/onlinedocs/gcc/Optimize-Options.html
Lots of things gets faster when you turn on optimization. However, they also get bigger, so you may run out of flash memory.
See the Saving Memory page for how to reduce flash memory usage.
Use ProffieOS 5.x or later 🔗
ProffieOS 5.x has a better WS281X driver which is both faster and uses less RAM. In addition, if you set maxLedsPerStrip to a number a little higher than it needs to be, ProffieOS 5.x will be able to run styles and feed out data more effectively in parallel.
Overclock pixel strips 🔗
While nearly all WS281X are specified to run at 800kHz, most of them can run faster than that, so you can get things to run a little faster and smoother by feeding out bits faster. To do so, you would change a typical blade definition from:
WS281XBladePtr<529, bladePin, Color8::GRB, PowerPINS<bladePowerPin2, bladePowerPin3>>()
to:
WS281XBladePtr<529, bladePin, Color8::GRB, PowerPINS<bladePowerPin2, bladePowerPin3>, DefaultPinClass, 1000000>()
Speed up the SD card 🔗
A slow SD card can slow down ProffieOS a lot. So make sure that your SD card is fast enough. In addition, there are things you can do to make it easier for ProffieOS to find files on the SD card, which is a small, but helpful speedup:
- Don't move files back-and-forth, rename and copy and do lots of operations on the SD card. These operations may grow the directory tables and make finding files takes longer. If you have done a lot of these sort of operations on your SD card, you might want to copy all the files from the SD card to your computer, format the SD card and copy the files back. After doing that, only the directory entries that are required will be on the SD card.
- Don't have a lot of extra files in the font and root directories on the SD card. If you put them in a sub-directory, it is fine.
- Don't put font deeply into the directory structure. If your font is in "fonts/obi/ep4/font11", it will take longer to open the files than if the font was simply called "obi11".
- Don't use long filenames. Long filenames use up more directory entries and will make it take slightly longer to find other files in the same directory. However, making file names shorter than 8 characters, plus 3 characters for the extension has no effect on speed.
- Prefer using the "EffectName/NNN.wav" structure over "EffectNameNNN.wav". Because of the way FAT32 works, having lots and lots of files in the same directory will make some of those files take longer to open. By creating sub-directories for each effect name (if that effect has more than one file) it will make finding files easier. For more info see Faster Performance of fonts and blade animations
Finally, sometimes SD cards become slow as they get older. Doing the format-and-replace-all-the-files maneuver might fix such problems, but at some point, you may need to just replace the SD card even if it was working fine in the past.
How to switch LED pads 🔗
Sometimes, a FET goes gets damaged. Or, maybe a solder pad gets ripped out, or something else happens that means that one of the LED1-6 pads can't be used anymore. In most cases, there is an unused LED pad or two that can be used instead. For now, let's assume that something bad happend to LED2 and LED3, and that we need to move the main blade over to use LED4 and LED5 instead.
The soldering part is fairly obvious, just cut or de-solder the wire from LED2/LED3 and solder it to LED4 and LED5 instead.
Now, we just need to update the blades array so that the Proffieboard knows to use the new pads. The blades array in the config file might look like this:
BladeConfig blades[] = {
 { 0, WS281XBladePtr<144, bladePin, Color8::GRB, PowerPINS<bladePowerPin2, bladePowerPin3> >(), CONFIGARRAY(presets) },
};
We just need to search & replace bladePowerPin2 with bladePowerPin4 and bladePoerPin3 with bladePowerPin5, so the results looks like this:
BladeConfig blades[] = {
 { 0, WS281XBladePtr<144, bladePin, Color8::GRB, PowerPINS<bladePowerPin4, bladePowerPin5> >(), CONFIGARRAY(presets) },
};
Upload ProffieOS to your saber using the updated config file, and everything should work just fine.
See also how to test a FET to find out how to check if a FET is not working.
People 🔗
About Profezzorn 🔗
Hi, I'm Profezzorn. My real name is Fredrik Hübinette, and I'm originally from Sweden, but nowadays I live in Washingon State, USA.
I wrote ProffieOS, I designed the Proffieboards, and I also do a lot of other stuff.
If you wish to contact me. Please go to The Crucible
If you need help with something, go to the right category and start a new thread about your problem. If you don't know which category to use, try the padawan area. You can also send me a personal message on the crucible if it's a business or personal question.
Alternatively, you can go go to The Rebel Armory Either create a thread in the section called "Profezzorn's Lab", or send a personal message to "Profezzorn".
Using email is not advisable as emails from unknown people usually end up in my spam folder. Using Facebook messenger does not work, because I don't use that.
Props 🔗
Using dual_prop.h 🔗
dual_prop.h allows for 2 discrete prop files to be used,
alternating on a latched switch (Blade Detect).
This is useful when you want a saber to
toggle to a blaster for example,
and you want the buttons to take on different behaviors.
How to: Use the following lines where you set your prop file in your config.
#ifdef CONFIG_PROP
#include "../props/dual_prop.h"
#include "../props/saber_sa22c_buttons.h"
#include "../props/blaster.h"
#undef PROP_TYPE
#define PROP_TYPE SaberBlasterProp<SaberSA22CButtons, Blaster>
#endif
** Note the prop file SaberSA22CButtons here would change to the file name of the prop you choose.
Then setup your config file for 2 states:
Bladein preset bank, and a BladeOut preset bank.
Give the BladeConfig 2 sets of descriptions, and
#define BLADE_DETECT_PIN properly.
Read more about blade detect here.
Props, fett263 🔗
ProffieOS6 "Dual Mode" Ignition, Preon, Retraction, PostOff sounds in Fett263 Prop 🔗
In ProffieOS6 using Fett263's prop file you can set your font up to select ignition, preon, retraction and postoff sounds based on blade position. With the odd numbered files being used when the blade is pointing up and even numbered files being used when the blade is pointing down.
You will need to use /props/saber_fett263_buttons.h
And add this define to your config:
#define FETT263_DUAL_MODE_SOUND
This will allow you to have different length sounds, dual ignition sounds for Crossguards or Staff sabers, or varied ignition, preon, retraction and postoff sounds within a font.
You will set your font up with the even sounds for when your saber is pointing down and odd sounds for when your saber is pointing up as long as there is more than one of each sound. The sounds will be randomly selected from odd or even files based on the blade orientation when effect is triggered.
Example:
- out01.wav //randomly selected when blade is up
- out02.wav //randomly selected when blade is down
- out03.wav //randomly selected when blade is up
- out04.wav //randomly selected when blade is down
In addition, you can set effects for Ignition, Preon and Retraction using BladeAngle<> to have unique effects for both positions (up or down) including setting up an effect for only one position if you desire.
You can also use WavLen<> function to set the timing of the effect based on the sound file used and have longer or shorter files used in the odd/even set up to have the effect match the sound based on blade orientation.
ProffieOS6 "Real Clash" sounds in Fett263 Prop 🔗
In ProffieOS6, using Fett263's prop file you can enable clash, begin lockup and end lockup sounds to be selected based on the actual clash strength.
To enable use /props/saber_fett263_buttons.h
Your config should include the following define(s)
#define FETT263_CLASH_STRENGTH_SOUND // enables Clash Strength selection for sounds
#define FETT263_MAX_CLASH 16 // optional define to set the hardest clash on saber range 8 ~ 16, defaults to 16 if not defined
Then in your fonts you will set up your clsh.wav, bgnlock.wav and endlock.wav (if more than one file) sequentially with the sounds for the lightest clashes as the lowest file numbers and the hardest clashes as the highest numbers.
Example (files must be numbered sequentially you cannot skip a number or you will get "error in font directory"):
- clsh01.wav = lightest clash sound
- clsh02.wav
- clsh03.wav
- ...
- clsh16.wav
You can combine the sounds with Clash and Lockup Effects that utilize the ClashImpactF<> function to create "Real Clash" effects that match the sound and effect to the actual strength of the clash.
ProffieOS6 Fett263 Track Player 🔗
The Fett263 prop file (/props/saber_fett263_buttons.h) introduces a Track Player capability that allows unlimited tracks and 4 playback methods for ProffieOS6.
All presets should be set up as follows and a "common" folder should be added to the SD card with the Voice Prompts (http://fredrik.hubbe.net/lightsaber/sound/)
{ "font;common", "font/tracks/trackname.wav",
StylePtr<...>(),
"preset name"
},
The default track in each preset should be set up the same as always, and all other tracks should be put in either "font/tracks/" if you want the tracks to be specific to a font/preset or "common/tracks/" if you want the tracks to be available universally for all presets.
Track files can be named anything so long as the entire string "font/tracks/trackname.wav" doesn't exceed 128 characters, although it's recommended to avoid spaces or special characters. They do not need to be named sequentially but you can if it is easier to identify.
The Track Player looks in both the "font/tracks/" and "common/tracks" folder and if any track files are found they can be selected using the Dial menu. If there are no wav files or "/tracks" is missing in both the font and common folder the default track will "Loop" in place of the Track Player. After rotating through Tracks there are 4 playback methods:
- Play Once
- Loop - plays selected track on a loop until stopped
- Rotate - begins with selected track and rotates sequentially through each track until stopped
- Random - begins with selected track and randomly selects tracks until stopped
Track Player Controls (2 Button) While Off
NEW! Track Player* = Long Click PWR parallel
  *requires tracks in either font/tracks/ or common/tracks/
  *if no tracks in font or common will "Loop" default track
  Turn Right (Stepped) = Next Track
  Turn Left (Stepped) = Previous Track
  Click PWR = Play Current Track Once
  Click AUX = Random (will play current track and then randomly select next tracks)
  Hold PWR + Turn Right = Rotate (will play current track and then next sequential tracks)
  Hold PWR + Turn Left = Loop Current Track
  Long Click PWR = Stop Track Player
Track Player Controls (1 Button) While Off
NEW! Track Player* = Double Click PWR (parallel or down)
  *if only default track exists in current preset, track will "Loop"
  Turn Right (Stepped) = Next Track
  Turn Left (Stepped) = Previous Track
  Click PWR = Play Current Track Once
  Hold PWR = Random (will play current track and then randomly select next tracks)
  Hold PWR + Turn Right = Rotate (will play current track and then next sequential tracks)
  Hold PWR + Turn Left = Loop Current Track
Fett263 Prop File with "Battle Mode" and Gesture Controls for ProffieOS5.x 🔗
Fett263 Prop File with "Battle Mode" and Gesture Controls for ProffieOS5.x 🔗
Instructions for including in your config at bottom of the page.
New features: 🔗
-
"Battle Mode" - gesture controlled Lockup, Melt, Drag
-
"Force Push" - a new gesture during Battle Mode, pushing your hilt towards you opponent quickly will trigger a force push sound (push.wav or force.wav) (this is optional with a define)
-
Gesture Ignitions and Retractions - Swing On, Stab On, Thrust On and Twist On with Twist Off
-
"Fast On" for Gesture Ignitions - ignored preon.wav and Preon effects and just ignites the blade on a gesture movement. By default all Gesture Ignitions will use Fast On and ignore Preon sounds and effects (this is customizable with defines if you want to enable Preons with Gestures)
-
On Demand "Power Save" and "Battery Level" effects - enable a dimming effect on your presets (via styles) to dim the blade brightness and save power on demand and view your current Battery Level with a custom style with a button press.
-
Multi-Phase - change presets while the blade is ignited
-
Multi-Blast Mode (from OS4.8 but can be used with Battle Mode) - activate to enable a blast effect for every blade swing/deflection
-
New Mode, Menu and Feature sound effects (add these new sounds to your font/preset for additional customization)
- On Demand Power Save - dim.wav
- On Demand Battery Level - battery.wav
- Battle Mode On (on toggle) - bmbegin.wav
- Battle Mode Off (on toggle) - bmend.wav
- Enter Volume Menu - vmbegin.wav
- Exit Volume Menu - vmend.wav
- Fast On (optional) - faston.wav
- Multi-Blast Mode On - blstbgn.wav
- Multi-Blast Mode Off - blstend.wav
While in Battle Mode - Lockup, Drag and Melt are all controlled by gestures only, no buttons are needed: 🔗
-
Lockup is initiated with a clash, if you hold your saber against your opponent's (or keep relatively still) Lockup will be active, to disengage Lockup you will pull your saber away from the opponents. During Lockup you can move your saber against your opponents and the Responsive effects will still respond to blade angle as you "struggle" the "pull away" motion is a deliberate change in angle (this can take a little practice).
-
Clash in "Battle Mode" is actually Begin Lockup/End Lockup in quick succession based on clashing your saber and pulling away immediately. As a result, your style needs to include LOCKUP_BEGIN and LOCKUP_END transitions, the combination of these transitions will create your "clash" effect. I have updated my library to now allow you to choose several options for both the begin and end Lockup in the Enhancement screen. You can mix and match as you like although some combinations work better together than others so test and decide for yourself. NOTE: bgnlock.wav and endlock.wav will be used, in testing you can rename your clsh.wav sounds to bgnlock.wav to your preference, some work better than others so it's ultimately up to the user. While in Battle Mode your actual Clash effects and Sounds are not used. I have timed out the Begin and End transitions on the library but you can customize to shorten or lengthen the visual effect, there is also a control factor in that if you don't pull away immediately the actual Lockup effect will appear so learning to control the saber is a part of the effect.
-
NOTE: OS 5.7 added an update for swinging through the clash. If you have a glancing clash or continue a swing after a clash your saber will do a traditional clash, if your blade comes to a stop or slows down it will go into Begin Lockup/End Lockup.
-
There is a new threshold for use with the Battle Mode features, it mostly affects "Lockup/Clash" as when you normally clash two sabers together there is a "bounce" that happens, the threshold wil let you ignore the "bounce" so Lockup can properly engage but if you have it too high then "clash" is harder to perform. I have defaulted to the "Goldilocks" zone I found in testing. If you wish to change you will use:
#define FETT263_LOCKUP_DELAY 200
(200 is the default, increasing will allow for more time to determine Lockup, decreasing will shorten)
This works in conjunction with the CLASH_THRESHOLD_G define, CLASH_THRESHOLD_G is the level to recognize the clash/stab event occured if the effects trigger too easily you will increase this value, if they are not triggering easily you will lower this value. After the Clash occurs the LOCKUP_THRESHOLD is used as noted above. The combination of these two thresholds is then used with your control of the saber for "pulling away" and the styles in your preset to create Clash/Lockup.
-
Drag in "Battle Mode" is activated by Stabbing down, this is to allow you to clash and lockup with your blades below horizontal like in the films. The Stab motion is a linear thrust down with contact (or an abrupt end). While Drag is active you can "drag" it along the floor to intimidate your opponent. To disengage Drag you only need to lift the blade from the floor at an angle. Drag (and Melt) have a lower threshold than Lockup so you won't need as deliberate a movement to "pull away".
-
Melt in "Battle Mode" is activated by stabbing horizontal or up, you can use the Responsive Melt to heat up the surface by turning your hilt and you can drag your saber along the wall/object, to disengage Melt you will pull away from the wall or object at an angle.
NOTE: Stab is not active during Battle Mode, if you do a quick Melt/Drag and pull away you can get a quasi-Stab effect. To use Stab (particularly for the new Summon and Release effects) you will exit "Battle Mode" by holding Aux and Swinging.
DEFAULT 2 BUTTON CONTROLS (PWR and AUX): 🔗
-
"Battle Mode" - hold AUX and Swing while blade is ON to toggle mode ON/OFF
-
Ignite (ON) - click PWR while OFF (Swing On, Twist On, Thrust On and Stab On available with defines)
-
Muted Ignition (ON) - double click PWR while OFF
-
Retract (OFF) - click PWR while ON (disabled during swinging, Twist Off available with define)
-
Play/Stop Music Track - hold and release PWR while OFF or hold and release PWR while pointing blade straight up while ON
-
Blast - click AUX while ON
-
Multi-Blast Mode - hold and release AUX while ON to enter mode, Swing to initiate Blasts, click Aux to exit mode (lockup, clash, stab, melt, drag or any button presses automatically exits mode)
-
Clash - clash blade while ON, in Battle Mode clash and pull away quickly for "Clash" (requires BEGIN_LOCKUP and END_LOCKUP styles and sounds)
-
Lockup - hold AUX and clash while ON, in Battle Mode clash and hold steady to activate, pull away to disengage
-
Drag - hold AUX and stab down while ON, in Battle Mode stab down, pull away to disengage
-
Melt - hold PWR (or AUX) and thrust forward and clash while ON in Battle Mode thrust and clash to engage, pull away to disengage
-
Lightning Block - hold PWR and click AUX while ON
-
Force - hold and release PWR while ON (except while pointing blade straight up)
-
Stab - thrust forward and clash blade while ON - deactivated in Battle Mode
-
Power Save - hold Aux and click PWR while ON (pointing up) to use Power Save (requires style)
-
Color Change - hold AUX and click PWR while ON (parallel or down) to enter CCWheel, turn hilt to rotate through colors, click PWR to select/exit if using COLOR_CHANGE_DIRECT each button press advances one Color at a time
-
Next Preset - click AUX while OFF (parallel or up)
-
Previous Preset - click Aux while OFF (pointing down)
-
MULTI_PHASE Next Preset - hold AUX and TWIST while ON (use define to enable)
-
MULTI_PHASE Previous Preset - hold PWR and TWIST while ON (use define to enable)
-
Battery Level - hold AUX and click PWR while OFF (requires style)
-
Enter SA22C Volume Menu - hold and release AUX while OFF
-
Volume Up (10% increment, 100% max) - click PWR while in Volume Menu while OFF
-
Volume Down (10% increment) - click AUX while in Volume Menu while OFF
-
Exit Volume Menu - hold and release AUX while in Volume Menu while OFF
OPTIONAL DEFINES (added to CONFIG_TOP in config.h file) 🔗
#define FETT263_BATTLE_MODE_ALWAYS_ON
Battle Mode is always on, toggle controls deactivated, This will disable traditional Clash and Stab effects, (cannot be used with #define FETT263_BATTLE_MODE_START_ON)
or
#define FETT263_BATTLE_MODE_START_ON
Battle Mode is active with each ignition by default but can be toggled using Aux + Swing control, (cannot be used with #define FETT263_BATTLE_MODE_ALWAYS_ON)
#define FETT263_LOCKUP_DELAY 200
This is the "delay" in millis to determine Clash vs Lockup
#define FETT263_BM_DISABLE_OFF_BUTTON
During Battle Mode Power Button Retraction is disabled
#define FETT263_SWING_ON
To enable Swing On Ignition control (automatically enters Battle Mode, uses Fast On)
or
#define FETT263_SWING_ON_PREON
Disables Fast On ignition for Swing On so Preon is used (cannot be used with #define FETT263_SWING_ON)
#define FETT263_SWING_ON_NO_BM
To enable Swing On Ignition control but not activate Battle Mode, (Combine with #define FETT263_SWING_ON or FETT263_SWING_ON_PREON to enable, cannot be used with #define FETT263_BATTLE_MODE_ALWAYS_ON or #define FETT263_BATTLE_MODE_START_ON)
#define FETT263_SWING_ON_SPEED 250
Adjust Swing Speed required for Ignition 250 ~ 500 recommended
#define FETT263_TWIST_OFF
To enable Twist Off Retraction control
#define FETT263_TWIST_ON
To enable Twist On Ignition control (automatically enters Battle Mode, uses Fast On)
or
#define FETT263_TWIST_ON_PREON
Disables Fast On ignition for Twist On so Preon is used (cannot be used with #define FETT263_TWIST_ON)
#define FETT263_TWIST_ON_NO_BM
To enable Twist On Ignition control but not activate Battle Mode, (Combine with #define FETT263_TWIST_ON or FETT263_TWIST_ON_PREON to enable, cannot be used with #define FETT263_BATTLE_MODE_ALWAYS_ON or #define FETT263_BATTLE_MODE_START_ON)
#define FETT263_STAB_ON
To enable Stab On Ignition control (automatically enters Battle Mode, uses Fast On)
or
#define FETT263_STAB_ON_PREON
Disables Fast On ignition for Stab On so Preon is used (cannot be used with #define FETT263_STAB_ON)
#define FETT263_STAB_ON_NO_BM
To enable Stab On Ignition control but not activate Battle Mode, (Combine with #define FETT263_STAB_ON or FETT263_STAB_ON_PREON, cannot be used with #define FETT263_BATTLE_MODE_ALWAYS_ON or #define FETT263_BATTLE_MODE_START_ON)
#define FETT263_THRUST_ON
To enable Thrust On Ignition control (automatically enters Battle Mode, uses Fast On)
or
#define FETT263_THRUST_ON_PREON
Disables Fast On ignition for Thrust On so Preon is used (cannot be used with #define FETT263_THRUST_ON)
#define FETT263_THRUST_ON_NO_BM
Combine with #define FETT263_THRUST_ON or FETT263_THRUST_ON_PREON, (cannot be used with #define FETT263_BATTLE_MODE_ALWAYS_ON or #define FETT263_BATTLE_MODE_START_ON)
#define FETT263_FORCE_PUSH
To enable gesture controlled Force Push during Battle Mode, (will use push.wav or force.wav if not present)
#define FETT263_FORCE_PUSH_ALWAYS_ON
To enable gesture controlled Force Push full time, (will use push.wav or force.wav if not present)
#define FETT263_FORCE_PUSH_LENGTH 5
Allows for adjustment to Push gesture length in millis needed to trigger Force Push Recommended range 1 ~ 10, 1 = shortest, easiest to trigger, 10 = longest
#define FETT263_MULTI_PHASE
This will enable a preset change while ON to create a "Multi-Phase" saber effect
#define MOTION_TIMEOUT 60 * 15 * 1000
This extends the motion timeout to 15 minutes to allow gesture ignition to remain active, Increase/decrease the "15" value as needed
Including prop file in config.h 🔗
To use this prop file you will include in your config and list the defines from above based on the controls and features you wish to enable. (see example below)
Example config (top section): 🔗
#ifdef CONFIG_TOP
#include "proffieboard_v2_config.h"
#define NUM_BLADES 1
#define NUM_BUTTONS 2
#define VOLUME 1500
const unsigned int maxLedsPerStrip = 144;
#define CLASH_THRESHOLD_G 2.0
#define ENABLE_AUDIO
#define ENABLE_MOTION
#define ENABLE_WS2811
#define ENABLE_SD
#define COLOR_CHANGE_DIRECT
#define DISABLE_DIAGNOSTIC_COMMANDS
#define FETT263_THRUST_ON // enables Thrust On Ignition
#define FETT263_SWING_ON // enables Swing On Ignition
#define FETT263_TWIST_ON // enables Twist On Ignition
#define FETT263_TWIST_OFF // enables Twist Off Retraction
#define FETT263_FORCE_PUSH // enables Force Push gesture/sound during Battle Mode
#define MOTION_TIMEOUT 60 * 15 * 1000 // keeps motion chip active for 15 minutes while blade is Off
#define FETT263_MULTI_PHASE // enables Multi-Phase preset changing while blade is ON
#endif
#ifdef CONFIG_PROP
#include "../props/saber_fett263_buttons.h"
#endif
#ifdef CONFIG_PRESETS
Preset presets[] = {...
GESTURE CONTROLS 🔗
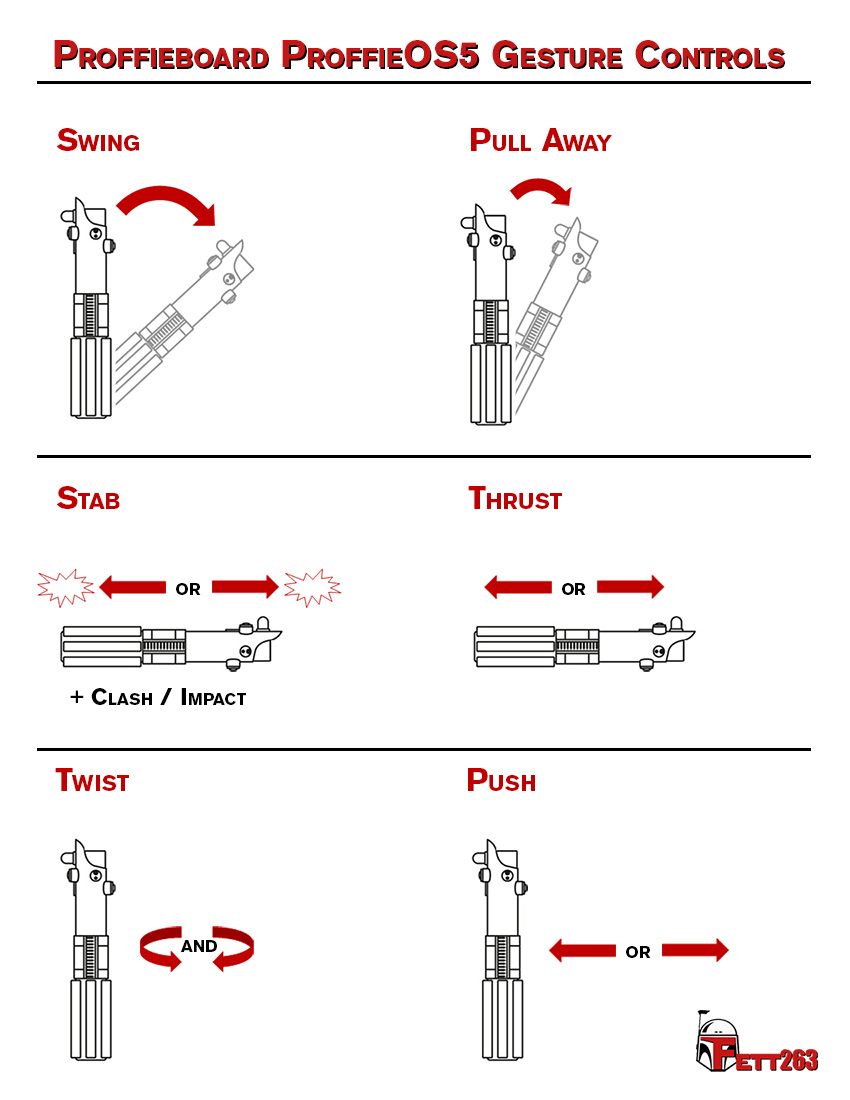
Menu Prompts and Sounds for ProffieOS6 🔗
Menu Prompts and Sounds for ProffieOS6 🔗
The following sound files should be included in "common" folder on SD card (but can also exist in each font folder as needed).
The sounds can be downloaded at the following page, where you can choose from a variety of versions and languages:
https://fredrik.hubbe.net/lightsaber/sound/
Example:
- PHRASE (or sound) = "filename" // notes if applicable
Menu Prompts / Sounds: 🔗
- Accept = "maccept.wav"
- Adjust Black Level = "mblack.wav"
- Adjust Color Hue = "mhue.wav"
- Adjust White Level = "mwhite.wav"
- Alt Color = "malt.wav"
- Auto = "mauto.wav"
- Base Color = "mbase.wav"
- Blast Color = "mblast.wav"
- Cancel = "mcancel.wav"
- Choreography Begin = "chreobgn.wav"
- Choreography End = "chreoend.wav"
- Clash Color = "mclash.wav"
- Clash Detection Level = "mbmclash.wav"
- Clash Lockup Position = "mlockpos.wav"
- Color List = "mcolorlt.wav"
- Color Menu = "mcolorsb.wav"
- Color Options = "mcolorop.wav"
- Confirm = "mconfirm.wav"
- Confirm Selection = "maffirm.wav"
- Cool Down Options = "mcooldwn.wav"
- Copy Colors = "mcopyc.wav"
- Copy Preset = "mcopy.wav"
- Delete Preset = "mdelete.wav"
- Disabled = "mfalse.wav"
- Down = "mdown.wav" // Sound for decrease
- Drag Color = "mdrag.wav"
- Drag Size = "mdragsz.wav"
- Edit Blade Length = "mlength.wav"
- Edit Brightness = "mdim.wav"
- Edit Clash Threshold = "mclashth.wav"
- Edit Color = "mcolor.wav"
- Edit Control Settings = "mcontrol.wav"
- Edit Font = "mfont.wav"
- Edit Mode = "medit.wav" // 1-sec leading silence delay
- Edit Settings = "msetting.wav"
- Edit Style = "mstyle.wav"
- Edit StyleSettings = "mstylset.wav"
- Edit Track = "mtrack.wav"
- Edit Volume = "mvolume.wav"
- Emitter Color = "memitter.wav"
- Emitter Size = "memitsz.wav"
- Enabled = "mtrue.wav"
- Enter Volume Menu = "vmbegin.wav"
- Exit = "mexit.wav"
- Force Push = "mpush.wav"
- Force Push Length = "mpushlen.wav"
- Gesture Menu = "mgestsub.wav"
- Gestures Off = "mgestoff.wav"
- Gestures On = "mgeston.wav"
- Ignition Color = "mignite.wav"
- Ignition Delay = "migdelay.wav"
- Ignition Options = "migopt.wav"
- Ignition Time = "mouttime.wav"
- Keep Rehearsal = "rehrsold.wav"
- LightningBlock Color = "mlb.wav"
- Lockup Color = "mlockup.wav"
- Lockup Delay = "mlockdly.wav"
- Loop = "mloop.wav"
- Main Menu = "mmain.wav"
- Maximum = "mmax.wav"
- Maximum Clash Strength = "maxclash.wav"
- Maximum Volume = "volmax.wav"
- Melt Size = "mmeltsz.wav"
- Minimum = "mmin.wav"
- Mininum Volume = "volmin.wav"
- No Choreography Available = "nochreo.wav"
- Off Color = "moff.wav"
- Option = "moptnum.wav"
- Post Off Color = "mpstoff.wav"
- Power Lock = "mpwrlock.wav"
- Power Up Options = "mpwrup.wav"
- Preon Color = "mpreon.wav"
- Preon Options = "mpreopt.wav"
- Preon Size = "mpreonsz.wav"
- Random = "mrandom.wav"
- Rehearse Begin = "rehrsbgn.wav"
- Rehearse End = "rehrsend.wav"
- Rehearse New = "rehrsnew.wav" // rename?
- Reset Colors = "mresetc.wav"
- Retraction Color = "mretract.wav"
- Retraction Delay = "mrtdelay.wav"
- Retraction Options = "mrtopt.wav"
- Retraction Time = "mintime.wav"
- Revert = "mrevert.wav"
- Rotate = "mrotate.wav"
- Save = "msave.wav"
- Select = "mselect.wav" // Sound for OK / Affirmative / Enter
- Select Blade = "mblade.wav"
- Select Effect = "meffect.wav"
- Select Option = "moption.wav"
- Select Preset = "mpreset.wav"
- Select Style = "mstylsel.wav"
- Settings Menu = "msetsub.wav"
- Stab Ignition = "mstabon.wav"
- Stab Color = "mstab.wav"
- Style = "mstylnum.wav"
- Style Menu = "mstylesb.wav"
- Style Options = "mstylopt.wav"
- Style Settings = "stylstm.wav"
- Swing Color = "mswing.wav"
- Swing Ignition = "mswingon.wav"
- Swing On Speed = "mswingsp.wav"
- Thrust Ignition = "mthrston.wav"
- Twist Ignition = "mtwiston.wav"
- Twist Retraction = "mtwstoff.wav"
- Up = "mup.wav" // Sound for increase
- Volume Down = "voldown.wav" // Sound for decreasing volume
- Volume Up = "volup.wav" // Sound for increasing volume
- Zooming In = "mzoom.wav" // Sound for color menu "zooming in"
Color List Colors (default): 🔗
/clrlst folder
- RED = "clrlst01.wav"
- ORANGERED = "clrlst02.wav"
- DARKORANGE = "clrlst03.wav"
- ORANGE = "clrlst04.wav"
- GOLD = "clrlst05.wav"
- YELLOW = "clrlst06.wav"
- GREENYELLOW = "clrlst07.wav"
- GREEN = "clrlst08.wav"
- AQUAMARINE = "clrlst09.wav"
- CYAN = "clrlst10.wav"
- DEEPSKYBLUE = "clrlst11.wav"
- DODGERBLUE = "clrlst12.wav"
- BLUE = "clrlst13.wav"
- ICEBLUE = "clrlst14.wav"
- INDIGO = "clrlst15.wav"
- PURPLE = "clrlst16.wav"
- DEEPPURPLE = "clrlst17.wav"
- MAGENTA = "clrlst18.wav"
- DEEPPINK = "clrlst19.wav"
- SILVER = "clrlst20.wav"
- GLACIER = "clrlst21.wav"
- ICEWHITE = "clrlst22.wav"
- LIGHTCYAN = "clrlst23.wav"
- MOCCASIN = "clrlst24.wav"
- LEMONCHIFFON = "clrlst25.wav"
- NAVAJOWHITE = "clrlst26.wav"
- WHITE = "clrlst27.wav"
Numbers 1 ~ 20: 🔗
/mnum folder
- "mnum1.wav" ~ "mnum20.wav"
Additional numbers / values: 🔗
- Zero "mzero.wav"
- Thirty = "thirty.wav"
- Forty = "forty.wav"
- Fifty = "fifty.wav"
- Sixty = "sixty.wav"
- Seventy = "seventy.wav"
- Eighty = "eighty.wav"
- Ninety = "ninety.wav"
- Hundred = "hundred.wav"
- Thousand = "thousand.wav"
- Milliseconds = "mmillis.wav"
- Percent = "mpercent.wav"
- Point (decimal) = "mpoint.wav"
- Volts = "mvolts.wav"
Sound 🔗
Alt Sounds 🔗
From ProffieOS 7.x, sound fonts can can have alternatives for some or all sound effects.
File structure 🔗
Let's say we want to create a light and a dark version of the same font, and the only sounds we actually want to change to do that is the hum and the force sounds.
Before, our font directory looks like this: (some effects omitted for brevity.)
clsh/
font.wav
force/
hum.wav
in/
out/
swingl/
swingh/
The force directory then contains a number of files, like:
force/01.wav
force/02.wav
force/03.wav
Now, to set up this font with two alternatives, we create alt directories called alt000 and alt001. Alt directories must always have three digits and always start at 000. We then move the hum.wav and force directory into one of the alt directories, and we create a new hum and force for the other alt directory. Our top level directory thus looks like:
alt000/
alt001/
clsh/
font.wav
in/
out/
swingl/
swingh/
And the alt directories have the following content:
alt000/force/01.wav
alt000/force/02.wav
alt000/force/03.wav
alt000/hum.wav
alt001/force/01.wav
alt001/force/02.wav
alt001/force/03.wav
alt001/hum.wav
Note that alt001/force and alt002/force has the same number of files in it. This is important; every alt directory MUST have exactly the same set of files in them. Only the length and content of the files can be different. If you don't have the same set of files, you will get an "error in font directory" error.
Controlling which alternative is used. 🔗
Ok, so now our sound font has two sets of hum and force sounds, but how do we select which set of sounds is actually used? ProffieOS does not actually do anything to select which alternative is used by default, it just provides ways for you to do it, either from a blade style, or from a prop. I will now describe a few ways that this could work, but it's by no means the only ways.
SyncAltToVariance 🔗
By putting SyncAltToVarianceL or SyncAltToVarianceF in your style, which alt is used will be linked to the variance. This makes it super-easy to create blade styles which switch colors AND sounds at the same time. Any controls used to change the variance (color change) will also affect the alt sounds.
Example, here is a simple layered style:
StylePtr<Layers<
  ColorChange<TrFade<300>,Red,Blue>,
  LockupL<AudioFlicker<Rainbow,White>>,
  SimpleClashL<White>,
  InOutHelperL<InOutFuncX<Int<300>,Int<800>>>>>()
SyncALtToVarianceL is an always-transparent layer, so we can basically insert it anywhwere in the layer stack, except at the beginning:
StylePtr<Layers<
  ColorChange<TrFade<300>,Red,Blue>,
  SyncAltToVarianceL,
  LockupL<AudioFlicker<Rainbow,White>>,
  SimpleClashL<White>,
  InOutHelperL<InOutFuncX<Int<300>,Int<800>>>>>()
There, now alt and variance will be synchronized, so the Red color will play alt000 sounds and the Blue color will play alt001 sounds.
TrDoEffect<EFFECT_ALT_SOUND, N> 🔗
By using TrDoEffect, with the EFFECT_ALT_SOUND effect, we can have the style explicitly select which alt sounds are used. This means that you can trigger alt sounds based on effects and pulses. This creates the ability to move between states in the style, and you can check which state you are in by using the AltF function. The possibilities here are endless, but also more complicated, so I will leave it up to the reader to figure out good examples of how to use this.
StylePtr<Layers<
	ColorSelect<AltF,TrWipe<300>,Green,Blue,Red>,
	TransitionEffectL<TrDoEffectX<TrInstant,EFFECT_ALT_SOUND,EffectIncrementF<EFFECT_FORCE,Int<3>>>,EFFECT_FORCE>,
	InOutTrL<TrWipe<300>,TrWipeIn<500>,Black>>>()
This style will increment the alt and color by 1 each time EFFECT_FORCE is triggered, so Green color will play alt000 sounds, Blue color will play alt001 sounds and Red color will play alt002 sounds. The TransitionEffectL<> layer controls the change for EFFECT_ALT_SOUND which in turn changes the ColorSelect via the AltF function.
Have the prop control the alt. 🔗
If your prop has builtin modes, it might make sense to switch alt sounds when you switch mode as well. For fonts that don't have alt sounds, this will have no effect. A prop that wants to do this should call SaberBase::DoEffect(EFFECT_ALT_SOUND, 0.0, N), which is basically the same as the TrDoEffect<> shown above. The prop could also control the variance, and let the style decide if the font should be synchronized with the variance or not. Doing it this way would essentially disable the "color change" functionality though.
altchng 🔗
When the alt is changed, the altchng effect is played. If the altchng effect is itself located in the alt folders, then it is played from the new alternative. (So if you switch from alt000 to alt004, it may play alt004/altchng/001.wav) Note that there is generally no way to select which altchng sound to play, since the number which is normally used to select which sound to play, is now used to select which alternative to use instead.
Faster performance of fonts and blade animations. 🔗
As blade styles become more complex, combined with some pixel strips having more LEDs in serial,
you may find less animation lag and fewer Audio Underflows (pops, clicks, gaps) by optimizing your font folder structure.
Sounds with multiple files should live in subfolders, such as a clsh folder containing clsh01.wav, clsh02.wav etc...
while single files, such as hum.wav or lock.wav should live in the font root.
See attached image for a visual of this.
ProffieOS will perform best if you cater to the way that FAT32 formatting works.
Each block can contain 16 file entries.
If you have 128 files in one directory, ProffieOS has to read on average 4 blocks to find the the file.
If you have 16 subdirectories with 16 files each, only 2 blocks have to be read.
It may be possible to optimize this by adding most commonly used files (hum) first.
Also, ProffieOS might be able to improve on this with some caching. (Future development)
For effects that only have one sound, it should be more efficient to NOT put them into a sub-directory."
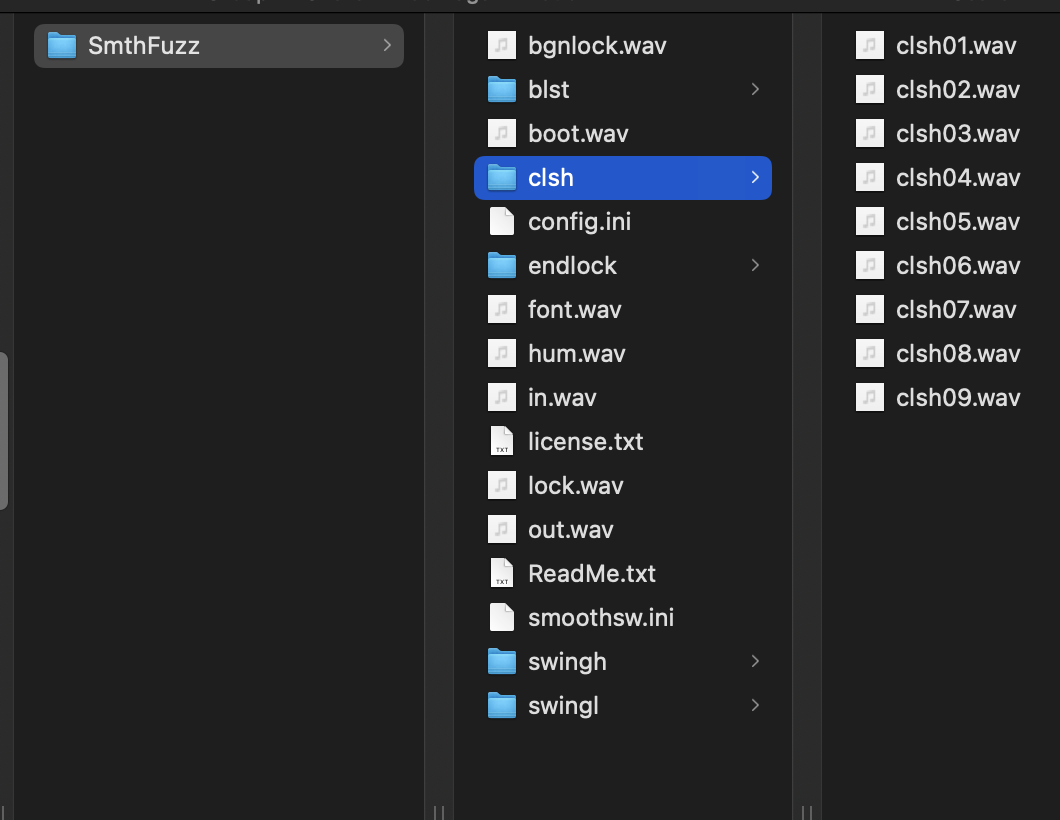
Pairing sequential effect sounds 🔗
Effect sounds in ProffieOS are played randomly when more than one file of a sound type exist (clsh01, clsh02, etc...)
When using a polyphonic font, these can be triggered in succession and over lap each other, such as multiple blaster deflections.
However, effect sounds that follow other sounds chronologically use a gapless transition as they are butted up to each other. An example of this is bgnlock->lock.
These sounds can be paired so that the same number sound files play when the first sound is triggered.
For example: preon01->out01, or bgndrag3->drag03.
Let's say you have a Count Dooku sound font, and preon02 contain speech like
"It is obvious that this contest can not be decided by our knowledge of The Force..."
Wouldn't it be cool if the out.wav that followed had the ignition sound and included the rest of the sentence
"...but by our skills with a Lightsaber." ? Well, as of ProffieOS6 that's possible.
Or, if you have a few different hums in the font, and out03.wav works really well with one particular hum, then name that perfect hum hum03.wav and pair them up!
How to pair effect sounds 🔗
First, the same number of files must exist for each sound to be paired. (so 3 preon.wavs need 3 out.wavs.)
If there are different amounts, pairing will be bypassed.
Then, in the font config.ini file, an entry is made setting the first effect of the sequence to paired=1.
For example:
# pair preon -> out.wavs
ProffieOS.SFX.preon.paired=1
# pair in -> pstoff.wavs
ProffieOS.SFX.in.paired=1
As of ProffieOS7, we now have all of the sequential effects pairable, so possibilities include:
preon->out
out->hum
hum->in
in->pstoff
bgnlock->lock
lock->endlock
*Note - this applies to all varities of lockup, so melt, drag, lb, arm
ProffieOS.SFX.hum.paired=1
When using this hum -> in pairing, the setting has another result.
If multiple hum files exist, even if not the same number of files as in.wavs (so it won't pair to them,)
this also will loop the same hum sound until next ignition instead of randomly choosing a different file once the current hum ends.
ProffieOS v6.x acceleration-based accent swings 🔗
In ProffieOS6 you can set your font up to use Accent Swings (swng.wav or swing.wav) based on swing acceleration.
Accent swings are played to give more life to faster swings on top of the normal swing pairs. Your font must include swng.wav or swing.wav files.
To do so your swng.wav sound files should be ordered sequentially with lowest file numbers for slower acceleration swings and highest numbers for fastest acceleration.
Acceleration Based Accent Swings will replace the need for Slashes, remove slsh.wav sounds from font or rename the slsh.wav files to swng.wav (or swing.wav) and use as the higher file numbers and combine with your Accent Swings to use this set up.
Example (files must be numbered sequentially you cannot skip a number or you will get "error in font directory"):
- swng01.wav - slowest Accent swing sound
- swng02.wav
- swng03.wav
- ...
- swng16.wav - fastest Accent swing sound
Then in the font config.ini you will add these variables:
#Minimum acceleration for Accent Swing file Selection
#recommended value is 20.0 ~ 30.0
ProffieOSMinSwingAcceleration=20.0
#Maximum acceleration for Accent Swing file Selection
#must be higher than Min value to enable selection
#recommended value is 100.0 ~ 150.0
ProffieOSMaxSwingAcceleration=100.0
When these variables are present in the font config.ini -and- the MaxSwingAcceleration is greater than the MinSwingAcceleration the swng.wav files will be selected based on the actual acceleration of the swing event.
smoothsw.ini 🔗
When one or more set of swingl/swingh (or lswing/hswing) files are present, ProffieOS will activate the SmoothSwing V1 or V2 algorithms. To decide which one to use, it will read a file called "smoothsw.ini", which can contain the following variables: (listed with their default values)
# SmoothSwing algorithm version, you probably want to set this to 2.
Version=2

# Degrees of rotations per second required to reach full volume.
# Default is 450.0 (any value)
SwingSensitivity=450

# Smoothswing volume multiplier (defaults to 3x normal volume)
# Default is 3.0 (value between 1 and 5)
MaxSwingVolume=3.0

# What percent the hum sound will decrease as swing increases
# Default is 75.0 (value between 1 and 100)
MaximumHumDucking=75

# Non-linear swing response (higher values make it more non-linear)
# Values greater than 1 will result in the Smoothswing sound staying quieter
# at lower speeds and then ramping up quickly to full volume a higher speeds.
# Values less than 1 will result in the Smoothswing volume ramping up quickly
# at lower speeds and then staying there as you approach full speed.
# the default is 1.75 (any value)
SwingSharpness=1.75

# Degrees per second needed to register as a smoothswing.
# Default is 20.0 (1 to 360)
SwingStrengthThreshold=20

# Length of first transition in degrees.
# Default is 45.0 (1 to 360)
Transition1Degrees=45

# Length of second transition in degrees.
# Default is 160.0 (1 to 360)
Transition2Degrees=160.0

# If not zero, swngNNN.wav or swngNNN.wav will
# be played when we reach this swing speed.
# Unit is degrees per second, 450 is a reasonable value.
# Default is 0.0
AccentSwingSpeedThreshold=450

# If not zero AND accent swings are on, this defines the threshold for when
# a swing is considered a slash. Unit is degrees per second **per second**.
# NOTE - While 260 is the default value, it is subjective.
# Something like 100 might work better.
# The higher the accent swing threshold, the higher the slash threshold will need to be.
AccentSlashAccelerationThreshold=260.0

# NOTES
# 1. The length of the smoothswing pair wavs has nothing to do with
# the length of the swing movement or how it transitions.
# Try setting the SwingSensitivity number so that you're not
# detecting motion for smaller movements.


# 2. If you find that the same swing pair sounds play for subsequent swings,
# try adjusting SwingSensitivity. If the saber is moving faster than the threshold velocity,
# it is going to be playing one of the smoothswing pairs on loop.
# The algorithm only picks a new swing pair of swingl and swingh sounds when it thinks
# it's safe to do so (when you're not in the middle of a swing).
Sound Font config.ini configuration 🔗
This page explains the parameters that are available in a sound font's config.ini file, and provides an example file. For more information on how to create a ProffieOS compatible sound font, click here
# Default config.ini

# This specifies how many milliseconds before the end of the "out" sound the hum
# starts to fade in. Default 100
humStart=100

# From ProffieOS 7.x, you can use ProffieOSHumDelay to specify how many milliseconds
# from the beginning of out.wav to start the hum. If both ProffieOSHumDelay and humStart
# are specified, then ProffieOSHumDelay is the one that will count.
# If not specified or set to -1, humStart will be used instead.
# Defaults to -1.
ProffieOSHumDelay=-1

# The volume of the hum sound. Can be 0-16, where 0 is muted.
# Default 15
volHum=15

# The volume of all effect sounds. Can be 0-16, where 0 is muted.
# Default 16
volEff=16

# How fast (degrees per second) we have to swing before a swing effect is
# triggered. Default 250.
ProffieOSSwingSpeedThreshold=250

# How much to bend the response curve between swing speed and swing volume.
# Can be 0.01 - 2.0, where value of 1.0 will result in no bending. Default 0.5
ProffieOSSwingVolumeSharpness=0.5

# The volume multiplier when swings are at the swing speed threshold.
# Can be 1.0 to 3.0. Default 2.0
ProffieOSMaxSwingVolume=2.0

# Specify what fraction of swing that must be played before a new swing can be
# started. Can be 0.0-1.0. Defaults to 0.5 (50%).
ProffieOSSwingOverlap=0.5

# This is used to control the volume of the combined hum and smoothswings
# when an accent swing plays.
# Defaults to 0.2 (volume is decreased by 20% of swing volume)
ProffieOSSmoothSwingDucking=0.2

# How slow (degrees per second) the swing has to be before it's not considered a
# swing anymore. Default 200.
ProffieOSSwingLowerThreshold=200

# Only used for non-smoothswing fonts. Specifies how aggressive a swing has to be to be considered a slash. Once we
# reach the ProffieOSSwingSpeedThreshold, rate of swing speed change is used to
# determine if it's a swing or a slash. Default 260
ProffieOSSlashAccelerationThreshold=260

# For OLED displays. This specifies the frame rate of animations.
# If not specified (or set to zero) the frame rate will be 24 frames
# per second for non-looped animations. For looped animations, the
# frame rate will be set so that the loop takes one second.
ProffieOSAnimationFrameRate=0.0

# For OLED displays, the time a blade style's "message",
# static BMP, or loop animation will play when changing presets.
ProffieOSFontImageDuration=5000.0

# For OLED displays, the time an on.bmp will play
ProffieOSOnImageDuration=5000.0

# For OLED displays, the time a blst.bmp will play
ProffieOSBlastImageDuration=1000.0

# For OLED displays, the time a clsh.bmp will play
ProffieOSClashImageDuration=500.0

# For OLED displays, the time a force.bmp will play
ProffieOSForceImageDuration=1000.0

# If #define ENABLE_SPINS is defined. Number of degrees the blade must travel while staying above the
# swing threshold in order to trigger a spin sound.  Default is 360 or
# one full rotation.
ProffieOSSpinDegrees=360.0

### ---- These below as of OS6 only ---- ###

# Minimum acceleration for Accent Swing file Selection
#recommended value is 20.0 ~ 30.0
ProffieOSMinSwingAcceleration=20.0

# Maximum acceleration for Accent Swing file Selection
#must be higher than Min value to enable selection
#recommended value is 100.0 ~ 150.0
ProffieOSMaxSwingAcceleration=100.0

# Match sequential effects such as preon->out.wav files
# EFFECTNAME can be “preon”, “out”, “pstoff”, etc.
# Set to 1 *AND* have the same number of files in the second effect to activate this feature.
# ProffieOS.SFX.EFFECTNAME.paired=1
# For example:
# ProffieOS.SFX.preon.paired=1
# ProffieOS.SFX.out.paired=1
#
# Also, when multiple hum files exist, this will loop the
# same hum sound until next ignition instead of randomly
# choosing a different file once the current hum ends.
# ProffieOS.SFX.hum.paired=1

# Set the volume for each effect individually, in percent.
# 50 makes it half as loud. 200 makes it twice as loud.
# Maximum allowed value is currently 255. The default is 100.
# EFFECTNAME can be "clash", “preon”, “out”, “pstoff”, etc.
# ProffieOS.SFX.EFFECTNAME.volume=100

### ---- OS 7.x and above ----

# Note, that from ProffieOS 7.x, all of the ImageDuration
# variables can be set to zero, in which case the length
# of the played wav file will be used to determing how long
# to show the image for.

# For OLED displays, the time a out.bmp will play
ProffieOSOutImageDuration=2000.0

# For OLED displays, the time a in.bmp will play
ProffieOSInImageDuration=2000.0

# For OLED displays, the time a pstoff.bmp will play
ProffieOSPstoffImageDuration=2000.0

# For OLED displays, the time a on.bmp will play
ProffieOSOnImageDuration=5000.0

# If true (non-zero) then smoothswing pairs will be played
# in sync with the hum. This means that you could have a
# musical beat in the hum, and smoothswing sounds could have
# melodies which would be played in sync with the beat.
ProffieOSSmoothSwingHumstart=0

### ---- OS 8.x and above ----

# Smoothswings default to switch back to the other sound again after 180 degrees.
# This 180 degrees is controllable by using the following:

#Low2HighSeparationDegrees=180

#High2LowSeparationDegrees=180

# How long it takes for the idle sound to fade in when
# it first starts playing. It loops at full volume afterwards.
# Default 3.0
ProffieOSIdleFadeIn=3.0
From ProffieOS 7.x forward, if there are multiple config.ini files in the font search path, they will all be read. Values specified in the first one will take precedence over values specified in the second one, and so forth. In ProffieOS 6.x and earlier, only once a config.ini was found, no more files were read.
Sound Font Configuration 🔗
A sound font is mostly made up of many sound files in a single directory. Let's take a look at the following example and break down the important aspects.
This file name is made up of four main parts:
-
The directory (Yellow) - This can be anything you want, and is typically the name of the font. All sound and config files must be in the same final directory, but fonts can be organized in to as many sub-directories as you want. The first entry in the presets[] array specifies the full path to the font directory. For example, you can have your fonts sorted as
sith/1/sith1, orfonts/jedi/named/obiwan, etc. -
The name (Magenta) - This is the name of the sound type, using the names specified below in the Sound Effect Names section. In this example, it's a clash sound.
-
The number (Cyan) - If you want to have multiple sound effects of the same type, add a number to the end of the filename before the extension. The numbers can be in the following format:
- 1,2,3, etc.
- 01, 02, 03, etc.
- 001, 002, 003, etc.
The number sequence must be consistent and without any gaps. It's also possible to omit the number completely if there is only a single sound. When playing a sound, ProffieOS will generally pick one of them randomly. For looping sounds, ProffieOS will randomly pick one of the numbered files each time it starts over. This means it's possible to create a more interesting hum by having
hum.wav,hum1.wav,hum2.wav, etc.- Note: While Proffie-based boards support long filenames, Teensy-based boards support a maximum of 8 characters for file names. It is recommended to stick to this maximum to ensure full compatibility with any sound board.
-
The extension (Pink) - The recommended format is .wav files that are 44khz, 16-bit mono PCM. ProffieOS also supports 11khz, 22khz, and 44khz .wav in both mono and stereo. You may also use .raw and .usl files, but they must be 44khz mono.
Alternative font file naming 🔗
Instead of font1/NameNNN.wav, you can also use font1/Name/NNN.wav, which lets you have more files and better organization. font1/Name/NameNNN.wav is also supported for compatibility with Igniter boards.
Font Search Paths. 🔗
You can have ProffieOS look in multiple directories for font and animation files, as well as config.ini and smoothsw.ini files. Primarily, this is meant to make it easier to share files like "ccbegin" and "ccend" between fonts, but it can also be used for more advanced things, like adding different quotes to a font. So how do you use this? Basically, you just specify a list of directories with a semicolon in between.
So if your current preset says "font1", you could change it to "font1;common" to have it first search "font1", and any files found there will be used first. After that ProffieOS will search "common" and add any files not already found.
A prime example of how this can be used is the "hero" font pack. You could have one "hero/font;hero/obiwan;common" preset, and another "hero/font;hero/luke;common" preset, without having to duplicate the files in the "hero/font" directory.
Currently, the only limit on how many directories you can search is that the whole list of directories must be less than 127 characters.
One caveat, you can't mix files with the same base name.
Let's say hero/font contains preon01.wav. Even if hero/obiwan contains preon02.wav, it will not be used.
The decision of which directory to use is done once for all files with the same "name", individually for each numbered file.
Note This feature is only available in ProffieOS 4.x. and later.
Sound Effect Names 🔗
The name part of the filename needs to be one that ProffieOS can recognize. Sounds can either be monophonic (Plecter) or polyphonic (Naigon Electronics) style. ProffieOS will automatically decide if a specific sound type is monophonic or polyphonic font based on the filename. Monophonic sounds will smoothly join with the hum when they are finished playing. Polyphonic sounds will automatically mix with the hum sound. Keep in mind that you cannot mix mono and polyphonic sounds for the same effect. For example, if you are using clash, you cannot use clsh as well. You can, however, mix for different effects. You could use clash alongside blst in the same font for example.
The following sounds are triggered along with blade animations. The buttons, gestures, or actions used to trigger them is specific to the prop file being used.
See The-CONFIG_PROP-section for a list of prop files included with ProffieOS. Additional sounds are available when using some props, such as quote. Each prop will have instructions in the top comment section for how to use it. If you are using the default saber.h prop, you can also read How to use ProffieOS for more details.
List of Names and Effects 🔗
| Monophonic Filename | Polyphonic Filename | Effect |
|---|---|---|
boot |
boot |
Played when ProffieOS boots up. |
swing |
swng |
Accent swing sounds that play near the peak of a swing motion. |
| N/A | swingl |
If present with swingh, the SmoothSwing algorithm will be used to generate swing sounds from these files when the saber is moved around. |
| N/A | swingh |
If present with swingl, the SmoothSwing algorithm will be used to generate swing sounds from these files when the saber is moved around. |
hum |
hum |
Played when the saber is on and stationary (looped) |
poweron |
out |
Extension sound when you ignite the blade. |
poweroff, pwroff |
in |
Retraction sound when the blade is shut off. |
clash |
clsh |
Played when you hit something with the saber |
force |
force |
Force use sound. |
slsh |
slsh |
Played when you make a swing that is accelerating faster than the threshold set in either config.ini or smoothsw.ini (OS3.x and up) |
stab |
stab |
Played when you make a stabbing motion (OS3.x and up) |
blaster |
blst |
Blaster deflection sound. |
lockup |
lock |
Sound when blades come together and struggle. |
bgnlock |
bgnlock |
Played when lockup starts |
endlock |
endlock |
Played when lockup ends (if not present, clash is used) |
drag |
drag |
Sound for dragging the tip of the saber blade. |
bgndrag |
bgndrag |
Begin drag |
enddrag |
enddrag |
End drag |
lb |
Force lightning block. | |
bgnlb |
Begin lightning block. | |
endlb |
End lightning block. | |
melt |
Simulate stabbing and melting an object with blade tip. | |
bgnmelt |
Begin melt | |
endmelt |
End melt | |
poweronf |
N/A | Force power on. (not yet implemented in ProffieOS) |
font |
font |
Played when you switch to this preset. |
| N/A | ccbegin |
Played when entering color change mode. |
| N/A | ccend |
Played when exiting color change mode |
| N/A | ccchange |
Played when changing color in "stepped" color change mode |
preon |
preon |
Played before the blade turns on |
pstoff |
pstoff |
Played after retraction when the blade turns off |
altchng |
altchng |
Played when the alt is changed. (OS7+) |
spin |
spin |
Spin sound (Experimental, needs #define ENABLE_SPINS) |
fastout |
fastout |
Played instead of "out" when using fast on (OS8+) |
quote |
quote |
Plays a quote (OS8+) |
chhum |
chhum |
Like altchng, but played before the new hum with no gap. (OS8+) |
mclick |
mclick |
Short menu clicked played when going between menu entries (OS8+) |
idle |
idle |
Played when not on (OS8+, ENABLE_IDLE_SOUND) |
Thermal Detonator Props 🔗
bgnarm- when the td is armingarmhum- when the td is armed (looped)endarm- when the td is disarmedboom- when the td blows up
Blaster Props 🔗
bgnautoautoendautoblastclipinclipoutemptyfirefulljamunjammodeplioffplionrangestunreload
As of OS6:mdkillmdstunmdauto
SmoothSwing Configuration 🔗
When one or more set of swingl/swingh files are present, ProffieOS will activate the SmoothSwing algorithms. To decide if it should use V1 or V2, it will read a file called "smoothsw.ini". More information on how to configure this file can be found on the smoothswing page.
SmoothSwing V1 🔗
Demo Video (Thexter's description) Many thanks to Thexter for his excellent work on this algorithm. Smoothswing V1 doesn't actually use any of the variables from the configuration file. The swingl and swingh files are played in a loop. The software will then place a rotating plane through the blade of your saber, and if the saber swings in one direction across the plane, we'll play more of swingl and less of the background hum. If we swing in the other direction, we'll play more of swingh and less of the hum. The fade will never blend swingl and swingh directly, it will essentially cross-fade between the regular hum and one of swingl/swingh based on direction and strength of the swing.
SmoothSwing V2 🔗
Demo Video (Thexter's description) Smoothswing V2 has some similarties to V1, but is much better at producing natural swing- and spin-like sounds, and also produces more variety than the V1 algorithm. To do this, the swinglNN.wav and swinghNN.wav files are paired up. Whenever a swing is not going on (swing speed < SwingStrengthThreshold) a new pair if selected randomly. As we start swinging, we keep track of how many degrees the saber has swung so far, and at a randomly selected threshold, we start a cross-fade to go from swingl to swingh. The transition lasts for Transition1Degrees, and if the swing continues, we will eventually cross-fade back from swingh to swingl 180 degrees after the first threshold. The second transition is generally wider and is controlled by Transition2Degrees. The combined swing sound is then cross-faded with the regular hum based on the swing strength.
Sub-sub sounds 🔗
This feature is new in ProffieOS 7.x
Normally, when you make a sound font effect, you will create more than one of each type of sound, and ProffieOS will select one of those randomly. However, more and more features are showing up which lets you actually select which of the random sounds to be played. Here is a brief list of those features:
- TrDoEffect
- Using effect.Select() from the prop
- sound pairing
- strength-based accent swings
When one of these features are used, the selection of sounds isn't random anymore. Most of the time, this is fine and intended, but sometimes it can be boring, because it will make things sound the same every time. For instance, if you enable strength-based accent swings, and you swing the saber the same each time, then the accent swing will also sound the same each time. To allow randomness back into the processes, sub-sub sounds adds another sub-directory of sounds.
Let's say we want to make our accent swings more random. To do that, we would create a folder structure like this in our font directory:
swng/01/000.wav
swng/01/001.wav
swng/01/002.wav
swng/02/000.wav
swng/02/001.wav
swng/02/002.wav
swng/03/000.wav
swng/03/001.wav
swng/03/002.wav
swng/04/000.wav
swng/04/001.wav
swng/04/002.wav
A few things to note:
- The file numbers must have three digits and start with 000.wav
- Each directory must have exactly the same number of wav files in it, or you will get "error in font directory".
- The directory names follow the same rules as normal effects, so they can start at 01, and 1-8 digits
- All the features listed above will see this as 4 different sounds (swng01-04). So with the strength-based accent swings example, this means 4 different strength levels, but with 3 varieties of sounds for each level.
- Out of the three files in the sub-directories, ProffieOS will choose which one to play randomly.
Tools 🔗
Button Commands 🔗
The following instructions require #define DISABLE_DIAGNOSTIC_COMMANDS to NOT be enabled in the CONFIG_TOP section of the config file.
A config file typically uses "pow", "aux" and "aux2" as names for the available buttons, which means that those names can be used as commands from the Serial Monitor.
If you just type "pow", it will send an event which will match one of these cases in your prop file:
case EVENTID(BUTTON_POWER, EVENT_CLICK_SHORT, MODE_OFF):
case EVENTID(BUTTON_POWER, EVENT_CLICK_SHORT, MODE_ON):
(depending on whether the saber is on or off)
You can also specify which kind of click/hold/press/release event with the following shorthand:
- p = PRESSED
- r = RELEASED
- h = HELD
- m = HELD_MEDIUM
- l = HELD_LONG
- S = CLICK_SHORT
- s = SAVED_CLICK_SHORT
- L = CLICK_LONG
So if you type "pow L", it will match the following cases:
case EVENTID(BUTTON_POWER, EVENT_CLICK_LONG, MODE_OFF):
case EVENTID(BUTTON_POWER, EVENT_CLICK_LONG, MODE_ON):
You can also add a number to work with double/triple/quad-clicks. So for instance "pow s2" will match:
case EVENTID(BUTTON_POWER, EVENT_SECOND_SAVED_CLICK_SHORT, MODE_OFF):
case EVENTID(BUTTON_POWER, EVENT_SECOND_SAVED_CLICK_SHORT, MODE_ON):
Finally, these commands can also be used as modifiers for other commands. For instance, to execute a clash with the power button held, you'd type "pow clash", which would match a case like this:
case EVENTID(BUTTON_NONE, EVENT_CLASH, MODE_ON | BUTTON_POWER):
case EVENTID(BUTTON_NONE, EVENT_CLASH, MODE_OFF | BUTTON_POWER):
And a command like "pow aux" would match one of:
  case EVENTID(BUTTON_AUX, EVENT_CLICK_SHORT, MODE_ON | BUTTON_POWER):
  case EVENTID(BUTTON_AUX, EVENT_CLICK_SHORT, MODE_OFF | BUTTON_POWER):
POV (persistance of vision) 🔗
This page needs more work, but here is some information from the pov_tools directory in ProffieOS...
create_POV_data_files (script) 🔗
Use ProffieOS POV Tools to create Persistence-Of-Vision images that show when you swing the blade.
This script utilizes the existing Makefile in the pov_tools folder.
Images can be created without this script via command line by typing 'make'.
Arguments may be provided as 'OPTIONS=--height=N --length=N --offset=N'
Under the hood:
pnmtorle - Converts a full-color image to hex data to be included in the code.
pgmtorle - Converts a single-color image to hex data to be included in the code.
pnmwindshieldwiper - Scales the image and bends it so that it will work on a swinging blade.
pnmquantizedtorle - Quantizes images to 8bit 256 colors to balance using color images and not taking up too much memory.
Operating System Requirements: 🔗
Windows (Windows 10 at time of writing): 🔗
Install Windows Subsystem for Linux
Linux subsystem for Windows is required before usage.
This can be done without manually downloading anything.
- Open Windows Powershell as administrator and then simply type in the following: wsl --install
- Let Powershell run through its thing and wait till it mentions that it's finished and that in order for the changes to take effect you have to reboot/restart your computer.
- Restart your computer as told and Ubuntu should install itself after you log back in.
- For more info: https://docs.microsoft.com/en-us/windows/wsl/install
Install g++ and netpbm
- It goes without saying that you hit the return key after each of the following entries.
- In the command line window that opened, type "sudo apt-get update". Enter your password.
- When that finishes, type "sudo apt-get install build-essential gdb".
- Answer the question with "y".
- When that finishes, type "sudo apt install netpbm".
- Answer the question with "y".
MacOS: 🔗
- Install Homebrew https://treehouse.github.io/installation-guides/mac/homebrew
- Install netpbm (In Terminal, type "brew install netpbm").
Linux 🔗
- Install netpbm http://netpbm.sourceforge.net/
Make POV files 🔗
- Put one or more .png images that you want to convert into the pov_tools folder.
If you have no images, you can run the script anyway and it can download the sample Star Wars logo and process it for you :)
File names that contain 'preview' will be ignored as valid source image files.
To run the script:
-
Windows: Double click "create_POV_data_files-Win.bat"
(If Microsoft Defender pops up a warning, click "More Info" then "Run anyway")
Mac or Linux: Double click "create_POV_data_files" -
Choose a sizing option from the list. There are some preset sizes plus 'Height entry only' and 'Custom size' options.
(Height is the number of pixels in the blade)
You may want to choose 'Custom' first to get an idea of what gets calculated, then the presets will make more sense.
Once familiar, you can customize the presets by editing that section of the script.
All valid .png files in the pov_tools folder will be processed to the setting you chose.
-
Check the resulting *preview.png in the pov_tools folder. It should look warped like a windshield shape.
-
The image data files are written directly to the ProffieOS/styles folder.
They will be formatted "sourceFileName_height_colorProfile_POV_data.h"
If you used a Single Color source file, use the resulting SC_POV_data.h file.
If you used a Full Color source file, then use the resulting FC_POV_data.h file.
If you used a Full Color source file, memory use might be less by choosing the 8b_POV_data.h file. -
A running log of your conversion history with the setting used is written to POV_conversions.log.
-
To use the POV data file for a blade style, first tell the OS which one with the following line added to your config file
in the CONFIG_TOP section:#define POV_INCLUDE_FILE "dataFileNameHere.h" -
Then you just use the POV blade style in a preset:
{ "Font", "tracks/track.wav",
   &style_pov,
  "my_pov"},
Swing the blade in a steady, quick movement to see the image in the air. A long-exposure camera capture showcases the result best.
Enjoy!
Additional Serial Monitor Commands 🔗
These commands are usually used for deeper diagnostics beyond typical use.
For more typical use case commands, see Serial Monitor Commands.
WARNING - While most of these are harmless, some of these are powerful and should only be used if you're familiar with how they work. 🔗
scanid 🔗
Have the board deactivate all current blades, check the BladeID and pick a BladeConfig [] array based on the new detected BladeID.
id 🔗
Show the blade ID.
dacbuf 🔗
Print the current contents of the dac buffer.
list_named_style 🔗
List all available named styles.
describe_named_style <style> 🔗
Show what arguments a style requires.
amp on/off 🔗
Turn amplifier on or off.
booster on/off 🔗
Turn 5V booster on or off.
make_default_console 🔗
Make this connection the default connection (if using something other than Arduino Serial monitor, like a TTL->USB interface)
malloc 🔗
Show how much dynamic memory is allocated.
whatison 🔗
Shows all the wav players, whether they are currently on or off, and what is loaded into each of them.
BLADES: 🔗
SimpleBlade: 🔗
blade on/off 🔗
Turn simple blade on off.
state 🔗
Displays if SimpleBlade is on or off.
The following requires ENABLE_FASTLED defined:
blade on/off 🔗
Turn apa102 blade on off.
The following requires ENABLE_WS2811 defined:
blade on/off 🔗
Turn ws2811 blade on off.
The following requires ENABLE_DEVELOPER_COMMANDS defined:
state 🔗
Displays if WS2811 is on or off
NOTE - The following commands only work if
#define DISABLE_DIAGNOSTIC_COMMANDS in NOT active in the config.h file.
monitor 🔗
Toggle extra debug printouts. Topic is one of: swings, gyro, samples, touch, battery, pwm, clash, temp, strokes, serial, fusion, variation
volumes 🔗
Prints volumes of sounds currently occupying wav players.
buffered 🔗
Prints buffering of sounds currently occupying wav players.
get_ble_config 🔗
Show BLE PIN
top 🔗
Prints statistics about how often things are running and how much cpu they are using. If something is slow, start by running this command a few times and see if something sticks out at you.
*NOTE* - The following commands only work if `#define ENABLE_DEVELOPER_COMMANDS` _IS_ active in the config.h file.
say ARG 🔗
Test error messages. See following ARGs list:
- bfd "Error in font directory"
- bof "Font directory not found"
- ftl "Font directory too long"
- sd "SD card not found"
- bb "Error in blade array"
- bp "Error in preset array"
- lb "Low battery"
talkie 🔗
Play talkie from hex string. rate = 25.
talkie_slow 🔗
rate = 25
talkie12 🔗
rate = 12
talkie15 🔗
rate = 15
Serial Monitor Commands 🔗
This a list of some of the most typical commands you can use in the Serial Monitor.
For more diagnostic/developer based commands, see Serial Monitor Additional Commands.
The console can be opened in Arduino by choosing menu Tools>Serial Monitor.
Type the command in the top box and hit return, or click the "Send" button on the right side.
Note - Commands listed under the Diagnostic Commands section below only work if
#define DISABLE_DIAGNOSTIC_COMMANDS in NOT active in the config.h file.
version 🔗
Prints which ProffieOS version is running.
reset 🔗
Reboots the Proffieboard.
RebootDFU 🔗
Reboots the Proffieboard as STM32BOOTLOADER device.
get_volume 🔗
Displays the current volume.
set_volume xxxx 🔗
Sets the current volume of the board. Overrides the value uploaded in your config.h file.
n 🔗
Go to next preset.
p 🔗
Go to the previous preset.
on 🔗
Turn the saber on.
off 🔗
Turn the saber off.
clash 🔗
Trigger a clash
force 🔗
Trigger a force push effect.
blast 🔗
Trigger a blast effect.
stab 🔗
Trigger a stab effect.
lock 🔗
Begin/end lockup mode.
lblock/lb 🔗
Begin/end lightning block.
drag 🔗
Begin/end drag.
melt 🔗
Begin/end melt.
ccmode 🔗
Enter/exit color change mode.
cd 🔗
Use the specified font directory. Full path needs to be provided.
pwd 🔗
Shows what font directory is currently active.
dir 🔗
Show the contents of a directory on the SD card. Full path needs to be provided.
play 🔗
Plays a particular file.
play_track 🔗
Like "play", but uses the track player to play it, which means that you can stop the track with "stop_track".
stop_track 🔗
Stops the currently playing track, if any.
scanid 🔗
Have the board deactivate all current blades, check the BladeID and pick a BladeConfig [] array based on the new detected BladeID.
pow / aux / aux2 (or any button name) 🔗
These commands can be used to send button events from the Serial Monitor. See Button Commands for more information.
blink N 🔗
Blink Status LED N times (Proffieboard V3 only)
Editing Presets in Place (writes to presets.ini) 🔗
rotate 🔗
Rotating is an alternative to saving the current preset. It puts the last preset first and saves presets.ini/tmp.
list_presets 🔗
Prints currently programmed presets.
set_font FONTNAME 🔗
Set current font.
set_track (full path to)TRACK 🔗
Sets current track.
set_name NAME 🔗
Set current preset name.
set_style 🔗
Set current style.
Diagnostic Commands 🔗
Note: The uploaded config file can not have #define DISABLE_DIAGNOSTIC_COMMANDS active for these to work.
beep 🔗
Plays a few beeps, great for testing if your speaker is working.
dir 🔗
List contents of current font directory.
effects 🔗
List all found effect sounds in font search path.
sdtest 🔗
Tests the speed of the sd card. From ProffieOS 3.x and forward, this will read all the files in the current font, then present an average speed and a histogram of how long it took to read each block and open each file.
sdtest all 🔗
Like the "sdtest" command, but reads every file on the SD card, this can take a while.
Commands available from ProffieOS 8.x and later. 🔗
quote 🔗
Triggers quote.
swing 🔗
Triggers swing/accent swing.
slash 🔗
Triggers accent slash.
spin 🔗
Triggers accent spin (if enabled with ENABLE_SPINS)
get_variation 🔗
Prints out the current variation (used by color change mode)
tag| command 🔗
This command can make communication with apps more robust. "tag" can be anything, as long as it doesn't have a space in it. ProffieOS will run the command, and then for every output line, it will print:
Line number,line length, tag|output line
Example, if your command is foo| list_fonts, the output could be:
1,8,foo|TeensySF
2,4,foo|hero
3,8,foo|graflex7
sd 🔗
- sd 1 - enable sd card access from computer
- sd 0 - disable sd card access from computer
- sd - check if sd card access is on or off Note, requres MOUNT_SD_SETTING. Also, the sd setting is never saved, so it always reverts to disabled when the board reboots or looses power.
Serial Monitor 🔗
The Serial Monitor is a simple tool for talking to ProffieOS. ProffieOS will print out messages when something is happening, and you can enter commands to try things out.
To start the Serial Monitor, go to connect your board to the computer and start up Arduino. Now go check Tools->Port and select the right port. For Proffieboard it might say "butterfly" next to it.
If the port doesn't show up, see this page: Where's my Port?
Once the right port is selected, start the serial monitor by selecting it from the Tools menu. If everything works, you should see some messages from ProffieOS, such as "Welcome to ProffieOS". The first time you use the Serial Monitor, you will need to select the correct line endings in the bottom right corner. The correct line ending is "newline".
You should now be able to type commands. For a list of typically used entries,
see Serial Monitor Commands.
For additional available commands, see Serial Monitor Additional Commands.
The ProffieOS Workbench 🔗
The ProffieOS Workbench is a WebApp that uses WebUSB to talk to your Proffieboard and lets you control basic settings and edit fonts and presets. This page will show you how to use it. If you're wondering how to set it up, see the webusb page.
Making the connection 🔗
If the Proffieboard is currently connected to your computer or phone, and the SD card is mounted, make sure to eject it or the app will not work properly. Click HERE to start the ProffieOS Workbench. You should see something like this:
Depending on the capabilities of your browser, you may see only one or none of these buttons. See the end of this page for how to get it working. Pick USB or BLE (bluetooth). Note that using BLE is only possible if your saber has a bluetooth module. To use the USB button, make sure that the computer/phone is connected to the proffieboard with a data-capable USB cable. Your browser will now ask you to select the proffieboard you want to connect to. Usually there is only one:
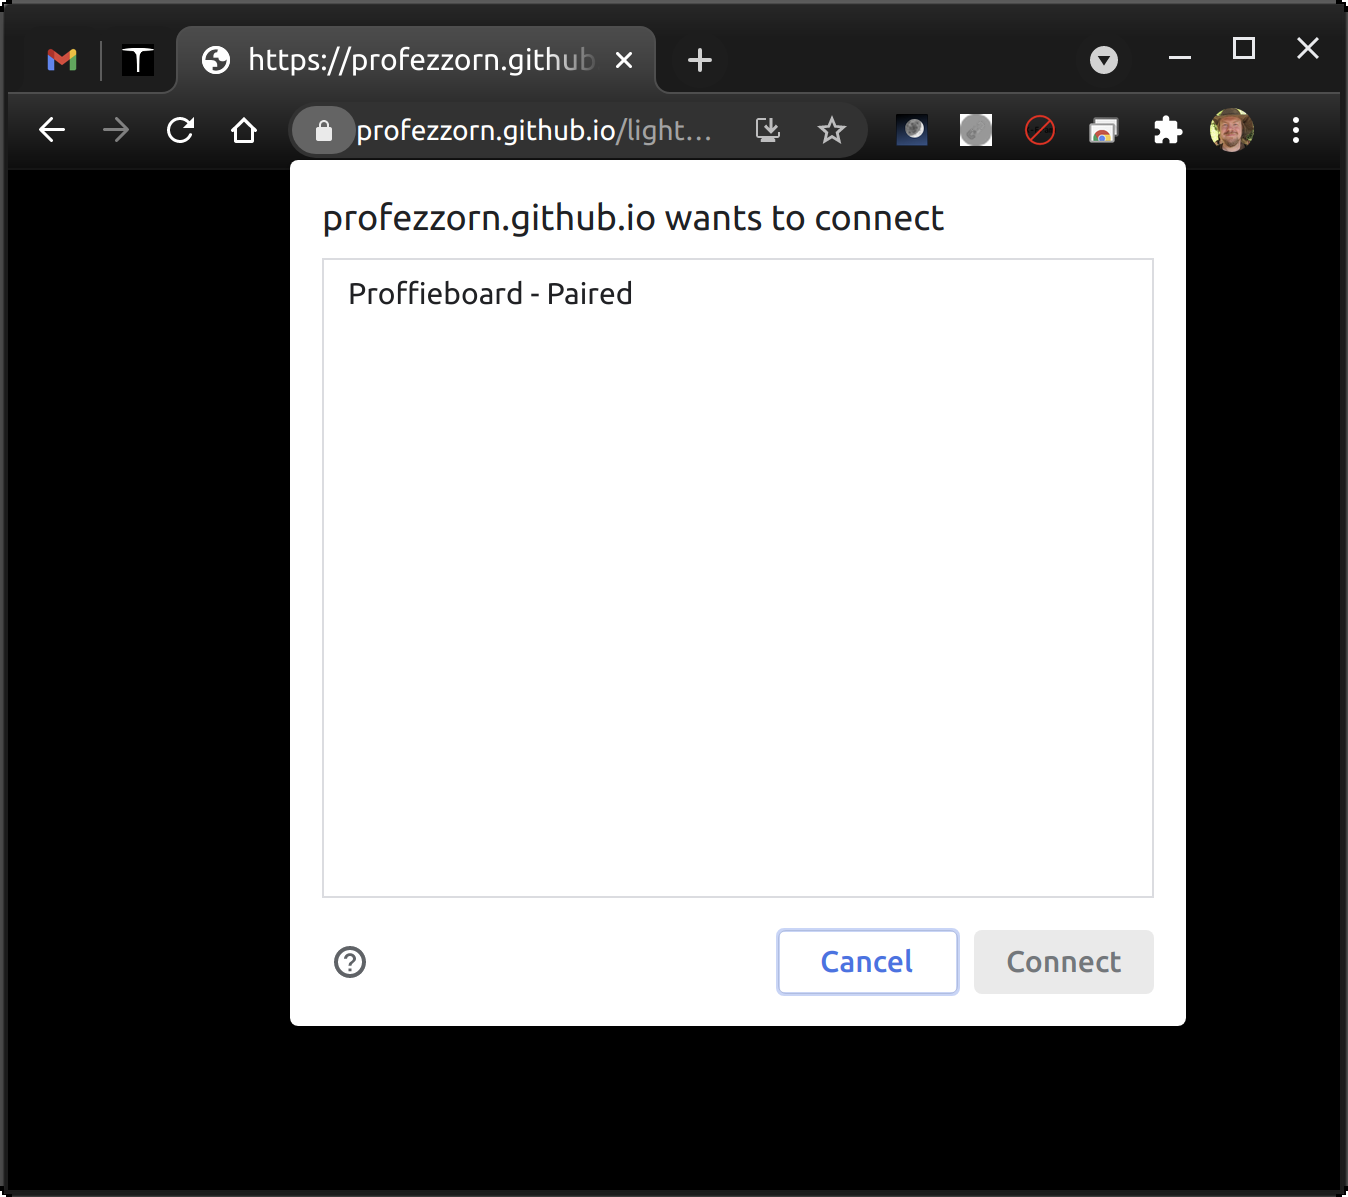
At this point you should be connected.
Control interaface 🔗
Once connected, you should see something like this:
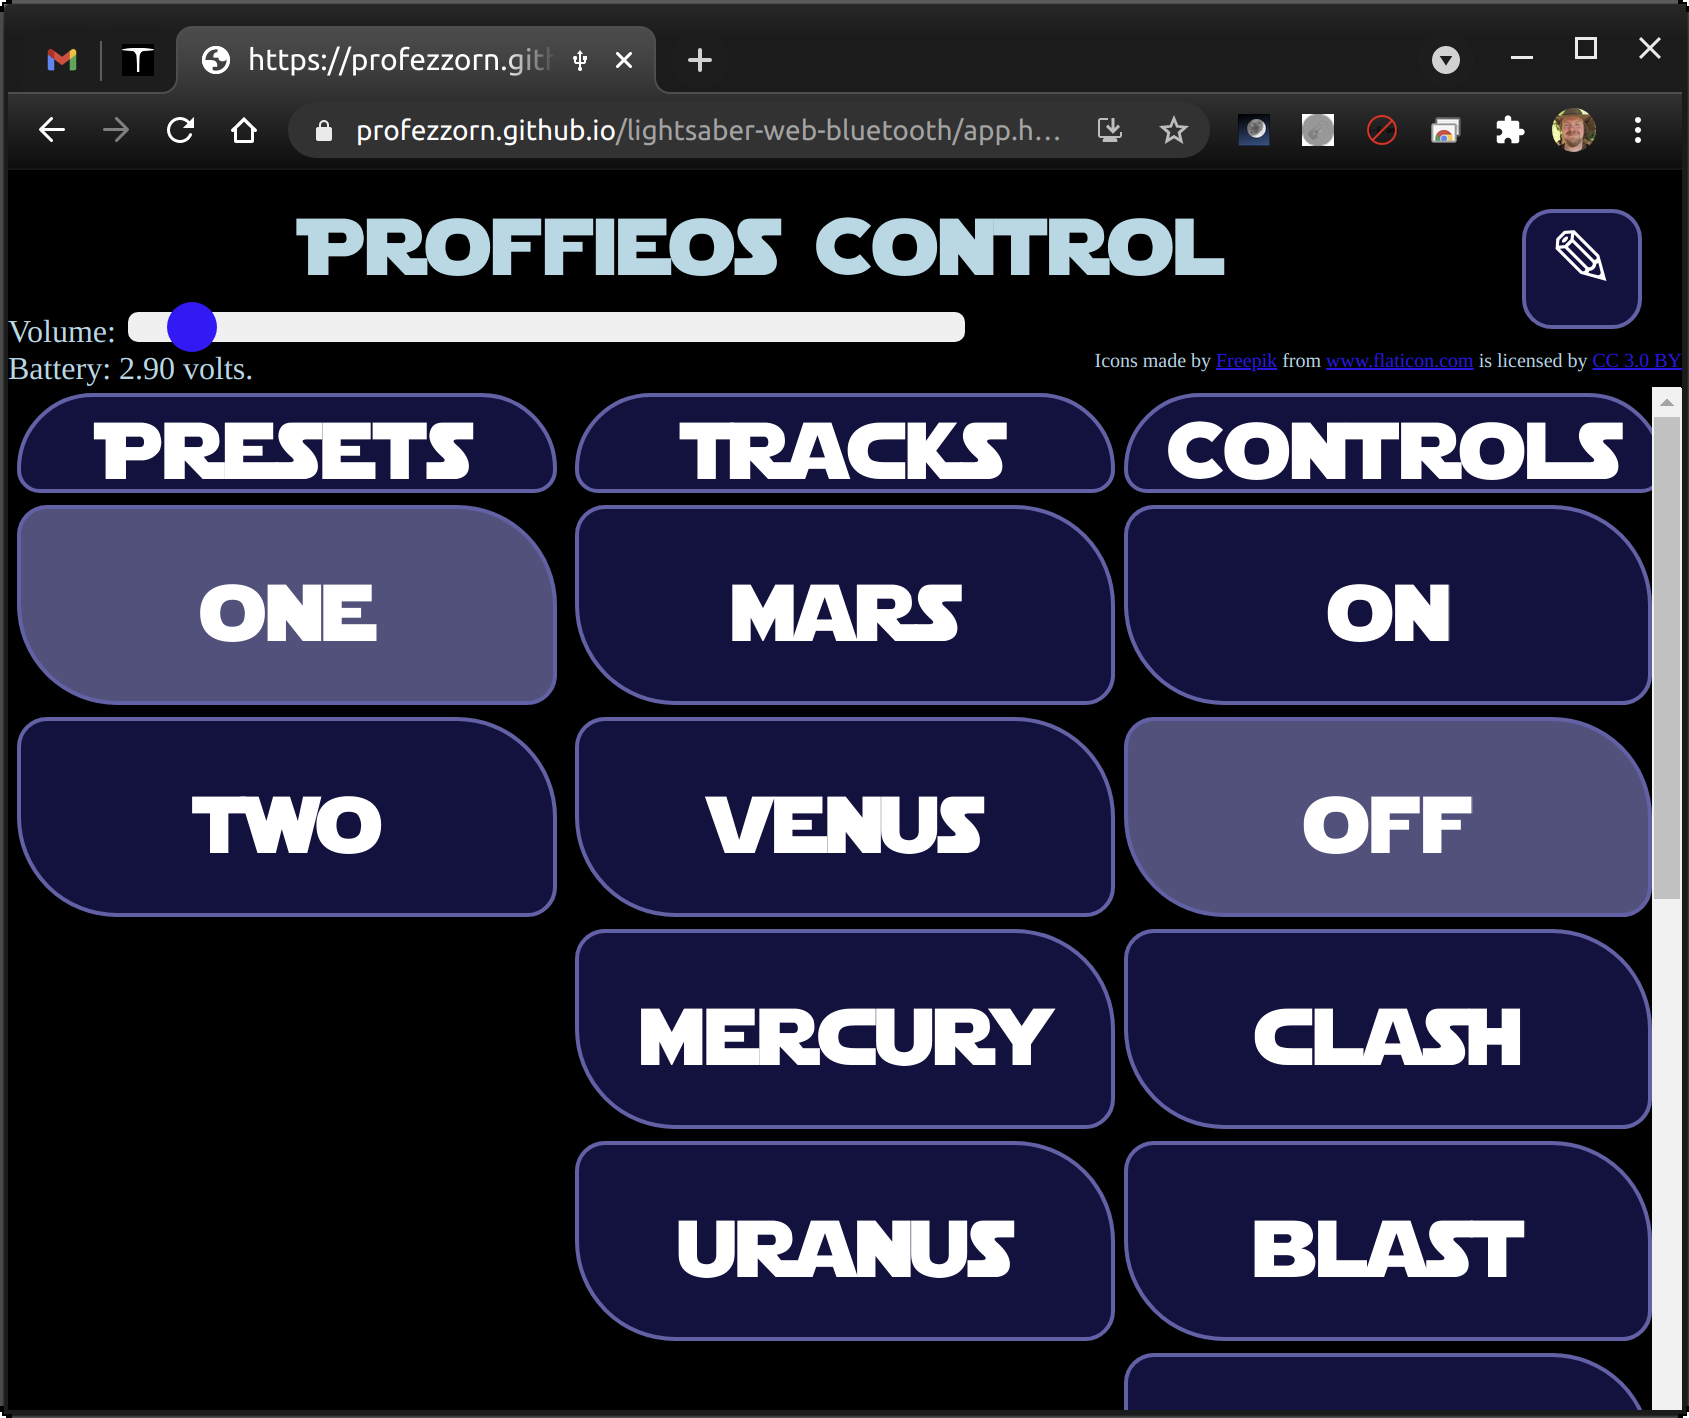
On the top left you'll see a slider for adjusting the volume and the current battery voltage. On the top right you'll see a pen button which takes you to the editing interface. Below those you'll see three columns:
- Presets, clicking them selects that preset.
- Tracks, clicking the track starts playing the track
- Actions, Lets you turn the saber on/off and trigger clashes, blasts and other effects.
Editing interaface 🔗
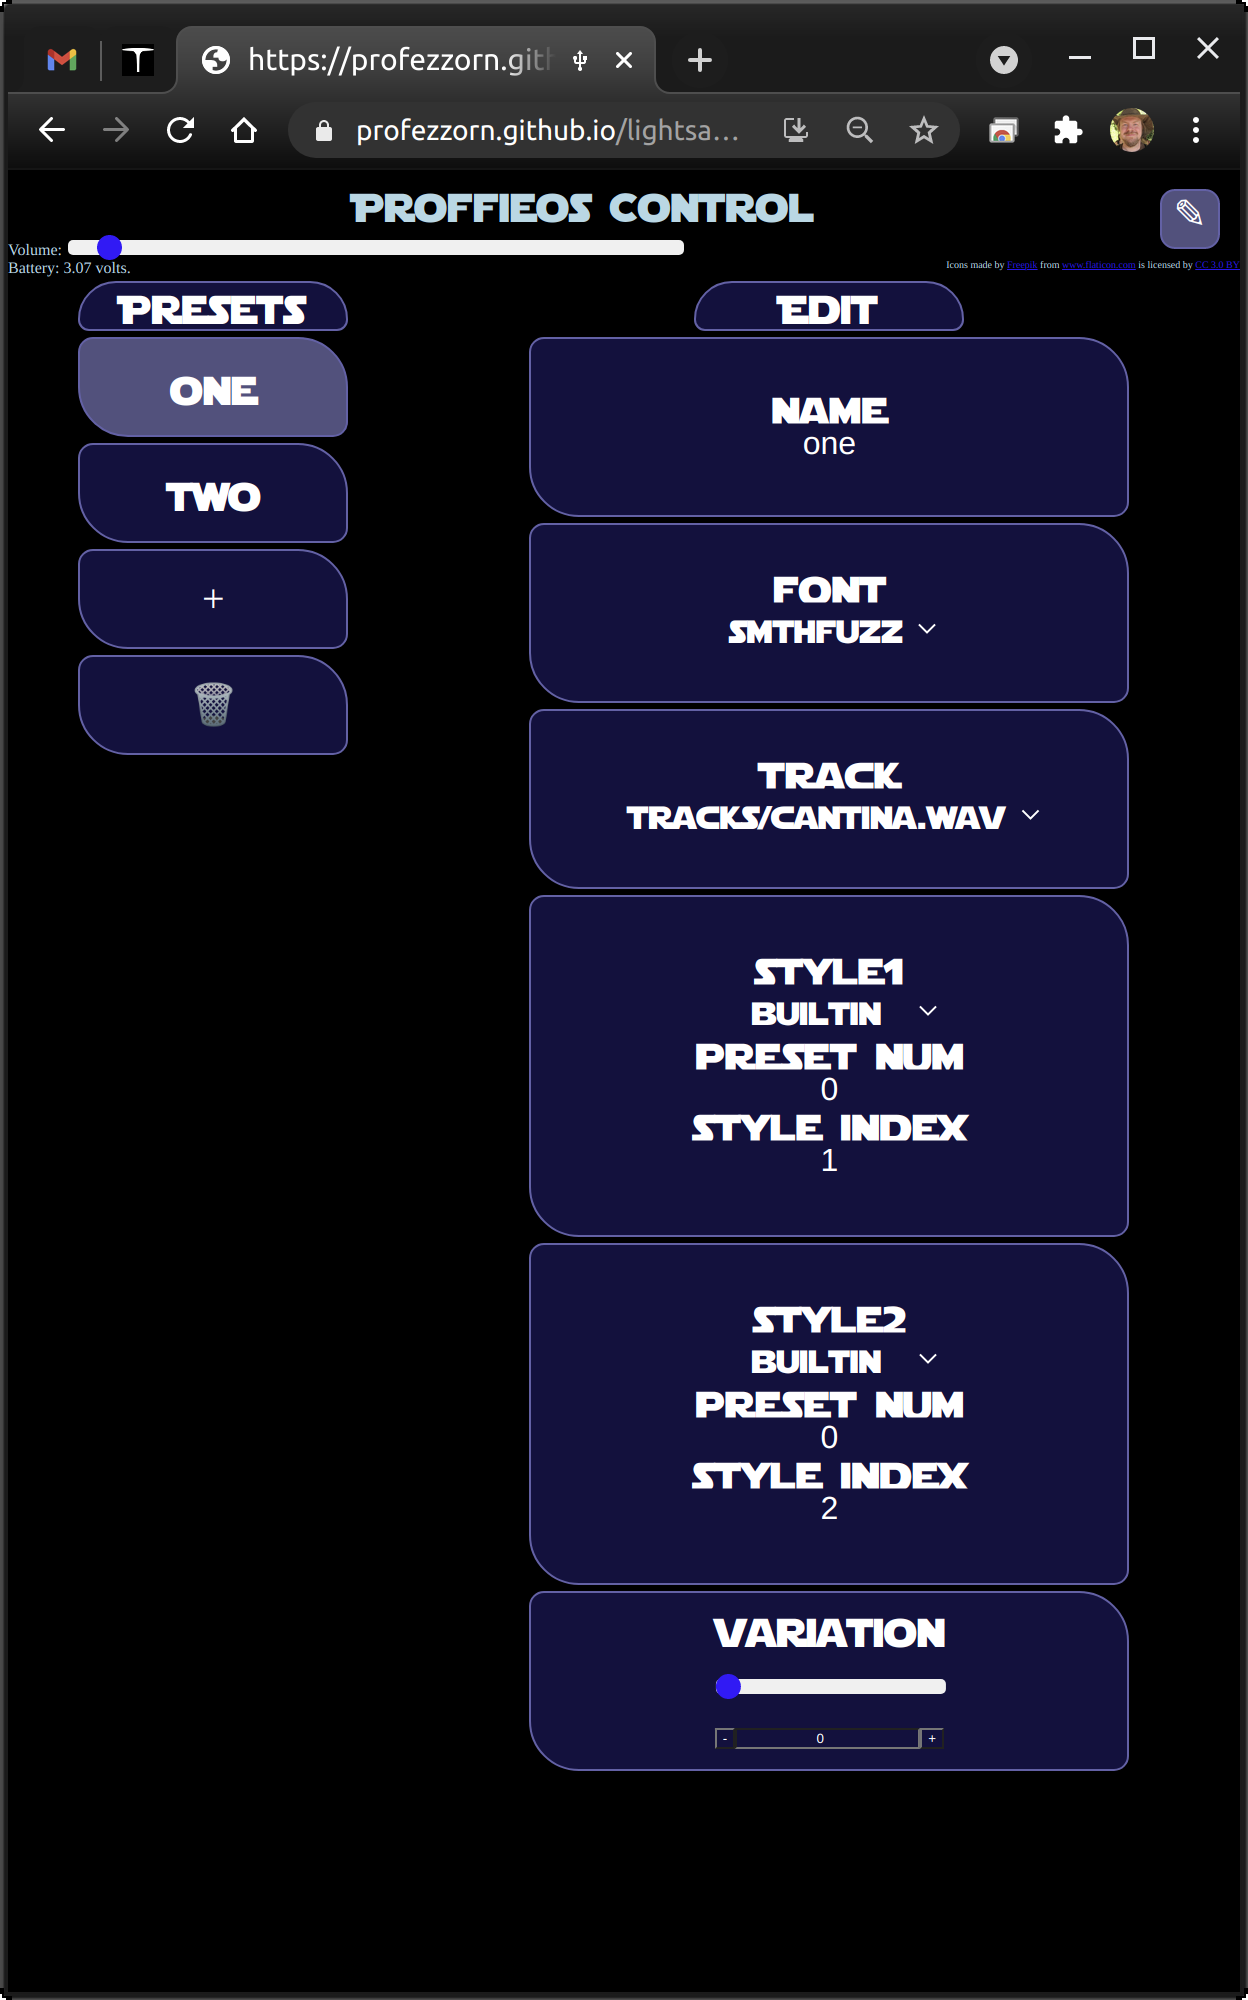
On the left you'll see all your presets, a plus and a trash can. You can re-order the presets by dragging them. You can delete presets by clicking the trash can or dragging presets onto the trash can. You can create new presets by clicking the plus button or dragging presets onto the plus icon. On the right you can see all the individual fields that make up a preset:
- Name: The name of the preset. This is really only used to identify the preset in this app.
- Font: The sound font for this preset.
- Track: The sound track to use with this preset.
- Styles: These specify the style and color for the blade. If your saber has multiple blades or accents, there can be multiple styles in each preset. In this example there are two styles.
- Variation: Depending on the style, this lets you change the style or color of the blade.
All changes you make are saved immediately. When done, click the pen icon in the top right corner again to return to the control interface.
How to add a new font 🔗
- Upload the font to the SD card. Assuming that your saber is configured with mass storage support, plug the USB cable into your saber and wait for the SD card to show on your desktop. Drag the font folder to the SD card, and then eject the drive from your computer safely. Please note that this can take a couple of minutes to complete.
- Now start from the top of this page and navigate to the Editing Interface.
- Pick a preset that may match the font you are adding.
- Press the "+" button. This will duplicate the preset you had selected.
- Now select the newly added font from the "font" dropdown in the right column.
- Done, although you may optionally change other parts of the preset like blade color and style.
How do I reset it back to factory settings? 🔗
- Plug in the USB cable and wait for the SD card to show up on your desktop.
- Open up the drive and delete "presets.ini" and "presets.tmp".
- Eject the SD card drive from your computer.
- Unplug the USB cable and insert your kill key, flip your kill switch or press the reset button on the proffieboard.
Troubleshooting 🔗
I get this message"This browser supports neither webusb nor web bluetooth." 🔗
See "No USB button" below.
No USB button 🔗
Make sure to select a browser that supports WebUSB..
No BLE button. 🔗
Make sure you use a a browser that supports Web-bluetooth. Note that it seems that with chrome on linux you have to enable "experimental web platform features" in about:flags. On IOS, you need to install an app called "Bluefly" to use Web-bluetooth.
Board doesn't show up after clicking USB button 🔗
- Make sure you have a working USB cable.
- Make sure your board was programmed with WebUSB support. (Webusb was selected in Arduino->Tools->Usb type)
- For windows7, you need to use zadig to make WebUSB work, here is how
Board doesn't show up after clicking the BLE button 🔗
- Does your saber actually have a bluetooth module?
- Is it a supported module? (FSC-BT630, FSC-BT909 or RedBear BLE Nano 2)
- Is the bluetooth module on? Is bluetooth on on the device you're trying to connect from?
I want more options! 🔗
Proffieboards can be programmed to do just about anything from Arduino. While not immensly complicated it does require more work than the methods described on this page. If you're still interested, check out the ProffieOS page.
Zadig 🔗
Zadig is a program that let's you update or replace device drivers for specific USB devices on Windows. For Proffieboards, we can Zadig to install a driver that lets us talk to the STM32 BOOTLOADER. However, it's easier to just use proffie-dfu-setup.exe. If proffie-defu-setup.exe doesn't work, or you just prefer to do things the hard way, here is how you do it with Zadig:
- Download Zadig
- Plugin the Proffieboard and toggle the RESET button while holding down the BOOT button
- Let Windows finish searching for drivers
- Start
Zadig - Select
Options -> List All Devices - Select
STM32 BOOTLOADERfrom the device dropdown - Verify that the USB ID is
0483 df11, if it is not, do not proceed! - Select
WinUSB (v6.1.7600.16385)as new driver - Click
Replace Driver
Done. Once zadig has been run, you shouldn't have to do it again. Your computer should remember what driver to use for the proffieboard bootloader from now on.
Note that on Windows 7, you will probably also need to update the ACM serial device driver, but that is done with a separate program.
Zadig doesn't have an undo, or revert button, but if you run Zadig on the wrong device, here is how you revert it: https://github.com/pbatard/libwdi/wiki/FAQ#Help_Zadig_replaced_the_driver_for_the_wrong_device_How_do_I_restore_it
Troubleshooting 🔗
How to decipher Arduino error messages 🔗
While a bit lengthy, and hard to put into typed words, hopefully this helps you understand how to read error messages and what they are caused by.
First, understand that a long list of errors does not necessarily mean there’s a ton of errors. They are just a cascade effect from the first problem.
If the compiler comes across something it doesn’t like, let’s say a brace that should be part of an open-close pair but there’s only an opening one without a closing brace, it will continue through the rest of the code trying to pair the remaining odd number of braces, finding each one mis-matched, and will spit out an error for ALL of those problems.
If the first one gets repaired, all the others will not occur.
Fortunately, Arduino error messages indicate a line number AND character number in the message, AND give you a little caret symbol underneath one of the characters. (little upward pointing arrow, pointing at a character). Understand that it is not necessarily pointing at the problem, but is actually pointing at the part of the code it "choked" on. So for example, if it was pointing at a closing brace at the end of a preset, the problem is likely a PREVIOUS character, like a missing or extra comma in the line before. It could also be pointing at a Closing brace that it came to without having read an Opening brace first. In that case, back at the beginning of a section, a preset, or higher up in the config, there's a missing opening brace somewhere. In other words, it's missing it's paired brace and it's saying....close? Close what? Nothing told me to open (missing open brace)
Incorrect number of blade styles in preset 🔗
You have to have a blade style for every "blade" defined in the Bladeconfig section at the bottom of your config file. If you have 3 blades (a main blade, a crystal chamber LED, and another LED pixel accent for example), then there needs to be 3 blade styles in each preset. This is a typical error, indicating there's at least one preset with too many styles.
error: too many initializers for 'Preset'

  421 | };
If on the other hand you get this error:
error: cannot convert 'const char*' to 'StyleFactory*' in initialization
then you have too few styles in one or more of your presets.
Transparent color as base layer 🔗
The error generated if this is the case will say:
error: conversion from 'RGBA_um_nod' to non-scalar type 'OverDriveColor' requested
The base layer of a blade style can not be an AlphaL with transparency. Such as:
StylePtr<Layers<
  AlphaL<Red,Int<16000>>,...........
The quick fix is to simply add a Black layer underneath everything else, since that won't be a visible difference, and it qualifies as a solid color as the first layer. So like:
StylePtr<Layers<Black,
  AlphaL<Red,Int<16000>>,...........
Example for the next few sections: 🔗
A config file named my_config.h that contains 2 blades, therefore 2 blade styles per preset. Here’s the preset:
17 { "JediFont", "tracks/GoodGuys.wav",
18   StylePtr<Cylon<SpringGreen,5,5,DeepSkyBlue,5,50,200>>(),
19   StylePtr<InOutHelper<DeepSkyBlue,100,100>>(),
20 "jedi" },
Missing comma after a blade style: 🔗
A missing comma at the end of a blade style error can look like this:
In file included from /User/Desktop/ProffieOS/ProffieOS.ino:556:0:
sketch/config/my_config.h:19:2: error: expected '}' before 'StylePtr'
  StylePtr<InOutHelper<DeepSkyBlue,100,100>>(),
  ^
The pointer is indicating the first character of the second blade style. Here, you should look for what’s wrong just before this character. In this case, even though the compiler says it was looking for a brace, it was actually a missing comma after the first blade style as seen here:
17 { "JediFont", "tracks/GoodGuys.wav",
18   StylePtr<Cylon<SpringGreen,5,5,DeepSkyBlue,5,50,200>>()
19   StylePtr<InOutHelper<DeepSkyBlue,100,100>>(),
20 "jedi" },
This is a case where the compiler got to the end of the first style and found no comma, so it assumed it was the end of the preset, and expected a closing brace }
Missing or an extra < or > in a blade style: 🔗
An extra > error usually looks like this:
In file included from /User/Desktop/ProffieOS/ProffieOS.ino:556:0:
sketch/config/my_config.h:18:57: error: expected primary-expression before ')' token
  StylePtr<Cylon<SpringGreen,5,5,DeepSkyBlue,5,50,200>   >   >(),
                                                               ^
The pointer is indicating a StylePtr’s close, but that’s because the compiler got to that and said…whut?? The problem here is that there’s an extra > before it at the end of the style (I spaced it out for visibility) and it’s messing up the order of things. If you read the file line and character number, you’ll see it’s line 18, character 57, which is indeed the extra >.
Conversely, a MISSING > at the end of the same style, so StylePtr<Cylon<SpringGreen,5,5,DeepSkyBlue,5,50,200>(),
makes this error:
In file included from /User/Desktop/ProffieOS/ProffieOS.ino:556:0:
sketch/config/my_config.h:19:45: error: call to non-constexpr function 'StyleFactory* StylePtr() [with STYLE = Layers<Rgb<0, 135, 255>, AlphaL<Rgb<0, 0, 0>, InOutHelperF<InOutFuncX<Int<100>, Int<100> >, true> > >]'
  StylePtr<InOutHelper<DeepSkyBlue,100,100>>(),
                                             ^
Notice how now the pointer is indicating a StylePtr’s close again, but THIS time, it’s at the NEXT style’s ending on line 19. The missing closing > for the first style’s Cylon effect has thrown off the correct formatting, and the compiler thought the whole next line was still part of the first style.
Misspelling: 🔗
The error should be pretty clear about this, just look at the thing it’s telling you “was not declared in this scope”, for example, an extra e in Green seen here:
In file included from /User/Desktop/ProffieOS/ProffieOS.ino:556:0:
sketch/config/my_config.h:18:17: error: 'SpringGreeen' was not declared in this scope
  StylePtr<Cylon<SpringGreeen,5,5,DeepSkyBlue,5,50,200>>(),
                 ^
Wrong Board version Selected: 🔗
#error Please select Proffieboard V2 in Tools->Board
Self explanatory.
Weird Unicode character errors : 🔗
The error message will say something like: " error: stray '\342' ", or “stray '\200' ", or “stray '\234' "
It seems that lately this is mostly a specific problem encountered by using a newer MacOS version of Textedit, but it could happen to anyone, including even straight copy/pasting from the Proffieboard Configurator page or using Windows Notepad.
Everything will appear fine in your config file on the surface, but this error means it contains one or more stylized characters, like fancy quotation marks, italicized looking braces etc... that are not valid characters to the Arduino compiler.
The fix is to delete the offending character(s) and retype them. Sometimes it can even be a return character (invisible) so deleting back to the last character in the previous line and typing a new return sometimes is needed.
That being said, you need to make sure your text editing software is set to PLAIN TEXT. In MacOS's Textedit, this option has changed defaults lately, so go to the menubar>Format>Make Plain Text before re-typing the characters.
This is why using a code-fiendly text editor like SublimeText is recommended, as it uses proper unicode for coding, numbered lines, is color coded, and can even "spell-check" your code using linting if you want.
Here's an example:
{ "KyberTROS", "tracks/TwoThemes.wav”,
Notice the last quotation mark is fancy/italicized.
Hard to catch, but nonetheless it is the problem.
Here's what the error would look like:
In file included from /User/Desktop/ProffieOS/ProffieOS.ino:556:0:
sketch/config/my_config.h:17:1: error: missing terminating " character
 { "KyberTROS", "tracks/TwoThemes.wav”,
 ^
If you look, you can see that it didn’t like something about the file my_config.h, line 17, character 1, and in this case that’s the opening brace. Now this is not a great example because the problem lies AFTER the reported character, but this happens, and sometimes you need to look before AND after the little pointer to see what’s wrong, but it’s always close by.
However, in this case, it DOES tell you in plain English that there’s a missing terminating " character. That’s because the ” is not the same as ", and it causes the error.
Delete the fancy/italicized weird Unicode ” with a nice plain text ", save the file, and then try Verify again.
Alternately, selecting the whole body of the file and Make Plain Text should work as well (shift+cmd+F in MacOS Textedit)
Base layer can't have transparency 🔗
If you have an AlphaL as the base layer in a blade style, you'll see this error:
error: conversion from 'RGBA_nod' to non-scalar type 'OverDriveColor' requested
The base color needs to be a non-Alpha color. Depending on the desired look, even just adding a base layer of Black will suffice.
Proffieboard plug-in not selected correctly 🔗
This is a typical error message you'll see if you don't have the board selected in Arduino menu Tools>Board>Proffieboard>Proffieboard (Version)
FS.h No such file or directory
'.text' will not fit in region 'FLASH' 🔗
This means that you've configured too many things, and ProffieOS won't fit in the available memory anymore. See the saving memory page for things you can do to fix it.
Audio Troubleshooting 🔗
-
charge the battery and see if that helps
-
try "get_volume" in the serial monitor and make sure it's at least 1000, you can also try the "beep" command
-
With the board off, measure resistance across the speaker pads if you see....
... less than 1 ohm, you may have a short somewhere, or a broken speaker
... more than 10 ohm, you have a broken speaker
... 3-9 ohms, should be ok
-
With the board on, and while it's ignited, check the voltage between GND and the 5v pad, is it about 5 volts? (If not, there is something wrong with the voltage booster.)
-
Switch your multimeter to AC measurements and measure between the speaker pads, do you see voltage when it's supposed to be playing? (And no voltage when it's not.) (If not, you may have a broken amplifier.)
What is it beeping? 🔗
If you're using the DISABLE_TALKIE define to save memory, the spoken error messages from the "What is it saying?" page will be replaced with beeps. This page will let you figure out what those beeps mean. Once you figure out which one is is, go to the What is it saying? page to find out what to do about it.
Try clicking on each line to hear what it sounds like.
That last one is not actually an error message, it's the sounds you hear if you use the "beep" command, and is also the notes from "Close Encounters of the 3rd Kind".
Try singing it 🔗
All of the beep codes above were composed with the same number of notes as the syllables in the error message. If you can sing the error code to the beep codes, then maybe you can figure out what the problem is without consulting this page. This video might help visualize things as well: https://www.youtube.com/watch?v=bVPDhBp1l9c
How to test a FET 🔗
FETs can sometimes get damaged by shorts. However, it can be difficult to test if they are working or not, because when they are not supposed to be on, they behave just like if they were broken. So let's discuss some ways to check if they are working or not.
First or all: It's not easy to test if a FET is working if nothing is connected to it. However, if something is connected to it, it's fairly easy.
Method 1 🔗
Connect the blade, turn your proffieboard on and make sure the blade you want to test is supposed to be on. Now measure the voltage between BATT+ and the LED pad on the board. If it's working, the voltage should be 3+ volts. When the blade is supposed to be off, the voltage shuld be less than 0.1 volts. Note that errors in your config file could potentially throw off these measurements, as the FET might never really be turned on.
Method 2 🔗
This method is particularly effective for simple LED blades. Basically, you just take a small piece of wire and short the relevant LED pad to BATT-. If that makes the LED light up, then LED and it's wiring is obviously OK, meaning that if it doesn't light up when you turn your saber on, it must either be a programming problem or a broken FET. This method can work with neopixels too, but if the neopixels don't light up, it might be because the data isn't working properly, so there are more possible causes.
Now, before you jump to conclusions, please make sure that your proffieboard programming is actually trying to turn the FET on. If you're not sure, I recommend measuring the gate voltage on the FET. Make sure your multimeter probe is pointy enough, and measure the voltage between the FET gate and GND.
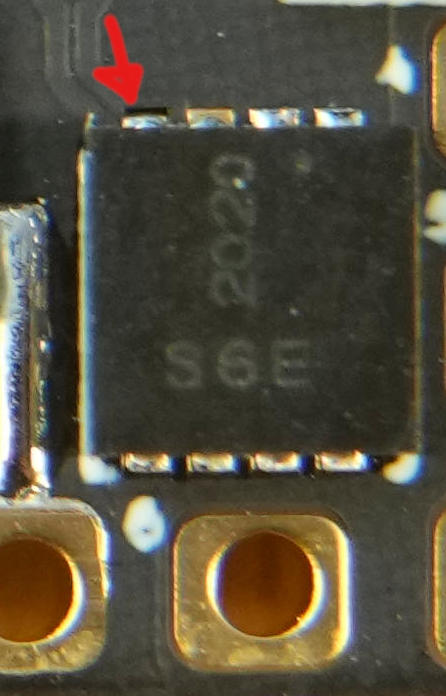
When the gate is supposed to be on, this voltage is supposed to be 3.3v. When the gate is off, this voltage is supposed to be 0v.
If the gate voltage is right, but the FET doesn't turn on (as determined by Method 1/2 above) then the FET is definitely broken, and you should probably try using a different LED pad, replace the FETs on the board, or replace the board.
Troubleshooing Files and Folder Structure 🔗
Short version first:
The ProffieOS.ino file must be in a folder named ProffieOS. Your config file (my_saber_config.h or however you named yours) must be in the config folder that is inside the SAME ProffieOS folder as the ProffieOS.ino file you are using in Arduino. So the paths to these files would look like this in Windows:
C:\Users\Fredrik\Desktop\ProffieOS\ProffieOS.ino C:\Users\Fredrik\Desktop\ProffieOS\config\my_saber_config.h
Or graphically in MacOS:
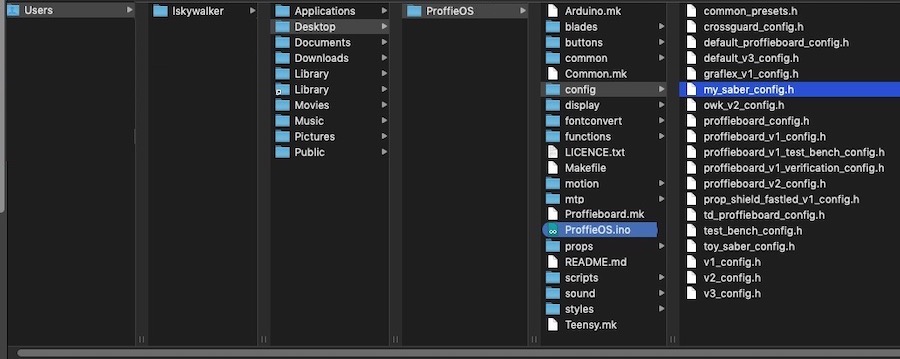
Longer detailed version:
Some common problems often heard in the forums and saber board pages:
- "After making some changes to my config (such as a new preset, blade style, or a font etc...) everything compiles and uploads successfully to the board. However, when powering on the saber, it seems nothing has changed."
NOTE - If you use #define SAVE_STATE in your config, you might not have changes take effect until you try deleting the generated files from the root level of your SD card named preset, curstate, and global. It's OK, they get replaced next time you run a preset. - "After downloading and unzipping the ProffieOS package, Arduino says something about a ProffieOS folder and offers to create one and move something, and after clicking OK, nothing compiles."
Issues like these are a very simple fix, but some basic understanding of file and folder hierarchy is needed.
Note that as of the latest version, simply unzipping the software package creates the correct folder structure, whereas previously, some versions have required renaming folders and moving files and folders into a ProffieOS folder, and not everyone maintained the hierarchy correctly in doing so.
ProffieOS code is using files which it expects to be in a certain place. It uses paths to files, which you've probably seen and used before, See above for examples.
The root folder for the software (top level folder) must be named ProffieOS. The ProffieOS.ino file that you open in Arduino must live in this folder. Subfolders of the ProffieOS folder contain the files the code needs (blades, common, config, props, and so on). When you have downloaded multiple versions and copies of the software, including forks and prop files, you need to keep everything organized to avoid mixing up which files you're currently using and working with.
It is recommended that you create a folder somewhere, either on the Desktop or in "Documents" where you keep lightsaber stuff. Then inside that, have one directory per ProffieOS version, and inside that, it would be ProffieOS/ProffieOS.ino, so something like:
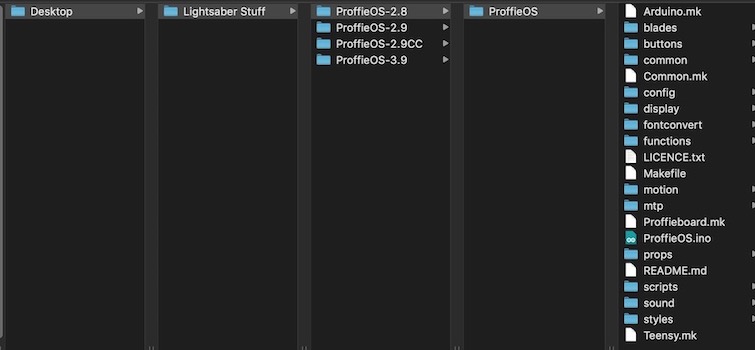
The written path in full could look like this: C:\Users\Hubbe\Documents\Lightsaber Stuff\ProffieOS-2.8\ProffieOS\ProffieOS.ino
Another reasonable alternative is to organize things by saber, which could look like: C:\Users\Hubbe\Documents\Lightsabers\Graflex\ProffieOS\ProffieOS.ino
Or, if you have multiple versions of ProffieOS for each saber (like I do):
C:\Users\Hubbe\Documents\Lightsabers\Graflex\ProffieOS-2.8\ProffieOS\ProffieOS.ino
Let's say you currently have everything contained in a folder named ProffieOS-2.8 and you try to open the ProffieOS.ino file in Arduino.
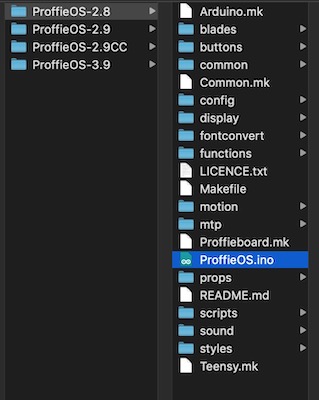
You get a message saying "The file "ProffieOS.ino" needs to be inside a sketch folder named "ProffieOS". Create this folder, move the file, and continue?"
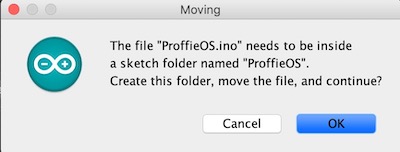
If you agree, the ProffieOS.ino file you tried to open gets moved into a newly created subfolder called ProffieOS, and the sketch opens. However, this only moved the .ino and left all of the files that the software needs outside the new folder.
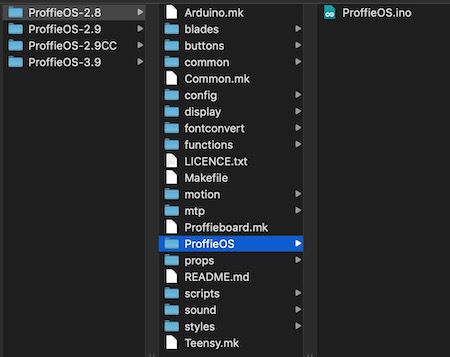
You need to structure this folder correctly before you can compile the code. Take all the folders next to ProffieOS and place them inside WITH ProffieOS.ino.
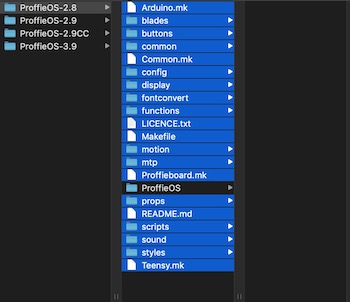
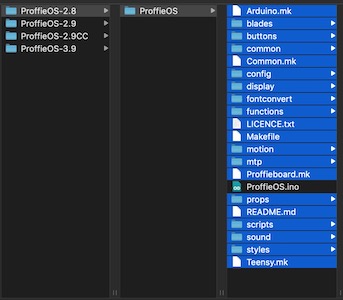
The usual problem is that the wrong version of ProffieOS/config/my_saber_config.h is being edited, one from an older version folder, while the newer ProffieOS.ino is being used in Arduino. The relative paths are the same from the ProffieOS folder and down, but the path prior is different. It's hard to put into words, but just make sure you edit the correct config file, and that you #define it in Arduino.
Is it uploading? 🔗
When you upload to a Proffieboard, the progress of the upload is shown in the same window as compile errors, and it should look something like this:
Note that for some version of Arduino you will need to scroll down to see this. If you do not see this, or something similar, then the upload was probably not successful.
Wrong port 🔗
One of the most common reasons for a failed upload is not selecting the right port. Usually this looks like this:
If this is what you see, select the right port in Arduino -> Tools -> Port, then try again. If the port is not shown, you can try these steps:
- Connect Proffieboard to computer.
- Hold the BOOT button.
- Press and release the RESET button.
- Check that the computer can see your board as STM32 BOOTLOADER. (See this page for how to find all USB devices connected to your computer: USB Connection Issues)
- If the board was not recognized by your computer, try a different cable, port, computer, etc. Ultimately, if the board cannot be found, it may be broken.
- Once the board is found, press the upload button in Arduino. Note that there will be no port listed under Arduino->Tools->Port, but if your board is already in bootloader mode, upload should work anyways.
Once upload has finished, the Port should be available in arduino, so you shouldn't have to do this process again.
DFU driver not installed 🔗
If you get this message while uploading "cannot open dfu device 0483:df11", it means that it found the bootloader, but it can't talk to it.
On windows, that usually means that you need to run proffie-dfu-setup to install the right driver for the STM32 BOOTLOADER. On Linux, it means that you need to install the right udev rules.
If you see some other errors when uploading, it's probably a compile error. Check the Arduino error messages page for help with those.
It doesn't compile, and I don't know why 🔗
First up: The arduino program has a small region at the bottom where it shows error messages in red text. Unfortunately it usually scrolls past the first error message and only shows you the last part, which is not very helpful. Make the error region larger and scroll up to find the first error message. Read on to learn what usually causes the errors, and how to find and fix them.
If you see this error:
#error Tools->DOSFS should be set to SDCARD (SPI)
Go to the Tools menu, find DOSFS and set it to "SDCARD (SPI)" and try again.
If you see a lot of red text compile errors, don't be discouraged thinking there's a lot of things wrong. Usually, just the first error shown is the actual problem, and all of the following messages are just a result of a cascade effect. The most common errors are in the presets section of the config file (my_saber.h for example) where edits to presets have occured. It's quite easy to make a typo, specifically leaving out a code punctuation (comma, < or >, a parenthesis, a brace etc...). Many times styles can be copied from the [Style Editor] or elsewhere and pasted in the config file without having a comma added, or the whole line to be replaced was selected, including the comma, and then pasted over. Each blade style must be followed by a comma, unless the preset description at the end is being omitted, leaving the blade style as the last element, where it then just gets followed by a closing brace comma }, Each style's arguments must open with < and close with >. Again, missing just one of these punctuations will cause the compile to fail. This is easy to miss once looking at long lines in a style or multiple nested templates, such as:
AudioFlicker<Blue,Rgb<128,0,128>>
is sometimes left as just
AudioFlicker<Blue,Rgb<128,0,128>
It looks complete at a quick glance. However, the Rgb has its closing > but AudioFlicker also needs one, and visually it's easy to miss until you get very used to seeing it.
The second most common issue is a mismatch of number of blades defined in the CONFIG_TOP section and the number of blade styles contained in the preset(s). Each LED wired to an LED pin on the board counts as a "blade", even if it's a single accent LED. If you have 1 main blade and 2 accent LEDs, 3 "blades" must be defined with #define NUM_BLADES 3, and all of the presets must contain 3 complete blade styles.
The error message in Arduino gives the best clue as to where the problem exists in the form of a line number of the config file causing the problem. For this reason, it is highly suggested to use a text editor that uses line numbering for troubleshooting the problem with the config file. In the following example error message, Just before the first occurance of the word "error" is the line number, and there's a caret symbol pointing up to the issue.
In file included from /HardDrive/Lightsabers/ProffieOS/ProffieOS.ino:631:0:
/var//T/arduino_build_915026/sketch/config/mysaber_config.h:47:5: error: expected '}' before 'StyleNormalPtr'
	StyleNormalPtr<WHITE, RED, 300, 800, RED>(), "white"},
	^
This tells you that when the compiler got to line 47, it was expecting a closing bracket. So we can go look at why. Here's the section with line 47 from the config:
{ "TeensySF", "tracks/mercury.wav",
  StyleNormalPtr<WHITE, RED, 300, 800, RED>()
  StyleNormalPtr<WHITE, RED, 300, 800, RED>(), "white"},
This config file uses 2 blade styles per preset, and line 47 looks fine, and it is. But the problem is that there is no comma after the style ABOVE it, so when the compiler got to the end of the first style and found no comma, it assumed it was the end of the preset, and expected a closing brace }
That is how you find errors using error messages from Arduino.
For more info on deciphering Arduino error codes, read here:
Error Messages in Arduino and how to decipher them.
If it still doesn't compile, try Googling your error message combined with a search term "Proffie". If it shows things that are not helpful, try adding site:therebelarmory.com to your query. Chances are that someone else has had the same problem and already asked about it on the forums.
If you still could use some help, go to The Crucible and post your config file and complete error message, and someone will help you figure out what the problem is.
If you've made edits and it DOES compile, but you don't see your changes after uploading, see the Troubleshooting Files and Folder Structure page.
SD Card troubleshooting 🔗
SD card problems is probably the most common issue with Proffieboard setups. ProffieOS uses SD cards in an unusual way, which puts high high demands on the SD cards in ways that they are not always well optimized for. Also, all SD cards will go bad sooner or later. It's not a matter of IF, it's a matter of WHEN.
How does SD cards work? 🔗
Fundamentally, SD cards are flash storage devices. They shoot electrons into little traps and keep them there, that's how they store the actual information. The reliability of these cells depends on how big they are. Bigger cells are more reliable, but also more costly, so naturally SD card manufacturers want to keep the cells as small as possible. Cells also also wear out eventually. The electron bombardment actually wear down the cell walls over time, making the cells less reliable.
To work around this, SD cards have a cpu, and use a variety of strategies to make these cells more reliable, these strategies include, but are not limited to:
- using checksums to detect when data is not read back correctly
- using CRC to automatically fix data when it is not read back correctly
- wear-leveling - SD cards usually have a table made of big reliable cells which specifies where each block is stored, and each time you write a block it will most likely be stored in a new location.
- avoid-lists - blocks that require CRC or fail checksums repeatedly are added to a list and avoided. SD cards usually have some extra blocks that they can use when blocks go bad. How much extra basically determines the lifetime of the SD card.
If you've heard of these strategies before, it's because they are not new. Hard drives, CD roms and just about every storage device use these strategies to improve function.
So why am I telling you all this? It's because I want you to understand that things go wrong in SD cards all the time, but mostly it's hidden by some algorithm that improves the relibility. However, that algorithm may require some time to run, and that's not good for ProffieOS. ProffieOS have has very small audio buffers. Basically only one 512-byte block, which at 16-bit 44100Hz is only about 11ms. That means that if a block read takes more than 11ms, there will be a gap in the audio. Since we may be playing multiple sounds, the limits are actually even less than that. To make matters even worse, opening a new file requires several block reads, and those must also finish within 11ms, or we get an audio underflow. Typically, block reads take ~0.2-0.3ms, so we should have plenty of time, but because of the strategies employed by the card to hide minor errors, that's not always the case.
For the most part, SD cards are not really designed for low-latency reads. Most cards take the approach that 99.99% of all reads will be fast, and every now and then some block will take more time, and that's fine. If you were just copying photos to/from the SD card, who cares if one of the pictures takes 100ms extra to copy, right? ProffieOS does, and now you do too.
So what can we do? Well, it might be helpful to look at the "A" rating for sd cards. The A rating is really about how many "transactions" the card can do per second. That's not exactly the same thing as reliably low latency, but it's at least more similar than the "U" rating which is based on the maximum possible throughput. The other thing I do is to look for "industrial" and "professional" cards, which may have bigger cells, more extra blocks and better CRC algorithms to improve reliability. (No guarantees, they might also be the same cards with different print on them, I have no way of knowing.)
I also highly recommend using V3 cards which has higher SD card bandwidth, which makes it a little more tolerant to some of these kinds of problems.
Clues 🔗
So what actually happens when SD cards go bad?
- reading certain parts of the SD card may be slow
- reading certain parts of the SD card may hang forever
- files and folders may be corrupted (this can also happen for other reasons, such as disconnecting prematurely.) But what actually happens to ProffieOS in these cases?
If SD card is slow 🔗
- Audio pops and glitches
- Audio underflow error messages in serial monitor
- Blade animations may freeze for short periods of time
- ProffieOS may freeze. This happens because playing audio is a high priority task for ProffieOS, and if the SD card is slow, playing audio may leave no time to do anything else.
If SD card hangs forever 🔗
- ProffieOS will freeze, most likely producing a squee-of-death (if audio is playing when it freezes)
If SD card is corrupt 🔗
- Sounds will not play.
- ProffieOS may crash
- Usually there are weird error messages in serial monitor which may end up looking like they are in a different language or something.
- Almost anything could happen.
Tests 🔗
So, if you see some of these problems listed above, how do you know if it's the SD card or something else? Most of the time, the answer is to use the "sdtest" command in the serial monitor.
Please note that the "sdtest" command is not available if you have the DISABLE_DIAGNOSTIC_COMMANDS in your config file. If you have that in your config file, you will need to temporarily comment it out (by adding // in front of it) and upload to the board before you can run "sdtest". You may also need to temporarily comment out some presets from your config file to make everything fit in flash memory.
To run "sdtest" pull up the Serial Monitor in arduino, type in "sdtest" and press enter. You should see something like this:
Playing common/mnum/mnum1.wav

Playing common/mnum/mnum2.wav

Playing common/mnum/mnum3.wav

Playing common/mnum/mnum4.wav

Playing common/mnum/mnum5.wav

Playing common/mnum/mnum6.wav

Playing common/mnum/mnum7.wav

Playing common/mnum/mnum8.wav

Playing common/mnum/mnum9.wav
N
Playing common/mnum/mnum10.wav

Playing common/mnum/mnum11.wav
M
Playing common/mnum/mnum12.wav

Playing common/mnum/mnum13.wav
M
Playing common/mnum/mnum14.wav
M
Playing common/mnum/mnum15.wav
M
Playing common/mnum/mnum16.wav
M
Playing common/mnum/mnum17.wav
L
Playing common/mnum/mnum18.wav
M
Playing common/mnum/mnum19.wav
N
Playing common/mnum/mnum20.wav
M
Playing common/medit.wav
ML
Playing common/vmend.wav
NL
Playing common/vmbegin.wav
NL
Playing Rescue/endlb/endlb1.wav
K
Playing Rescue/endlb/endlb2.wav
M
Playing Rescue/endlb/endlb3.wav
M
Playing Rescue/lb/lb.wav
LKMLKLLLLLKMMKKMLLLKLMLKLK
Playing Rescue/bgnlb/bgnlb1.wav
L
Playing Rescue/bgnlb/bgnlb2.wav
L
Playing Rescue/bgnlb/bgnlb3.wav
NM
Playing Rescue/endmelt/endmelt.wav
L
Playing Rescue/melt/melt.wav
LLKLLKLLKLLKLLKLLLLKLMKKLLLLKK
Playing Rescue/bgnmelt/bgnmelt.wav
LMK
Playing Rescue/enddrag/enddrag1.wav

Playing Rescue/enddrag/enddrag2.wav
N
Playing Rescue/enddrag/enddrag3.wav

Playing Rescue/enddrag/enddrag4.wav

Playing Rescue/drag/drag.wav
LKLMLLLLLMKLM
Playing Rescue/bgndrag/bgndrag1.wav

Playing Rescue/bgndrag/bgndrag2.wav

Playing Rescue/bgndrag/bgndrag3.wav

Playing Rescue/bgndrag/bgndrag4.wav
Playing Rescue/swingh/swingh01.wav
NLLKLLKLLKLLKKMLML
Playing Rescue/swingh/swingh02.wav
NMMKLLKLLKMMK
Playing Rescue/swingh/swingh03.wav
MMLLLKLLKLLKLLKLLKLLK
Playing Rescue/swingh/swingh04.wav
MKLMLLLKLMKLMLLLLLLKLM
Playing Rescue/swingl/swingl01.wav
LLKLMLKLLLLK
Playing Rescue/swingl/swingl02.wav
MKLKLMLKLKKLKLMLLLLL
Playing Rescue/swingl/swingl03.wav
MMLLLKLLKKLKLLKMLLKLLK
Playing Rescue/swingl/swingl04.wav
LKLKKLMLKLLLLKLMLLK
Playing Rescue/swng/swng01.wav
L
Playing Rescue/swng/swng02.wav
M
Playing Rescue/swng/swng03.wav
M
Playing Rescue/swng/swng04.wav
N
Playing Rescue/swng/swng05.wav
M
Playing Rescue/swng/swng06.wav

Playing Rescue/swng/swng07.wav
M
Playing Rescue/swng/swng08.wav
N
Playing Rescue/swng/swng09.wav
N
Playing Rescue/swng/swng10.wav
M
Playing Rescue/swng/swng11.wav

Playing Rescue/swng/swng12.wav

Playing Rescue/swng/swng13.wav

Playing Rescue/swng/swng14.wav
M
Playing Rescue/swng/swng15.wav
M
Playing Rescue/swng/swng16.wav
M
Playing Rescue/lock/lock01.wav
LKLLKLLLMMKLLKLLKLLKLLKLLKLLKMM
Playing Rescue/out/out01.wav
LL
Playing Rescue/out/out02.wav
MM
Playing Rescue/out/out03.wav
MK
Playing Rescue/out/out04.wav
NL
Playing Rescue/in/in01.wav
L
Playing Rescue/in/in02.wav
M
Playing Rescue/clsh/clsh01.wav
L
Playing Rescue/clsh/clsh02.wav
N
Playing Rescue/clsh/clsh03.wav
N
Playing Rescue/clsh/clsh04.wav
L
Playing Rescue/clsh/clsh05.wav
N
Playing Rescue/clsh/clsh06.wav
N
Playing Rescue/clsh/clsh07.wav
M
Playing Rescue/clsh/clsh08.wav
M
Playing Rescue/clsh/clsh09.wav
M
Playing Rescue/clsh/clsh10.wav
M
Playing Rescue/clsh/clsh11.wav
M
Playing Rescue/clsh/clsh12.wav
M
Playing Rescue/clsh/clsh13.wav
ML
Playing Rescue/clsh/clsh14.wav
M
Playing Rescue/clsh/clsh15.wav
ML
Playing Rescue/clsh/clsh16.wav
MK
Playing Rescue/blst/blst01.wav
LL
Playing Rescue/blst/blst02.wav
M
Playing Rescue/blst/blst03.wav
ML
Playing Rescue/blst/blst04.wav
NM
Playing Rescue/blst/blst05.wav
M
Playing Rescue/blst/blst06.wav
MK
Playing Rescue/endlock/endlock1.wav
L
Playing Rescue/endlock/endlock2.wav
NL
Playing Rescue/endlock/endlock3.wav
ML
Playing Rescue/endlock/endlock4.wav
N
Playing Rescue/bgnlock/bgnlock1.wav
KL
Playing Rescue/bgnlock/bgnlock2.wav
NL
Playing Rescue/bgnlock/bgnlock3.wav
M
Playing Rescue/bgnlock/bgnlock4.wav
M
Playing Rescue/font/font.wav
KLLLL
Playing Rescue/stab/stab1.wav
LM
Playing Rescue/stab/stab2.wav
M
Playing Rescue/stab/stab3.wav
NM
Playing Rescue/stab/stab4.wav
NK
Playing Rescue/force/force1.wav
KLLKL
Playing Rescue/force/force2.wav
MKLLK
Playing Rescue/force/force3.wav
MMLLL
Playing Rescue/force/force4.wav
O
Playing Rescue/force/force5.wav
MKKLKLM
Playing Rescue/force/force6.wav
MK
Playing Rescue/force/force7.wav
NLK
Playing Rescue/force/force8.wav
NML
Playing Rescue/force/force9.wav
NLKLLLMKKLLK
Playing Rescue/hum/hum01.wav
MKLLKLLKMMKLMLLLNMLKMMKLLLLLLMLKMMKLMLLLKLL
Playing Rescue/boot/boot.wav
MLLLKLLK
Time to open files: Average time: 2561.39 us
                                             .  .
                                             :  :
                                             :  ::.
                                           . :  :::
                                           :::  :::
                                           :::  :::
                                           :::  :::
                                           :::..:::                   .
                                          .:::::::::                ::: .
                                          ::::::::::    .          .::: :
                           :              :::::::::: : :::         :::: :: :
x100us              1                   2                   3                   4                   5
0 1 2 3 4 5 6 7 8 9 0 1 2 3 4 5 6 7 8 9 0 1 2 3 4 5 6 7 8 9 0 1 2 3 4 5 6 7 8 9 0 1 2 3 4 5 6 7 8 9 0
Time to read blocks: Average speed: 1924.88 kb/s, 21.82 simultaneous audio streams.

     :
     :
     :
     :
     :
     :
    .:
    ::
    ::
   .::.....
x100us              1                   2                   3                   4                   5
0 1 2 3 4 5 6 7 8 9 0 1 2 3 4 5 6 7 8 9 0 1 2 3 4 5 6 7 8 9 0 1 2 3 4 5 6 7 8 9 0 1 2 3 4 5 6 7 8 9 0
Unmounting SD Card.
Here is what all of it means:
First of all, while it's running you see things like this:
Playing Rescue/hum/hum01.wav
MKLLKLLKMMKLMLLLNMLKMMKLLLLLLMLKMMKLMLLLKLL
What this means is that ProffieOS opened up the file "Rescue/hum/hum01.wav" and read it. For every 64kb, it writes out a letter which specifies how fast it was able to read it. If the speed is equivialent to one audio stream then it will print "1", 10 audio stream would print out an "A", 11 will be "B", etc. In the example above we see K, L and M, which is 20, 21 and 22 streams, which is very good. Generally speaking, you will want 12 "C" or better. If a particular part of your SD card is bad, you may see numbers instead of letters, and you may also observe freezing as the letters are printed out. Note that the algorithms on the SD card may step in and auto-fix these things, so you may get different resulst if you run it again.
Finally, at the end you'll see two histograms, one for opening files and one for reading blocks. These histograms have twenty columns per millisecond and the columns of dots generally show how many reads/opens fell into that bucket. So, if we start with the "time to open files" histogram above, we can see that:
- Most of the time, opening a file takes 2.1-2.5ms. However, some of the time, opening a file takes 3.35-3.75ms.
- Some files opened as fast as 1.35ms, not sure why.
- At the top it shows the average time: 2561.39 us (2.56139 ms)
Please note that a good average isn't always enough. It could be that there is one file that takes 12ms to open, but the average is still low. This is why we have a histogram so taht we can see what the spread of results actually is.
Moving on to the block read histogram, we can see that:
- The average speed is: 1924.88 kb/s, which is 21.82 simultaneous audio streams. This is a good result. 12 or more is required.
- The vast majority of block reads take 0.2-0.25ms - which is good.
- The worst block read took 0.5ms - which is pretty normal.
Please note that "sdtest" only tests the files of the current font by default, however you can do "sdtest all" to to have sdtest read all files on the sdcard. This takes longer of course, but will tell you if any of the fonts on the SD card has problems.
Solutions 🔗
Obviously "get a new SD card" will solve all of these problems - assuming you get a good SD card, which isn't always easy. However, formatting the SD card and re-loading all the files often works quite well. This can also solve corruption problems, which usually are caused by user errors, OS bugs or bad cables rather than bad SD cards. For slow cards, I would recommend getting a new card even if formatting seems to help. Most likely, the slowness will come back.
For formatting the SD card I recommend using the SD card association formatter. Other ways to format may be fine, but some use partitions or file systems that ProffieOS doesn't support. If you use something else to format and it doesn't work, please try the SD card association one.
A note about corruption 🔗
Almost all SD card corruption is caused by the same thing: Interrupted SD card writes. There are basicaly two this can happen:
- ProffieOS is writing to the card when you turn it off.
- Your computer is writing to the SD card when it is disconnected from the computer.
From ProffieOS 7.x, a new save file format was introduced, which makes it so that any corruption caused by interrupted writes are harmless, so long as they don't cause the SD card to freeze and never return. Basically (1) should not be a concern anymore.
For (2), a little caution goes a long way, make sure you do this:
- if you have "mass storage" on, always select "eject safely" before disconnecting the board from your computer.
- Also use "eject safely" before hitting "upload" in Arduino. An upload will reboot the board, which also disconnects it.
- After "eject safely" make sure to wait until the little popup says you can remove the board. This can take several minutes if you copied fonts to the SD card. Even hours if you copied a lot of fonts.
- In ProffieOS 8.x there is an defined called MOUNT_SD_SETTING which will prevent your computer from accessing your SD card when you don't want it to. I highly recommend using this define to avoid SD card corruption.
Deciphering the Status LED 🔗
The V3 Proffieboard has a Status led. That LED can provide a fair amount of information about what the board is doing. Let this page be your decoder wheel for understanding what it's doing.
Blinks 🔗
If the LED is blinking (not pulsing) then it's trying to show you an error code. The number of blinks tells you what the error is, according to the following table:
- Low Battery
- SD Card Not Found
- Error in Blade Array
OFF 🔗
The LED will be off if the saber is completely idle in order to save power.
Pulsing 🔗
When the saber is doing something, the LED will be pulsing. The speed of the pulse will tell you how busy the saber is. If it's pulsing fast, then the saber is working hard, if it's pulsing slowly, it is not.
When USB is connected, the shape of the pulse will change from a triangle wave ( ⋀⋀⋀⋀ ) to a sawtooth wave ( ⩘⩘⩘⩘ ).
When ignited, the brightness of the LED will increase.
When charging, there will be an extra "blip" every 2 seconds on the Status LED.
So to summarize:
Triangle Pulse (fade in, fade out) = USB is not connected. Pulse is faster when the CPU is busy.
Sawtooth Pulse (fade in, fade in) = USB IS connected. Pulse is faster when the CPU is busy.
It’s brighter when ignited.
Brief blinks every 2 seconds when charging.
Controlling the LED yourself 🔗
If you don't like how the Status LED behaves by default, you can add #define NO_STATUS_LED to your config file. Then you can add a blade to control the status LED like this:
SimpleBlade<CH2LED, NoLED, NoLED, NoLED, StatusLEDPin, -1, -1, -1>()
Blade styles should then use Green or White to drive the Status LED.
How to test if data pins are working. 🔗
If your WS281X pixels don't light up, it's often hard to know why. It could be the data, it could be the power, or a burnt out pixel. To test the power, see the FET testing page. To check if the data is working, keep reading.
- get a multimeter
- set it to measure AC voltage
- Put one probe on the GND pad on the board
- Put the other one on the data pad you want to test.
- Check the measurement.
If data is flowing, you should see a fluctuating value somewhere around one volt. The actual value will depend on the color, and also on the meter. It's not very important what the value is, as long as you see a distinct difference when data is flowing and data is not flowing.
Data should be flowing when the board is on and ignited unless you use styles which allows the blade to turn off, like StylePtr<Black>() in your config file. If data is not flowing there are a couple of things to check:
- the config file might have an error in it causing the blade to not work. To rule this out, replace your config file with a super-simple one, like the default_proffieboard_config.h, or one that comes from the proffieboard configurator.
- There may be a short somewhere permanently making that particular pin fixed at a particular voltage. Try checking for continuity between the data pin and GND, 3.3v or BATT+.
- The pin is burnt out and you should try a different one.
To try a different one, you will need to update your config file to use the new pin. Let's say your blades[] array looks like this:
BladeConfig blades[] = {
 { 0, WS281XBladePtr<144, bladePin, Color8::GRB, PowerPINS<bladePowerPin2, bladePowerPin3> >(), CONFIGARRAY(presets) },
};
To change it to use the Data2 pin instead of Data1, you should change the blades array to:
BladeConfig blades[] = {
 { 0, WS281XBladePtr<144, blade2Pin, Color8::GRB, PowerPINS<bladePowerPin2, bladePowerPin3> >(), CONFIGARRAY(presets) },
};
Note that Data2 does not have a built-in resistor like Data1 does, so you will need to add a resistor when switing from Data1 to Data2.
USB Connection Issues 🔗
In order to be able to upload programs to a Proffieboard or Teensy, your computer must be able to talk to it. While there are various drivers permission issues that may need to be solved, this page explains how to tell if he connection is working at all.
Most operating systems have a way to view all connected devices. When a Proffieboard is connected, it should show up as either a "Proffieboard" or "STM32 BOOTLOADER". A bad program may lock the processor in a loop, preventing it from communicating with the computer, if that happens, press RESET while holding BOOT, and it should show up as "STM32 BOOTLOADER".
Here is how to check connected devices on...
Windows 10 / 11 🔗
Go to Start Menu->Control Panel->Devices and Printers
Windows 7 🔗
Go to Control Panel -> Devices and Printers
Mac 🔗
Apple Menu -> About this Mac -> System Report -> USB
Linux 🔗
Open up a shell and type "lsusb"
Now, if nothing shows up, try a different USB cable, as some micro-USB cables are charge-only. If you need to buy a new cable, I recommend buying one that is USB-IF certified.
Once you have verified that the board shows up properly, proceed to Where's my Port?.
Finding Voltage Drops 🔗
Voltage drops can occur in any circuit, but the problem becomes more common the more current is going through the circuit. In a lightsaber, this generally means that all the components that provide power to the blade(s) may cause voltage drops. Depending on how severe they are, voltage drops can cause the blade to not light up, only show some colors (red) or become flickery or unreliable. In partcular, only showing red colors is a very strong indication that voltage drops are occurring, so now it's just a matter of figuring out what is causing it.
Any component can cause voltage drops, this includes battery, wires, solder joints, connectors, charge ports, pogo pins, pogo pin PCBs, FETs, and anything else that is involved with transmitting or regulating the power. Fortunately, the procedure for finding where the problem occurs doesn't care what kind of component it is.
In most sabers, the power circuit looks something like this:

Note that this just shows the path of the battery power to and from the blade, all other connections have been omitted. Also, your circuit might look slightly different, but that's ok, this is just an example.
- Turn the saber on and ignite it with the blade connected.
- Start at the battery (position 1 and 7), measure the voltage betweend + and -. Is it low? (Meaning less than 3.5 volts.) Then the battery is the problem. Try charging it. If that doesn't help, get a new battery.
- Leave the negative probe on the battery -, and move the positive probe from + to the next step in the circuit. If the voltage changed by more than 0.1 volt, you have found a problem.
- Once you reach the LED strip (6), move the positive probe back to (1), and then start moving the negative probe instead. Again, if you see a drop greater than 0.1 volts, you have found a problem.
Ok, so I found the problem, now what? 🔗
Well, it depends on what the problem is of course, here are a list of common voltage drop issues and what you can do about them:
Bad / weak battery or battery protection circuit. 🔗
Get a new battery. You want a battery which is rated for at least 10A.
Wires are too thin. 🔗
Use better wires. Minmum for saber wiring is AWG 24.
Bad (cold) solder joints. 🔗
Usually this happens because the solder joints were not heated up enough, you should be able to fix it by just re-heating it, let the solder melt and then let it re-solidify.
Shorts 🔗
Sometimes voltage drops happen because the power is shorted to another part of the circuit. The short will need to be fixed if that is the case.
Insufficient FETs. 🔗
Some people only hook up a single FET (led pads) to power a blade. Sometimes that works ok, sometimes it doesn't. Use two or more FETs.
Bad FETs. 🔗
FETs can become damaged if shorted. Check the FET testing page to learn how to check if they are working properly or not.
Insufficient pogo pins 🔗
If you have a high-power blade, a 7-pin pogo pin adapter might not be sufficient, get one with 9 or 11 pins instead.
Dirty / oxidized pogo pins or blade PCB 🔗
Try cleaning them. :)
Voltage drops on the LED strip 🔗
Either you trimmed the LED strip too much, or you have a cheap strip with insufficient copper in it. Get new, better LED strips.
Charge port voltage drops. 🔗
Make sure you have one that is rated for high amperes. Check that the spring contacts aren't bent back. If this doesn't help, replace it.
Frayed wires 🔗
This tends to happen near solder joints, the copper strands break and only a few of them actually connect to the copper. Sometimes you need good magnification to see what is going on. If you have frayed wires, you'll have to cut, strip resolder or replace the wire.
WebUSB 🔗
WebUSB is a standard that lets browsers talk to USB devices directly. ProffieOS uses this to let you control and configure the board from a browser. To make WebUSB work, you need:
- A Proffieboard, WebUSB currently does not work with Teensys connected via USB, it does work for both Teensy and Proffieboard via BLE connection.
- ProffieOS 1.312 or later
- 0.1.7 or later of the proffieboard-arduino plugin.
- A browser that supports WebUSB, such as Chrome. see here for more information: https://caniuse.com/webusb
- A USB cable (not charge-only!), or BLE connection.
Depending on how you want to connect the WebUSB app to your saber make sure to set the configuration for the serial port as follows; Proffieboard connected via USB to WebUSB app;
- Select : USB type: "Serial + WebUSB" in the Arduino IDE, or "Serial + Mass Storage + WebUSB if you also want to access the SD card without removing it -Teensy based sabers connected via USB to the WebUSB app are not yet supported.
Proffieboard or Teensysaber connected via BLE to WebUSB app;
- Make sure #define ENABLE_SERIAL is in your config file, and your Bluetooth device is working.
- USB type : "Serial" will work for both Teensy and Proffieboard
After that, plug in the board to a computer or phone if you want to use the USB connection, or connect via BLE from within a webpage that can control the board, such as: https://profezzorn.github.io/lightsaber-web-bluetooth/app.html
Troubleshooting 🔗
ProffieOS has some code that allows Windows 8.1+ assign the right driver automatically to make WebUSB work. Unfortunately, that code does not work with Windows 7. so if you're using Windows 7 you have to use zadig to make WebUSB work:
- Run Zadig
- Select Options->List All Devices
- Select "CDC Data (interface 2)"
- Check that the USB ID is 1209 6668 02
- Select WinUSB (v6.1.7600.16385) as new driver
- Click Replace Driver
If you're having problems with making WebUSB work on Windows 10, it may be because of having used zadig to override the windows defaults for the proffieboard device. If so, this is how you undo zadig overrides: https://github.com/pbatard/libwdi/wiki/FAQ#Help_Zadig_replaced_the_driver_for_the_wrong_device_How_do_I_restore_it
The WebUSB app will work on Windows, Linux and Android, but to get BLE working on IOS, you might need to install a WebBLE enabled browser on you IOS device (chrome for IOS does not suppert WebBLE yet).
Update 2022-06: Bluefy (free) from the appstore used to work perfect with the WebUSB app. Unfortunately that is no longer the case as of beginning of 2021.
An alternative for IOS users is the WebBLE app, and has been tested with the latest IOS version. https://apps.apple.com/us/app/webble/id1193531073
Here's a tutorial for how to get around the ProffieOS Workbench webpage:
https://fredrik.hubbe.net/lightsaber/webusb.html
What is it saying? 🔗
ProffieOS has several spoken error messages. While spoken error messages are meant to be user friendly, it can sometimes be difficult to hear what it's actually saying. Luckily, there is a fairly short list of actual error messages:
Font directory not found 🔗
This happens when the font specified in your your current preset cannot be found on the SD card. A common reason for this is mispelling the font name in one of the 2 places; the SD card or the preset. They need to be identically spelled with no spaces preferably.
It may also be a path problem. For example "Greyscale/CODA" is not the same as "CODA". The preset's font path must match the folder structure on the SD card.
It could also be if "ProffieOS_SD_Card" sounds were downloaded and put incorrectly on the SD card. What you're supposed to do is to just copy the contents of that directory to the root level of the SD.
Voice pack not found. 🔗
Spoken menu items and some other prompts are contained in a ProffieOS Voicepack, which are required by some prop files.
Typically these sound files are in a folder named "common" and need to be on the SD card for the system to read them.
The "common" folder is just another font folder as far as ProffieOS is concerned, and it is used by including it in the font search path in a preset such as { "FontName;common", .....
The default ProffieOS Voicepacks can be found here: Default ProffieOS Voicepacks
Additional options can be found here: Additional Voicepacks
Font directory too long - Teensysaber boards only as of ProffieOS 6.x. 🔗
If your font directory can't be found AND the name is longer than 8 characters, you may get this error message. Check the path and name of the font folder you specified in the preset and make sure it matched exactly on the SD card.
SD card not found 🔗
This means that the board cannot detect the SD card. Either the SD card is not present, it's not formatted as FAT32, or something electrical is wrong.
Error in font directory 🔗
This means that one or more sound effect files are missing or incorrectly numbered. For instance, if you have hum1.wav, hum2.wav and hum4.wav (but no hum3.wav) you will get this error message.
Error in voice pack version 🔗
As of ProffieOS8, additional voice prompt files have been added and are included in a V2 Voicepack. If the prop file you are using requires these newer sounds, and an original V1 Voicepack is found, this error occurs.
Error in blade array 🔗
This happens if the blade array is not configured correctly. The reasons may be complicated, so ask for help if you can't figure it out.
Low battery 🔗
Charge it!
Something else 🔗
If you hear it saying something else, this page may be out of date and will need to be updated, please remind me to do so.
Where's my port? 🔗
If the Proffieboard Port doesn't show up in Arduino->Tools->Port, don't worry, most of the time you just need to press BOOT+RESET and hit upload. After the board is programmed, the port will show up again.
If programming works, but the port still doesn't show up, it's possible that you you need to install a driver. If you're on a Mac, you may need to upgrade to a later version of OSX. On linux, make sure you have the udev rules installed. See Proffieboard Setup If you're on Windows 7, follow the usb serial driver instructions here: Proffieboard Setup On Windows 10, it should just work.
If it still doesn't work, it's possible that some other software has messed things up, or perhaps you used zadig incorrectly and changed the driver for the Proffieboard serial device. Here is how you check what driver is used on Windows 10:
- Go to Settings->Devices
- Scroll down and click on "Devices and printers"
- In the "Unspecified" category, find "Proffieboard". (If it's not there, go back and program the board first.)
- Double-click the proffieboard device.
- Select the "Hardware" tab.
- You should see a list of device functions, which should contain "USB Composite Device" and "USB Serial Device"
- Double-click the "USB Serial Device"
- Select the Driver tab
- Click "Driver Details"
- It should say "C:\WINDOWS\system32\DRIVERS\usbser.sys"
It's possible that usbser.sys lives in a different location, and that's probably fine. However, if you see "winusb.sys" or some completely different driver, you probably ran zadig on the wrong device at some point. Here is how you undo it: https://github.com/pbatard/libwdi/wiki/FAQ#Help_Zadig_replaced_the_driver_for_the_wrong_device_How_do_I_restore_it
Here is a video that shows how to check and fix the serial port driver: https://www.youtube.com/watch?v=XgT8dq4rhPk